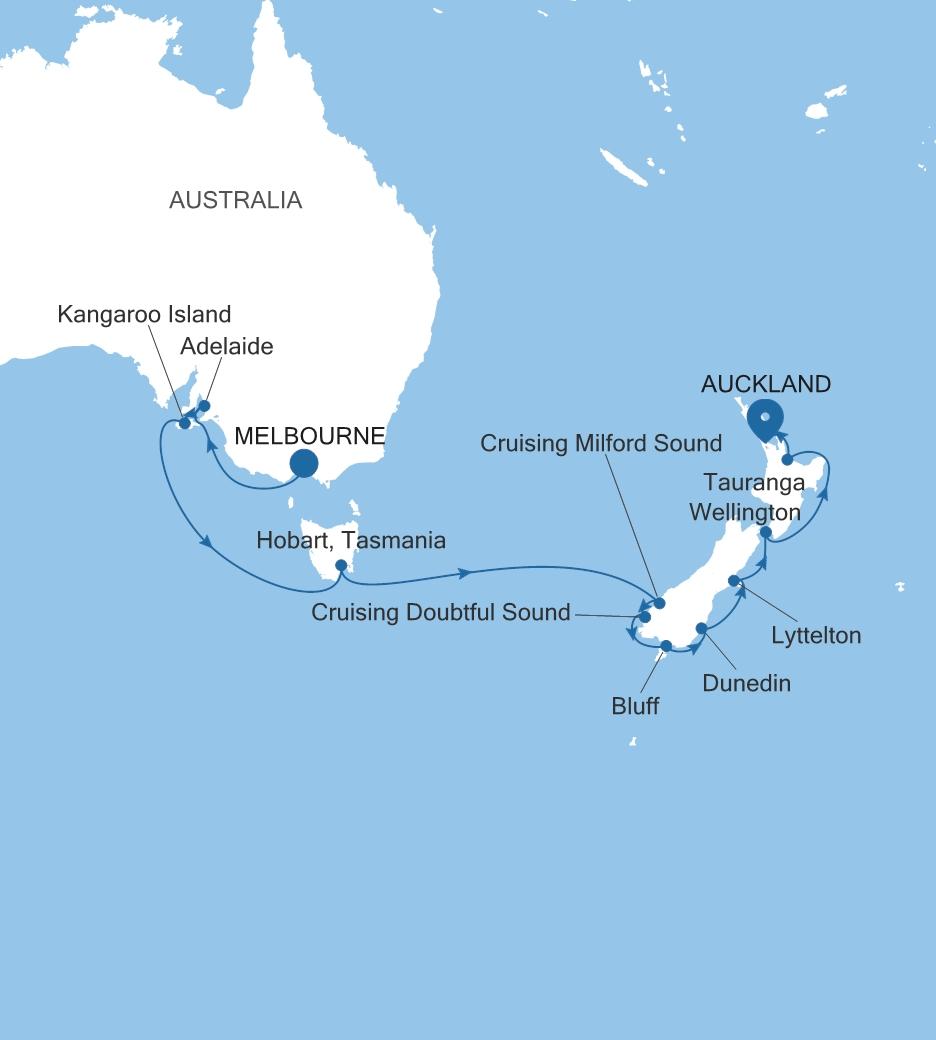
MELBOURNE TO AUCKLAND
Melbourne → Auckland
Voyage: MO260103016MELBOURNE TO AUCKLAND
Cruise Overview
Ship Information
SILVER MOON
Building on the phenomenal success of Silver Muse, Silver Moon mirrors her sister ship and establishes a new era of Silversea. At 40,700 gross tons and with capacity to accommodate 596 passengers on board, Silver Moon maintains the small-ship intimacy and spacious all-suite accommodation that are the hallmarks of the Silversea experience. Silver Moon also features the all-new Sea And Land Taste (S.A.L.T.) program —an immersive culinary concept that enables guests to travel deeper through a range of destination-based gastronomic experiences. Get ready for a new world of travel.
Photo Gallery


Detailed Itinerary
Melbourne, Australia
Australia's metropolitan cultural capital is a refined, contemporary, and richly liveable city - which has a blend for every taste. The smells of freshly ground, artisan coffees fill the streets of this hip, youthful city, which is generously sprinkled with fine dining establishments, art galleries, and absorbing museums. With an airy outdoor lifestyle, Melbourne is a vibrant global hub of fashion, fun, and festivities. Multicultural and diverse, Victoria's capital is crisscrossed by narrow alleys and splashed with street art. It's fair to say Melbourne's bearded baristas take their coffees seriously. Settle in to sample the unique coffee culture that is an essential part of Melbourne life. Looking for something a little stronger? The city's rooftop bars come alive with clinking cocktails as the sun sets. A world leader in culinary arts, take your seat at award-winning restaurants, and sample world foods alongside delicious wines, cultivated in the vineyards of the surrounding valleys. Savor a glass while cruising the arching Yarra River, for an unbeatable introduction to Melbourne. An outdoor city, it's no surprise that Melbourne is one of Australia's sporting giants. The vast bowl of Melbourne Cricket Ground serves as the city's sporting cathedral - squeezing in over 100,000 fans and hosting various sports on its hallowed, oval turf. Whether it's the rumble of hoofs during the Melbourne Cup, revs of engines during the Formula One, or thwacks of tennis balls during the Australian Open - few places can boast such a comprehensive list of high-profile sporting appeals.

Day at sea
Days at sea are the perfect opportunity to relax, unwind, and catch up with what you've been meaning to do. So whether that is going to the gym, visiting the spa, whale-watching, catching up on your reading, or simply topping up your tan, these blue sea days are the perfect balance to busy days spent exploring shoreside.
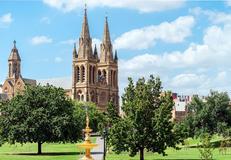
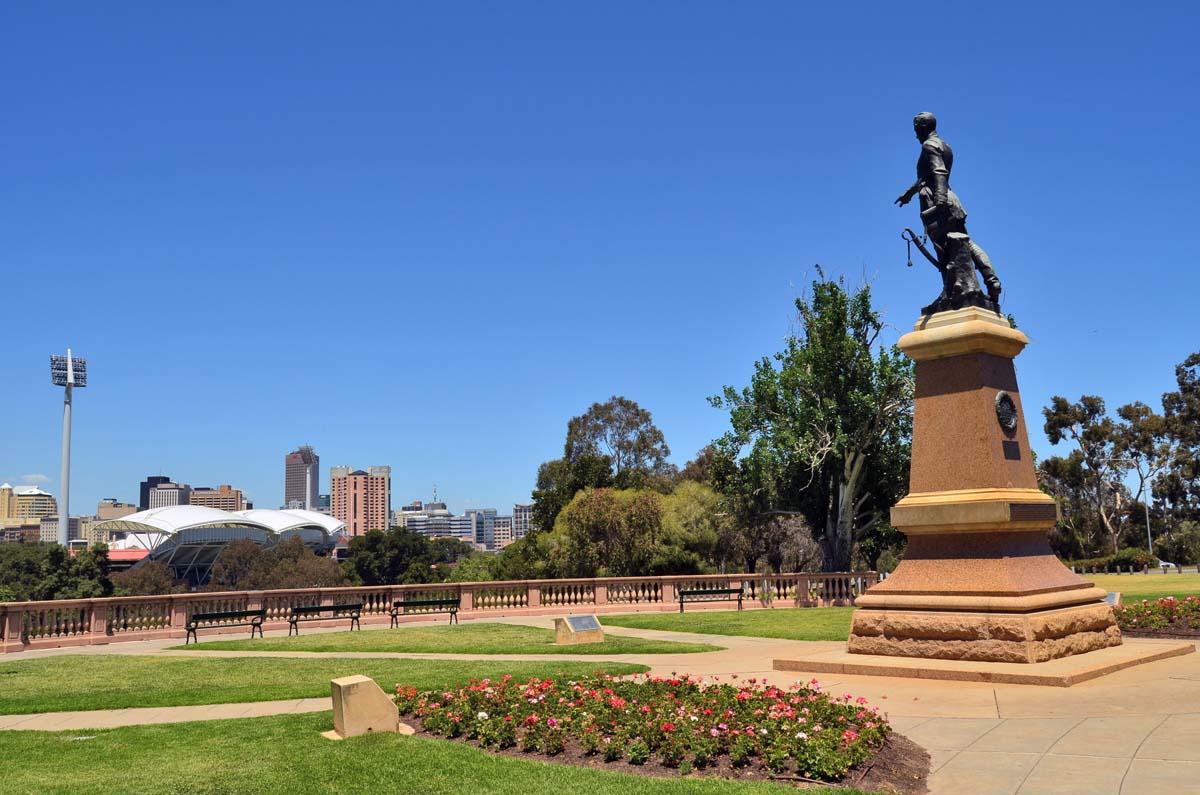
Adelaide, Australia
For those of you who might think that Adelaide lacks behind its coastal counterparts in terms of culture and creativity, think again. Adelaide is a thriving urban city with bright, leafy alleys that beg to be explored. The city's labyrinthine lanes and alleys are bursting with bars and eateries, serving everything from local craft beer to modern Australian cuisine. Uber aware of their carbon footprint, Adelaideans like to keep things close to home, so expect lots of local produce, which is abundant, fresh, and delicious. Unsurprisingly, Barossa wine from the neighboring valley features prominently on wine lists everywhere. Naturally, a lot of life centers around the lovely beaches, which are home to surfers, sheltered waters, and wide boulevards. The coast is blessed with acres of parkland, perfect for lazing the afternoon away. Many of Australia's most beautiful (and historic) buildings can be found within the boundaries of the city including the handsomely restored former Railway Building, numerous stately Colonial buildings, St. Peter's Cathedral, the grand old Parliament Buildings and nearby Government House, which all make a worthy addition to any visit. Adelaide is of course known for its wide diversity of faiths, and as such carries its nickname "the city of churches" with pride. Contrary to other Australian penal settlements, Adelaide was a free settlement. This meant that it was also a state free from religious persecution, leading rise to the construction of many churches.
3 Included Shore Excursions
Included with Port-to-Port
Adelaide Highlights
Code: ADL-A
ACTIVITY LEVEL
Minimal
VIEW
Historic Handorf & Adelaide Hills
Code: ADL-D
ACTIVITY LEVEL
Moderate
VIEW
Adelaide Sights & Wildlife Park
Code: ADL-E
ACTIVITY LEVEL
Moderate
VIEW
8 Selected Shore Excursions
Barossa Valley Food & Wine
Code: ADL-F
ACTIVITY LEVEL
Minimal
VIEW
D'Arenberg - More Than a Cellar Door
Code: ADL-N
ACTIVITY LEVEL
Moderate
VIEW
Sailing Brindabella
Code: ADL-P
ACTIVITY LEVEL
Extensive
VIEW
S.A.L.T. Foraging for Flavor in Adelaide’s Beautiful Botanic Garden with a Star of the South Australia Culinary Scene
Code: ADL-R
ACTIVITY LEVEL
Moderate
VIEW
Adelaide by Private Car with Guide - Half Day
Code: ADL-V
ACTIVITY LEVEL
Minimal
VIEW
Adelaide by Private Car with Guide - Full Day
Code: ADL-W
ACTIVITY LEVEL
Minimal
VIEW
Adelaide by Private Van with Guide - Half Day
Code: ADL-X
ACTIVITY LEVEL
Minimal
VIEW
Adelaide by Private Van with Guide - Full Day
Code: ADL-Y
ACTIVITY LEVEL
Minimal
VIEW
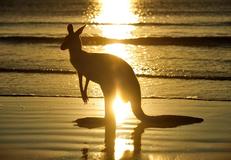
Kangaroo Island, Australia
Kangaroo Island is, with 1,740 square miles, the third largest island off the coast of Australia. It is 96 miles long and 34 miles wide, and known for its outstanding natural beauty. Due to its remote location, Kangaroo Island was less affected than the mainland by the impact of European development. To this day, the island is rich in diverse flora and fauna seldom found elsewhere. As one of the world's last unspoiled wilderness places, about 30 percent of the island has been designated as National Parks. The most important one is Flinders Chase at the western end of Kangaroo Island, with Seal Bay Conservation Park following close behind. Its large sandy beach and dune area is home to Australian sea lions where they come to rest and nurse their young. Kingscote, formerly known as Queenscliffe, is the largest town on the island and its main supply depot. Tourism is a significant element in the local economy. A mix of attractive small townships, wildlife sanctuaries, and fascinating wilderness areas guarantee a steady stream of visitors each year.
1 Included Shore Excursion
Included with Port-to-Port
Pennington Bay & Historic Kingscote
Code: KAG-G
ACTIVITY LEVEL
Minimal
VIEW
4 Selected Shore Excursions
A Taste of Kangaroo Island
Code: KAG-A
ACTIVITY LEVEL
Moderate
VIEW
Seal Bay Discovery
Code: KAG-B
ACTIVITY LEVEL
Moderate
VIEW
Kangaroo Island Wildlife Park & Beach
Code: KAG-E
ACTIVITY LEVEL
Moderate
VIEW
Penneshaw & Surrounds Ocean Experience
Code: KAG-H
ACTIVITY LEVEL
Minimal
VIEW
Day at sea
Days at sea are the perfect opportunity to relax, unwind, and catch up with what you've been meaning to do. So whether that is going to the gym, visiting the spa, whale-watching, catching up on your reading, or simply topping up your tan, these blue sea days are the perfect balance to busy days spent exploring shoreside.
Hobart, Tasmania, Australia
Mount Wellington's looming, cloud-wisped form is an ever-present sight as you explore booming Hobart, the cosmopolitan capital of Australia's most southerly state. A former British penal colony, nowadays Australia's second-oldest city is a place to live the free and easy life. Encircled by dramatic cliffs, landscaped gardens, and rolling vineyards, Hobart is also well-stacked with cultural pursuits including museums, and respected - if controversial - galleries plastering new and old art to their walls. With fresh sea breezes and a fabulous location, Hobart is a creative place, where you can browse the produce of local artisans in Saturday's massive Salamanca Market - which draws visitors from all across Tasmania and beyond. Eat at waterfront restaurants, or rise up Mount Wellington's slopes to appreciate the remoteness of Hobart's location. From this elevated platform, you can look down across views of flowing forests, undulating mountains, and endless ocean swallowing up the city. Further away, animal sanctuaries introduce you to the island's famous inhabitants, including the famous Tasmanian devil. Thirsty? Hobart has a long brewing tradition - so enjoy a refreshing ale poured from the country's oldest brewery. The climate's blend of generous sunshine and cool Antarctic breezes helps Hobart to produce its acclaimed wines, and thick clumps of pinot noir grapes hang from vineyards dotted along the valleys nearby. Taste the wines, accompanied by a platter of artisan cheese and sausage. Whiskey aficionados aren't left in the cold either, with international award-winning distilleries close by.
3 Included Shore Excursions
Included with Port-to-Port
Hobart Highlights
Code: HBA-A
ACTIVITY LEVEL
Minimal
VIEW
Tassie Devils & Richmond
Code: HBA-E
ACTIVITY LEVEL
Extensive
VIEW
Hobart Storyteller Walk
Code: HBA-H
ACTIVITY LEVEL
Extensive
VIEW
9 Selected Shore Excursions
S.A.L.T. Tasmania’s Wild Tastes with Hunting, Fishing, Wood-Fire Cooking Star Chef Analiese Gregory
Code: HBA-003
ACTIVITY LEVEL
Minimal
VIEW
MONA - Discovery in Style
Code: HBA-B
ACTIVITY LEVEL
Moderate
VIEW
Port Arthur Discovery
Code: HBA-F
ACTIVITY LEVEL
Extensive
VIEW
Oysters & Wine
Code: HBA-L
ACTIVITY LEVEL
Minimal
VIEW
Rugged Tasmanian Coast via RIB-Boat
Code: HBA-O
ACTIVITY LEVEL
Moderate
VIEW
Hobart by Private Car with Guide - Half Day
Code: HBA-V
ACTIVITY LEVEL
Minimal
VIEW
Hobart by Private Car with Guide - Full Day
Code: HBA-W
ACTIVITY LEVEL
Minimal
VIEW
Hobart by Private Van with Guide - Half Day
Code: HBA-X
ACTIVITY LEVEL
Minimal
VIEW
Hobart by Private Van with Guide - Full Day
Code: HBA-Y
ACTIVITY LEVEL
Minimal
VIEW

Day at sea
Days at sea are the perfect opportunity to relax, unwind, and catch up with what you've been meaning to do. So whether that is going to the gym, visiting the spa, whale-watching, catching up on your reading, or simply topping up your tan, these blue sea days are the perfect balance to busy days spent exploring shoreside.

Cruising Milford Sound, New Zealand
Named after Milford Haven in Wales, Milford Sound is not a sound but a fjord, yet the name has stuck. In 1998 the Maori name Piopiotahi was added and officially it should be written as Milford Sound/Piopiotahi. The local name refers to the extinct New Zealand Thrush (the piopio). Milford Sound sits within South Island’s Fiordland National Park, one of the four national parks forming the UNESCO World Heritage site “Te Wahipounamu” – pounamu being the local greenstone highly estimated for carvings by the Maori. The fjord has a length of approximately 16 kilometers and a depth of more than 290 meters. Steep cliffs, several impressive waterfalls, and dense rainforest characterize the fjord. Halfway down the fjord is Stirling Falls, the second tallest. Near the end of the sound, the U-shaped Sinbad Gully and the famous Mitre Peak which rises to a height of 1,692 meters can be seen, while on the eastern side is Lady Bowen Falls, at 162 meters the tallest of the falls. The Piopiotahi Marine Reserve protects the flora and fauna in the water. Apart from bottlenose dolphins in the fjord, New Zealand fur seals can be seen resting on Seal Rock on the northern shore, while on the opposite side is a Fiordland Crested Penguin site.

Cruising Doubtful Sound, New Zealand
As with all of New Zealand’s fiords, Doubtful Sound is a masterpiece of nature. The only way to reach it is by boat, crossing Lake Manapouri, so of the three Sounds (Dusky and Milford being the other two), Doubtful is the least touristy. Thus those who are lucky enough to experience Doubtful Sound deserve it. Because of the Sound’s inaccessibility, you’ll encounter very few people as you float through the silent waterways. Animals, however, are a different matter. Because of the lack of human interaction, Mother Nature has been given free rein here. The dense forest is rife with wildlife and birdsong is a constant soundtrack (otherwise it is the sound of silence). In the water, you can expect to get up close and personal with fur seals, pods of bottlenose dolphins and some lucky souls have even sighted the occasional whale and albatross. Ornithologists will no doubt already know that Doubtful Sound is home to the rare Fiordland Crested Penguin, so be sure to keep your binoculars ready as it would be a shame to miss the once-in-a-lifetime sighting. The region is famous for its seven-meter annual rainfall, so do not be surprised if the sun isn’t shining. Yet despite the potential mist, Doubtful Sound remains majestic. The waterfalls are more mesmerizing, the glassy water more mysterious, and the mountains rising into the clouds more impressive. As the Fiordland’s website puts it, Doubtful Sound offers its visitors “cloistered serenity”. Expect to be both humbled and uplifted.

Bluff, New Zealand
The most southernmost town in New Zealand, Bluff (or The Bluff as it is locally known) is perhaps the most European of all the settlements in the country. Called Campbelltown until 1917, the city was officially renamed after the 265-meter conical hill that towers above it. One of the farthest corners of the British Empire, the inaugural Royal Tour of New Zealand by Queen Elizabeth II and Prince Philip, the Duke of Edinburgh, concluded at Bluff in January 1954. Nowadays, however, it is the Bluff oysters that are the stars of the show. Reputed to be the best in the world, these local heroes are what have really put Bluff on the map and are celebrated every May with a lively festival honoring Ostrea chilensis (that’s Latin for Bluff oyster). But gastronomy aside (and it is mostly oyster-related), Bluff offers the adventurous traveler much in the way of activity. Gateway to Stewart Island, day trippers here might enjoy hopping on the ferry for the hour-long trip to Stewart Island, New Zealand’s third island. Unspoiled, tranquil, and stunning, Stewart Island is a showcase for New Zealand’s undiscovered tourism spots due to its privileged (yet remote) position in the world. However, for those who wish to stay on the mainland, the Bluff Maritime Museum is a “must visit” for anyone traveling along the Southern Scenic Route, with fascinating historical information about the many early shipwrecks in these challenging southern waters and coastlines. The comprehensive network of walking tracks will delight the ornithologists amongst you – just don’t forget your binoculars!
1 Included Shore Excursion
Included with Port-to-Port
Southland Panorama
Code: BLU-D
ACTIVITY LEVEL
Minimal
VIEW
5 Selected Shore Excursions
Waikaka Valley Farm Experience
Code: BLU-A
ACTIVITY LEVEL
Minimal
VIEW
Transport World & Motorcycle Mecca
Code: BLU-B
ACTIVITY LEVEL
Moderate
VIEW
Catlins & Lake Edge Farm
Code: BLU-C
ACTIVITY LEVEL
Moderate
VIEW
Catlins Coast Discovery
Code: BLU-I
ACTIVITY LEVEL
Moderate
VIEW
A Taste of Stewart Island
Code: BLU-J
ACTIVITY LEVEL
Moderate
VIEW
Dunedin (Port Chalmers), New Zealand
The south-easterly coast of New Zealand's wild southern island is a haven for outdoor adventures, with masses of raw scenic beauty and thrilling coastline. Heading the Otago Harbour, Dunedin is a cosmopolitan city of culture and architectural splendor, with a distinctly tartan flare. Settled by the Scots in 1848, the romantically misty valleys and moody landscapes, continue to capture the hearts of visitors to these distant shores. Searing bagpipes echo down the streets in the Edinburgh of the South, which wears its Scottish origins proudly. Gothic revival architecture is scattered liberally, including the magnificent university - with its glorious clocktower - and the city's grand cathedral. Head to the elegant Octagon to see the statue of Robert Burns, whose nephew was a city founder. The railway station is perhaps the pick of this city's many artistic structures. Its glowing gardens and pretty mosaics add extra detail to the elegant, gingerbread building. It's also the perfect jumping-off point for romantic rail adventures along the coastline. The melodramatic coastline of the Otago Peninsula boasts dramatic cliffs and sea-sprayed beaches, as well as an abundance of animals. Explore cliffs laced with tunnels and hidden walkways, to get you up close and personal with Yellow-eyed penguins. Sea lions and seals also sprawl out on windswept beaches, drifting in and out of indulgent dozes. The south island's second-largest city regularly receives a top-up of youthful energy thanks to its healthy student population. Not that Dunedin is lacking a distinctly quirky personality of its own, as showcased by the event where locals race thousands of chocolate orbs down the world's steepest street - Baldwin Street. Museums in the city tell of Chinese influences, as well as the stories of early Maori settlers. Round off an active day sampling a South Island institution - an icy beer from Speight's Brewery.
3 Included Shore Excursions
Included with Port-to-Port
Orokonui Ecosanctuary
Code: PCH-G
ACTIVITY LEVEL
Moderate
VIEW
Olveston Home & Dunedin Botanic Garden
Code: PCH-K
ACTIVITY LEVEL
Moderate
VIEW
Dunedin City Sights & Larnach Castle
Code: PCH-L
ACTIVITY LEVEL
Moderate
VIEW
7 Selected Shore Excursions
Taieri Gorge Railway Experience
Code: PCH-B
ACTIVITY LEVEL
Minimal
VIEW
Otago Wildlife Cruise
Code: PCH-D
ACTIVITY LEVEL
Moderate
VIEW
Nature's Wonders
Code: PCH-J
ACTIVITY LEVEL
Extensive
VIEW
Port Chalmers by Private Car with Guide - Half Day
Code: PCH-V
ACTIVITY LEVEL
Minimal
VIEW
Port Chalmers by Private Car with Guide - Full Day
Code: PCH-W
ACTIVITY LEVEL
Minimal
VIEW
Port Chalmers by Private Van with Guide - Half Day
Code: PCH-X
ACTIVITY LEVEL
Minimal
VIEW
Port Chalmers by Private Van with Guide - Full Day
Code: PCH-Y
ACTIVITY LEVEL
Minimal
VIEW
1 Mid-Voyage Land Adventure
Mid-Voyage Land Adventure: Spectacular Mount Cook - The ‘Top’ of New Zealand
Code: 01MIDPCH-B
ACTIVITY LEVEL
Moderate
VIEW

Lyttelton (Christchurch), New Zealand
New Zealand's "Garden City" is a place of quiet streets, leafy parks, and beautiful tree-lined boulevards. Christchurch has an unmistakable English flavor to it and serves as the gateway to southern New Zealand's natural wonders. The rebuild of the country's oldest city continues apace - following the earthquakes that devastated it in 2011 - and the South Island's biggest city is now blossoming, having evolved into a confident and cultural powerhouse. Colorful street art adds an edge to the city, while shiny new bars and restaurants contribute to the sense of revitalization and renewal. Visit museums, and take tours to learn more of the reconstruction, which has made incredible progress in recent years. The old-time charm of a punt on the River Avon is still a quintessential Christchurch experience. Sail amid weeping willows drooping to the water, as you drift through a blur of colors in the botanical gardens. Surrounded by extinct volcanoes, soaring lakes, and the rolling farmlands of the Canterbury Plains, spectacular scenery sprawls around the city. Pay a visit to the Southern Alps' snow-covered peaks, the stunning hot pools and rushing streams of Hanmer Springs, or the Hector's dolphins who swim at Akaroa. A city that has faced immense challenges - both natural and manmade - over the last decade, it's hard not to feel inspired by Christchurch's defiant character and friendly people, who share an open and welcoming outlook that shines stronger than ever.
2 Included Shore Excursions
Included with Port-to-Port
Discover Christchurch
Code: LYT-A
ACTIVITY LEVEL
Moderate
VIEW
Lyttelton Discovery Cruise
Code: LYT-G
ACTIVITY LEVEL
Minimal
VIEW
4 Selected Shore Excursions
High Country Explorer
Code: LYT-B
ACTIVITY LEVEL
Moderate
VIEW
Journey into Middle Earth
Code: LYT-F
ACTIVITY LEVEL
Moderate
VIEW
Canterbury Sheep Farm
Code: LYT-H
ACTIVITY LEVEL
Moderate
VIEW
Waipara Valley Wine Outing
Code: LYT-K
ACTIVITY LEVEL
Minimal
VIEW

Wellington, New Zealand
Sprawling around a hook-shaped peninsula, Wellington is a vibrant and energetic seaside capital. A compact, well-stocked city of buzzing bars and chatting cafes, New Zealand's capital is a bright and breezy place with an infectious, easy-going atmosphere. Known as the creative hub of the South Pacific, there are shows to see, art installations to enjoy, and rich flavors to savor here. The sounds of rare and beautiful birdlife fill the hills around the city, and the bush of the green belt provides an easy-to-access sanctuary, for strolls and cycle rides. The Botanical Gardens break up the buildings, even more, while an iconic, cherry-red cable car rumbles up Wellington's slope to the city's best viewpoint, looking out over the city's scenic harbor from above. Zealandia has provided an urban home for rare and endangered birdlife, bringing many species back from the brink. Varied museums cover everything from Maori traditions to earthquake simulations and even the real-life Kraken - a displayed colossal squid. Wellington is only New Zealand's third-biggest city, but spend some time here and you'll realize that's a blessing. Eminently scrollable, you can stop in at countless cool cafes to top up your caffeine levels whenever your energy is flagging - the smell of a fresh artisan espresso is never far away. The wines grown nearby are revered, and the city's craft beers are also making waves. Wander the breezy waterfront, and admire the surfers riding the wind-whipped rollers of the self-proclaimed "coolest little capital in the world".
3 Included Shore Excursions
Included with Port-to-Port
New Zealand’s Capital
Code: WLG-A
ACTIVITY LEVEL
Minimal
VIEW
The Storm Coast
Code: WLG-H
ACTIVITY LEVEL
Moderate
VIEW
Zealandia Ecosanctuary & Cable Car
Code: WLG-J
ACTIVITY LEVEL
Moderate
VIEW
9 Selected Shore Excursions
Seal Coast Safari
Code: WLG-B
ACTIVITY LEVEL
Moderate
VIEW
In the Footsteps of Lord of the Rings
Code: WLG-E
ACTIVITY LEVEL
Moderate
VIEW
Otari Wilton's Bush Nature Trek
Code: WLG-M
ACTIVITY LEVEL
Moderate
VIEW
Maori Cultural Walking Tour
Code: WLG-N
ACTIVITY LEVEL
Extensive
VIEW
Capital Bites Walking Sampler
Code: WLG-O
ACTIVITY LEVEL
Extensive
VIEW
Wellington by Private Car with Guide - Half Day
Code: WLG-V
ACTIVITY LEVEL
Minimal
VIEW
Wellington by Private Car with Guide - Full Day
Code: WLG-W
ACTIVITY LEVEL
Minimal
VIEW
Wellington by Private Van with Guide - Half Day
Code: WLG-X
ACTIVITY LEVEL
Minimal
VIEW
Wellington by Private Van with Guide - Full Day
Code: WLG-Y
ACTIVITY LEVEL
Minimal
VIEW

Day at sea
Days at sea are the perfect opportunity to relax, unwind, and catch up with what you've been meaning to do. So whether that is going to the gym, visiting the spa, whale-watching, catching up on your reading, or simply topping up your tan, these blue sea days are the perfect balance to busy days spent exploring shoreside.

Tauranga, New Zealand
Tauranga is New Zealand's sunny capital - with wide sweeping beaches and surfers curling across cresting waves. Climb to the top for spectacular views of the natural harbor, or take winding coastal footpaths to explore the unfolding scenery. An entry point to the vast indent of the Bay of Plenty, the volcanic peak of Mount Maunganui is a fittingly dramatic welcome. Brooding, geothermal energy creates spectacular natural attractions across this region, while plunging waterfalls, and fascinating Maori culture ensure that the Bay of Plenty has a lot to offer visitors. Said to receive New Zealand's highest amount of sunshine, the hanging kiwi, citrus fruit, and avocados add an exotic touch to the area's landscape - especially around Te Puke. Vibrant teal and orange colors await at the stunning geothermal area of Whakarewarewa Thermal Reserve, where mud pools bubble and steam rises from the earth. There are more hot pools, and some of the country's best scenery, at Lake Rotoiti - where you can kayak across the smooth surface and enter a cave that glows gentle blue, with its darkened roof illuminated by glittering glow worms. Enter New Zealand's fantasy world, with a visit to some of the country's celebrated filming spots - which have featured as doubles for JRR Tolkien's Middle Earth's fantasy settings. Offshore, the wonderful White Island's volcanic cone peeks from the waves, and New Zealand's most active volcano certainly knows how to put on a show, belching out smoke across the water.
3 Included Shore Excursions
Included with Port-to-Port
Discover Tauranga
Code: TRG-B
ACTIVITY LEVEL
Minimal
VIEW
Maori Cultural Experience
Code: TRG-L
ACTIVITY LEVEL
Moderate
VIEW
Tauranga Scenic Harbour Cruise
Code: TRG-M
ACTIVITY LEVEL
Minimal
VIEW
8 Selected Shore Excursions
Geothermal Wonderland
Code: TRG-A
ACTIVITY LEVEL
Moderate
VIEW
Fairytale New Zealand: Hobbiton Movie Set
Code: TRG-E
ACTIVITY LEVEL
Moderate
VIEW
Lake Rotoiti & Glowworm Cave Kayaking
Code: TRG-H
ACTIVITY LEVEL
Extensive
VIEW
'Bay of Plenty' for Foodies
Code: TRG-I
ACTIVITY LEVEL
Minimal
VIEW
Tauranga by Private Car with Guide - Half Day
Code: TRG-V
ACTIVITY LEVEL
Minimal
VIEW
Tauranga by Private Car with Guide - Full Day
Code: TRG-W
ACTIVITY LEVEL
Minimal
VIEW
Tauranga by Private Van with Guide - Half Day
Code: TRG-X
ACTIVITY LEVEL
Minimal
VIEW
Tauranga by Private Van with Guide - Full Day
Code: TRG-Y
ACTIVITY LEVEL
Minimal
VIEW

Auckland, New Zealand
Blending beachy recreation with all the delights of a modern, diverse, and thoroughly multicultural city, Auckland sits on the lucid blue-green waters of New Zealand's north island. Known as the “City of Sails”, its two harbors will tempt you with waterfront walks, and the chance to breathe fresh sea air deep into your lungs while absorbing spectacular views of Auckland's grand harbor bridge's span. Take in the true scale of Auckland's magnificent cityscape by ascending 192 meters to the Sky Tower, and looking out over the city's gleaming silver towers, which reflect on the abundant waters below. Views over the bay and adjacent islands await, and you can share elegant cocktails at this dizzying height, above the mingling yachts of Viaduct Harbour. Immerse yourself in the rich history and culture of the area at Auckland Art Gallery, Toi o Tāmaki. Set beside tranquil fountains and handsomely landscaped flowerbeds of Albert Park, the French-Renaissance building houses New Zealand's most extensive art collection, and exhibits works from Mäori and Pacific artists. New Zealand is world-renowned for its captivating natural scenery, and day trips across the sparkling bays, to nearby islands like Waiheke, Tiritiri Matangi, and Rangitoto, are always tempting. Discover lava caves, grape-laden vineyards, and flourishing wildlife in the Hauraki Gulf's islands. You'll also find an exceptional 360-degree panorama over the city, to the horizon beyond, from the heights of ancient Mount Eden. The spectacular dormant volcano rises improbably from a city suburb and also lends its name to Eden Park - the unusual, translucent stadium of New Zealand's mighty All Blacks.

Cabin Categories

VISTA SUITE
The Vista Suite provides a generous living space for all travelers. The Vista Suite offers all the comfort and attention to detail that you can expect aboard. A generous expanse of interior comforts—elegant decor, a stunning bathroom, and an ample seating area make this a cozy home away from home. The seating area of the Vista Suite has plenty of room to relax while large picture windows frame panoramic ocean views—the perfect backdrop for breakfast in bed! Three Wheelchair Accessible Suites (407, 409, 417).

PANORAMA SUITE
The Panorama Suite provides a generous living space for voyagers. Located on the lower decks in the bow, the Panorama offers all the comfort and attention to detail that you can expect aboard. A generous expanse of interior comforts—elegant decor, a stunning bathroom, and an ample seating area make this a cozy home away from home. The seating area of the Panorama Suite has plenty of room to relax while large picture windows frame panoramic ocean views

CLASSIC VERANDA SUITE
The Classic Veranda Suite provides a generous living space for voyagers. Located on the lower decks in the bow, the Classic Veranda Suite offers all the comfort and attention to detail that you can expect aboard—both inside and out. A generous expanse of interior comforts—elegant decor, a stunning bathroom, and an ample seating area make this a cozy home away from home. But perhaps this suite’s finest asset lies just outside, as floor-to-ceiling glass doors open onto a private veranda, making every sunset feel as if it is yours alone.

SUPERIOR VERANDA SUITE
Located on the upper deck and offering spectacular sunset views, the Superior Veranda Suite has all the comforts and luxury that you can expect aboard. A comfortable living space, attention to detail, and a generous expanse of amenities, this stunning suite makes for a cozy home while at sea. But perhaps this suite’s finest asset lies just outside, as floor-to-ceiling glass doors open onto a private veranda, making every sunset feel as if it is yours alone.
G2
Auto-created from Silver API for SILVER MOON - MO260103016
O2
Auto-created from Silver API for SILVER MOON - MO260103016
R2
Auto-created from Silver API for SILVER MOON - MO260103016
S2
Auto-created from Silver API for SILVER MOON - MO260103016

DELUXE VERANDA SUITE
The Deluxe Veranda Suite offers a comfortable living space, close to the heart of the ship. With its preferred midship location and all the comfort and attention to detail that you can expect aboard, the Deluxe Veranda Suite is the savvy traveler’s paradise—both inside and out. Elegant decor, a stunning bathroom, and an ample seating area make this a cozy home away from home. But perhaps this suite’s finest asset lies just outside, as floor-to-ceiling glass doors open onto a private veranda, making every sunset feel as if it is yours alone.

SILVER SUITE
Step onto your terrace and bask in the calm feeling of the ocean breeze. Dissolve into the comfort of your king-size bed. Prepare for the evening in the beautiful bathroom. The upper deck location provides the most spectacular ocean views while the spacious living area allows for comfortable relaxation, where cozy nights in become veritable experiences in themselves. The two-bedroom configuration of this suite makes this the ideal option for families.

ROYAL SUITE
Designed with the values of the culture of living in mind, the Royal Suite offers a vast, elegant space. Precise lines, authentic Italian craftsmanship, and fine materials make up just some of the details of this stunning suite. Commanding and majestic, the Royal Suite boasts a lavish living area that is perfect for entertaining, plush interior furnishings, and sweeping seascapes from the private terrace. The comfort of the spacious apartment makes this the ideal space for those wanting to feel the true comfort and luxury of the Silversea philosophy.

GRAND SUITE
Indulge in the epitome of ultra-luxury cruising. The Grand Suite is for those who want to experience sailing in style. The sophistication of the Silversea philosophy coupled with ample interior and exterior space makes this the perfect choice for serious travelers. With the biggest verandas on board, enjoy entertaining new friends or simply sharing intimate meals while contemplating spectacular sunsets. Savor the sense of well-being offered by the luxurious furnishings and modern amenities. Offering an unprecedented level of relaxation, the Grand Suite is the perfect romantic getaway.

OWNER’S SUITE
Picture yourself enjoying a delicious breakfast on your private veranda. Imagine watching the sun set, a flute of chilled champagne in hand, setting sail for your next destination. Prestigious, classic, and sophisticated, this stylish apartment suite offers the ultimate in fine accommodation on board. Set aside for those who seek a superlative level of space, comfort, and service, the Owner’s Suite has it all. The adjoining bedroom, with its en suite bathroom, offers its own spectacular ocean views.
Dining Options
Atlantide
Pivotal to the Silver Moon dining experience, this elegant bar and grill incorporates the best that the sea has to offer.
Atlantide
Pivotal to the Silver Moon dining experience, this elegant bar and grill incorporates the best that the sea has to offer.
Atlantide
Pivotal to the Silver Moon dining experience, this elegant bar and grill incorporates the best that the sea has to offer.
Atlantide
Pivotal to the Silver Moon dining experience, this elegant bar and grill incorporates the best that the sea has to offer.
Atlantide
Pivotal to the Silver Moon dining experience, this elegant bar and grill incorporates the best that the sea has to offer.
Atlantide
Pivotal to the Silver Moon dining experience, this elegant bar and grill incorporates the best that the sea has to offer.
Atlantide
Pivotal to the Silver Moon dining experience, this elegant bar and grill incorporates the best that the sea has to offer.
Atlantide
Pivotal to the Silver Moon dining experience, this elegant bar and grill incorporates the best that the sea has to offer.
Atlantide
Pivotal to the Silver Moon dining experience, this elegant bar and grill incorporates the best that the sea has to offer.
Atlantide
Pivotal to the Silver Moon dining experience, this elegant bar and grill incorporates the best that the sea has to offer.
Kaiseki
One of the most immediately recognizable characteristics of Japanese culture for its stunning costumes and elaborate makeup, the ancient art of Kaiseki theater reflects a passion for tradition and performance.
Kaiseki
One of the most immediately recognizable characteristics of Japanese culture for its stunning costumes and elaborate makeup, the ancient art of Kaiseki theater reflects a passion for tradition and performance.
Kaiseki
One of the most immediately recognizable characteristics of Japanese culture for its stunning costumes and elaborate makeup, the ancient art of Kaiseki theater reflects a passion for tradition and performance.
Kaiseki
One of the most immediately recognizable characteristics of Japanese culture for its stunning costumes and elaborate makeup, the ancient art of Kaiseki theater reflects a passion for tradition and performance.
Kaiseki
One of the most immediately recognizable characteristics of Japanese culture for its stunning costumes and elaborate makeup, the ancient art of Kaiseki theater reflects a passion for tradition and performance.
Kaiseki
One of the most immediately recognizable characteristics of Japanese culture for its stunning costumes and elaborate makeup, the ancient art of Kaiseki theater reflects a passion for tradition and performance.
Kaiseki
One of the most immediately recognizable characteristics of Japanese culture for its stunning costumes and elaborate makeup, the ancient art of Kaiseki theater reflects a passion for tradition and performance.
Kaiseki
One of the most immediately recognizable characteristics of Japanese culture for its stunning costumes and elaborate makeup, the ancient art of Kaiseki theater reflects a passion for tradition and performance.
Kaiseki
One of the most immediately recognizable characteristics of Japanese culture for its stunning costumes and elaborate makeup, the ancient art of Kaiseki theater reflects a passion for tradition and performance.
Kaiseki
One of the most immediately recognizable characteristics of Japanese culture for its stunning costumes and elaborate makeup, the ancient art of Kaiseki theater reflects a passion for tradition and performance.
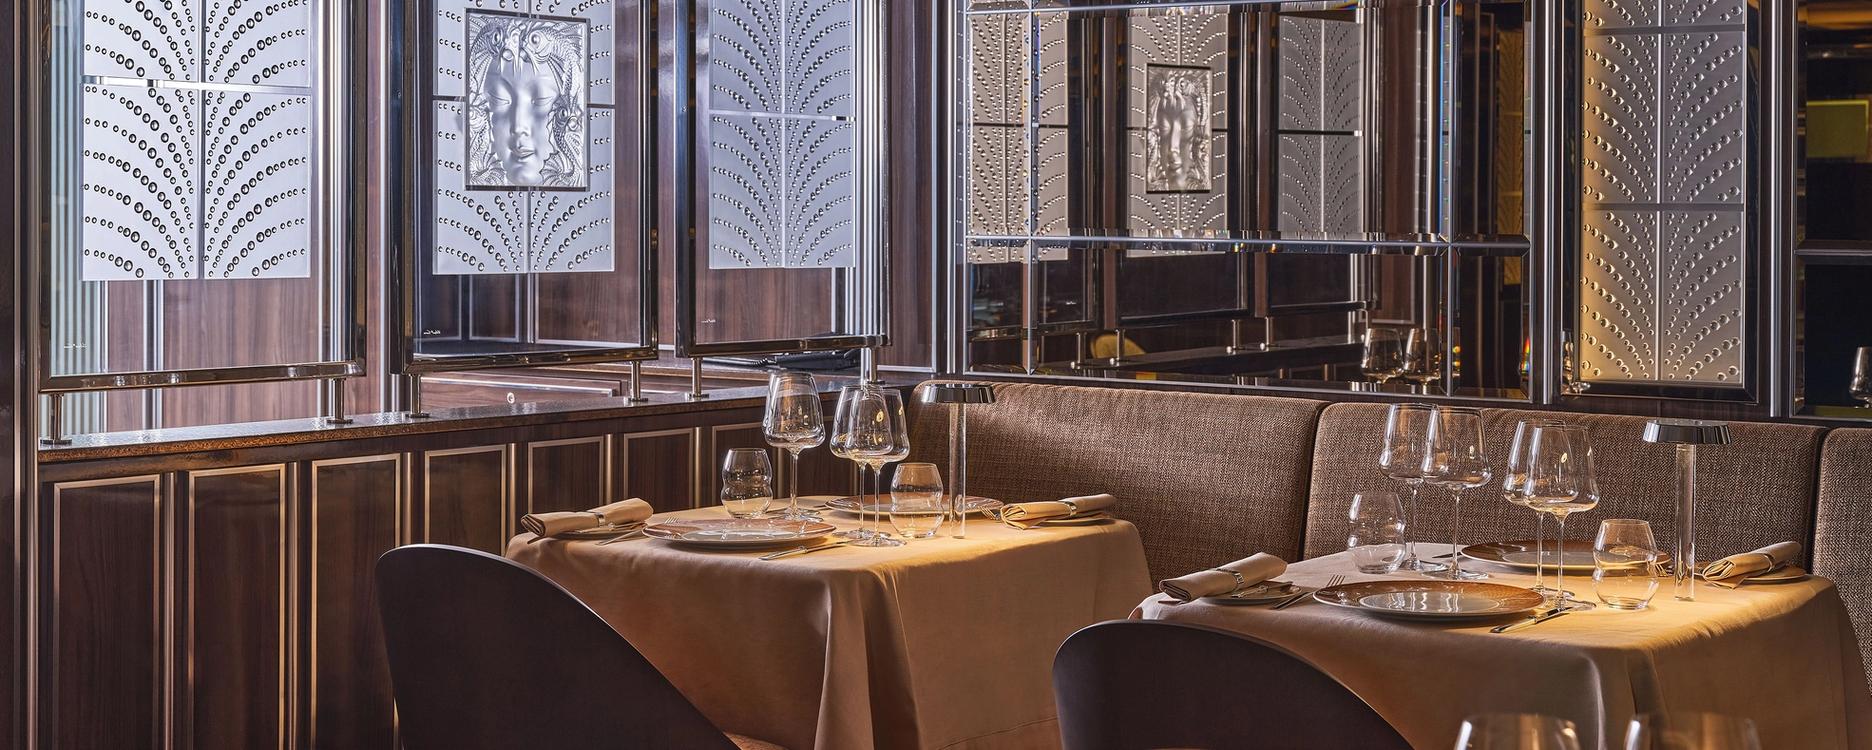
La Dame
Silversea’s signature French restaurant, La Dame is the epitome of fine dining. Featuring the rich, smooth flavors of France, La Dame’s reputation for gastronomic excellence is fully upheld aboard Silver Moon.
La Dame
Silversea’s signature French restaurant, La Dame is the epitome of fine dining. Featuring the rich, smooth flavors of France, La Dame’s reputation for gastronomic excellence is fully upheld aboard Silver Moon.
La Dame
Silversea’s signature French restaurant, La Dame is the epitome of fine dining. Featuring the rich, smooth flavors of France, La Dame’s reputation for gastronomic excellence is fully upheld aboard Silver Moon.
La Dame
Silversea’s signature French restaurant, La Dame is the epitome of fine dining. Featuring the rich, smooth flavors of France, La Dame’s reputation for gastronomic excellence is fully upheld aboard Silver Moon.
La Dame
Silversea’s signature French restaurant, La Dame is the epitome of fine dining. Featuring the rich, smooth flavors of France, La Dame’s reputation for gastronomic excellence is fully upheld aboard Silver Moon.
La Dame
Silversea’s signature French restaurant, La Dame is the epitome of fine dining. Featuring the rich, smooth flavors of France, La Dame’s reputation for gastronomic excellence is fully upheld aboard Silver Moon.
La Dame
Silversea’s signature French restaurant, La Dame is the epitome of fine dining. Featuring the rich, smooth flavors of France, La Dame’s reputation for gastronomic excellence is fully upheld aboard Silver Moon.
La Dame
Silversea’s signature French restaurant, La Dame is the epitome of fine dining. Featuring the rich, smooth flavors of France, La Dame’s reputation for gastronomic excellence is fully upheld aboard Silver Moon.
La Dame
Silversea’s signature French restaurant, La Dame is the epitome of fine dining. Featuring the rich, smooth flavors of France, La Dame’s reputation for gastronomic excellence is fully upheld aboard Silver Moon.
La Dame
Silversea’s signature French restaurant, La Dame is the epitome of fine dining. Featuring the rich, smooth flavors of France, La Dame’s reputation for gastronomic excellence is fully upheld aboard Silver Moon.
La Terrazza
Authentic Italian recipes and the freshest, sustainable ingredients come together in this restaurant at sea.
La Terrazza
Authentic Italian recipes and the freshest, sustainable ingredients come together in this restaurant at sea.
La Terrazza
Authentic Italian recipes and the freshest, sustainable ingredients come together in this restaurant at sea.
La Terrazza
Authentic Italian recipes and the freshest, sustainable ingredients come together in this restaurant at sea.
La Terrazza
Authentic Italian recipes and the freshest, sustainable ingredients come together in this restaurant at sea.
La Terrazza
Authentic Italian recipes and the freshest, sustainable ingredients come together in this restaurant at sea.
La Terrazza
Authentic Italian recipes and the freshest, sustainable ingredients come together in this restaurant at sea.
La Terrazza
Authentic Italian recipes and the freshest, sustainable ingredients come together in this restaurant at sea.
La Terrazza
Authentic Italian recipes and the freshest, sustainable ingredients come together in this restaurant at sea.
La Terrazza
Authentic Italian recipes and the freshest, sustainable ingredients come together in this restaurant at sea.
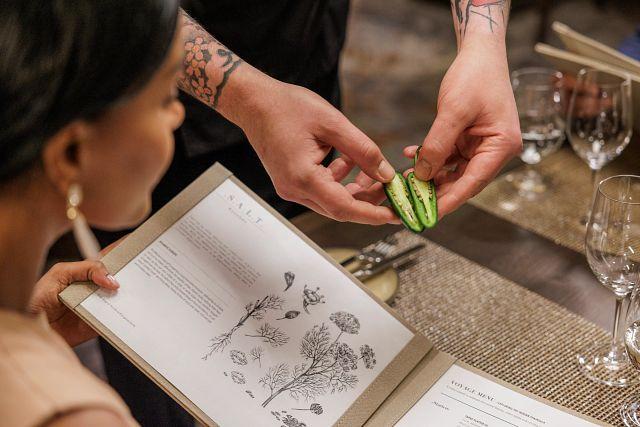
S.A.L.T. Kitchen
S.A.L.T. Kitchen offers an ever-changing destination-inspired menu, featuring regional specialties and local flavors, all made with responsibly sourced ingredients. Paired with over 160 regional wines, it provides an immersive culinary journey at sea.
S.A.L.T. Kitchen
S.A.L.T. Kitchen offers an ever-changing destination-inspired menu, featuring regional specialties and local flavors, all made with responsibly sourced ingredients. Paired with over 160 regional wines, it provides an immersive culinary journey at sea.
S.A.L.T. Kitchen
S.A.L.T. Kitchen offers an ever-changing destination-inspired menu, featuring regional specialties and local flavors, all made with responsibly sourced ingredients. Paired with over 160 regional wines, it provides an immersive culinary journey at sea.
S.A.L.T. Kitchen
S.A.L.T. Kitchen offers an ever-changing destination-inspired menu, featuring regional specialties and local flavors, all made with responsibly sourced ingredients. Paired with over 160 regional wines, it provides an immersive culinary journey at sea.
S.A.L.T. Kitchen
S.A.L.T. Kitchen offers an ever-changing destination-inspired menu, featuring regional specialties and local flavors, all made with responsibly sourced ingredients. Paired with over 160 regional wines, it provides an immersive culinary journey at sea.
S.A.L.T. Kitchen
S.A.L.T. Kitchen offers an ever-changing destination-inspired menu, featuring regional specialties and local flavors, all made with responsibly sourced ingredients. Paired with over 160 regional wines, it provides an immersive culinary journey at sea.
S.A.L.T. Kitchen
S.A.L.T. Kitchen offers an ever-changing destination-inspired menu, featuring regional specialties and local flavors, all made with responsibly sourced ingredients. Paired with over 160 regional wines, it provides an immersive culinary journey at sea.
S.A.L.T. Kitchen
S.A.L.T. Kitchen offers an ever-changing destination-inspired menu, featuring regional specialties and local flavors, all made with responsibly sourced ingredients. Paired with over 160 regional wines, it provides an immersive culinary journey at sea.
S.A.L.T. Kitchen
S.A.L.T. Kitchen offers an ever-changing destination-inspired menu, featuring regional specialties and local flavors, all made with responsibly sourced ingredients. Paired with over 160 regional wines, it provides an immersive culinary journey at sea.
S.A.L.T. Kitchen
S.A.L.T. Kitchen offers an ever-changing destination-inspired menu, featuring regional specialties and local flavors, all made with responsibly sourced ingredients. Paired with over 160 regional wines, it provides an immersive culinary journey at sea.
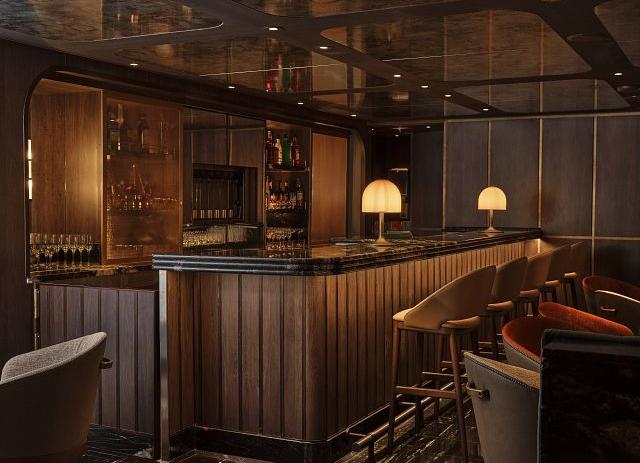
Silver Note
Small-plate, tapas-style dishes of mouthwatering international cuisine perfectly complement the rich, exciting entertainment as the smooth sounds of jazz and blues fill the air.
Silver Note
Small-plate, tapas-style dishes of mouthwatering international cuisine perfectly complement the rich, exciting entertainment as the smooth sounds of jazz and blues fill the air.
Silver Note
Small-plate, tapas-style dishes of mouthwatering international cuisine perfectly complement the rich, exciting entertainment as the smooth sounds of jazz and blues fill the air.
Silver Note
Small-plate, tapas-style dishes of mouthwatering international cuisine perfectly complement the rich, exciting entertainment as the smooth sounds of jazz and blues fill the air.
Silver Note
Small-plate, tapas-style dishes of mouthwatering international cuisine perfectly complement the rich, exciting entertainment as the smooth sounds of jazz and blues fill the air.
Silver Note
Small-plate, tapas-style dishes of mouthwatering international cuisine perfectly complement the rich, exciting entertainment as the smooth sounds of jazz and blues fill the air.
Silver Note
Small-plate, tapas-style dishes of mouthwatering international cuisine perfectly complement the rich, exciting entertainment as the smooth sounds of jazz and blues fill the air.
Silver Note
Small-plate, tapas-style dishes of mouthwatering international cuisine perfectly complement the rich, exciting entertainment as the smooth sounds of jazz and blues fill the air.
Silver Note
Small-plate, tapas-style dishes of mouthwatering international cuisine perfectly complement the rich, exciting entertainment as the smooth sounds of jazz and blues fill the air.
Silver Note
Small-plate, tapas-style dishes of mouthwatering international cuisine perfectly complement the rich, exciting entertainment as the smooth sounds of jazz and blues fill the air.
Spaccanapoli
Reflecting Silversea’s Italian heritage, this emblematic street in Naples divides the city in two and is renowned for its pizzerias.
Spaccanapoli
Reflecting Silversea’s Italian heritage, this emblematic street in Naples divides the city in two and is renowned for its pizzerias.
Spaccanapoli
Reflecting Silversea’s Italian heritage, this emblematic street in Naples divides the city in two and is renowned for its pizzerias.
Spaccanapoli
Reflecting Silversea’s Italian heritage, this emblematic street in Naples divides the city in two and is renowned for its pizzerias.
Spaccanapoli
Reflecting Silversea’s Italian heritage, this emblematic street in Naples divides the city in two and is renowned for its pizzerias.
Spaccanapoli
Reflecting Silversea’s Italian heritage, this emblematic street in Naples divides the city in two and is renowned for its pizzerias.
Spaccanapoli
Reflecting Silversea’s Italian heritage, this emblematic street in Naples divides the city in two and is renowned for its pizzerias.
Spaccanapoli
Reflecting Silversea’s Italian heritage, this emblematic street in Naples divides the city in two and is renowned for its pizzerias.
Spaccanapoli
Reflecting Silversea’s Italian heritage, this emblematic street in Naples divides the city in two and is renowned for its pizzerias.
Spaccanapoli
Reflecting Silversea’s Italian heritage, this emblematic street in Naples divides the city in two and is renowned for its pizzerias.
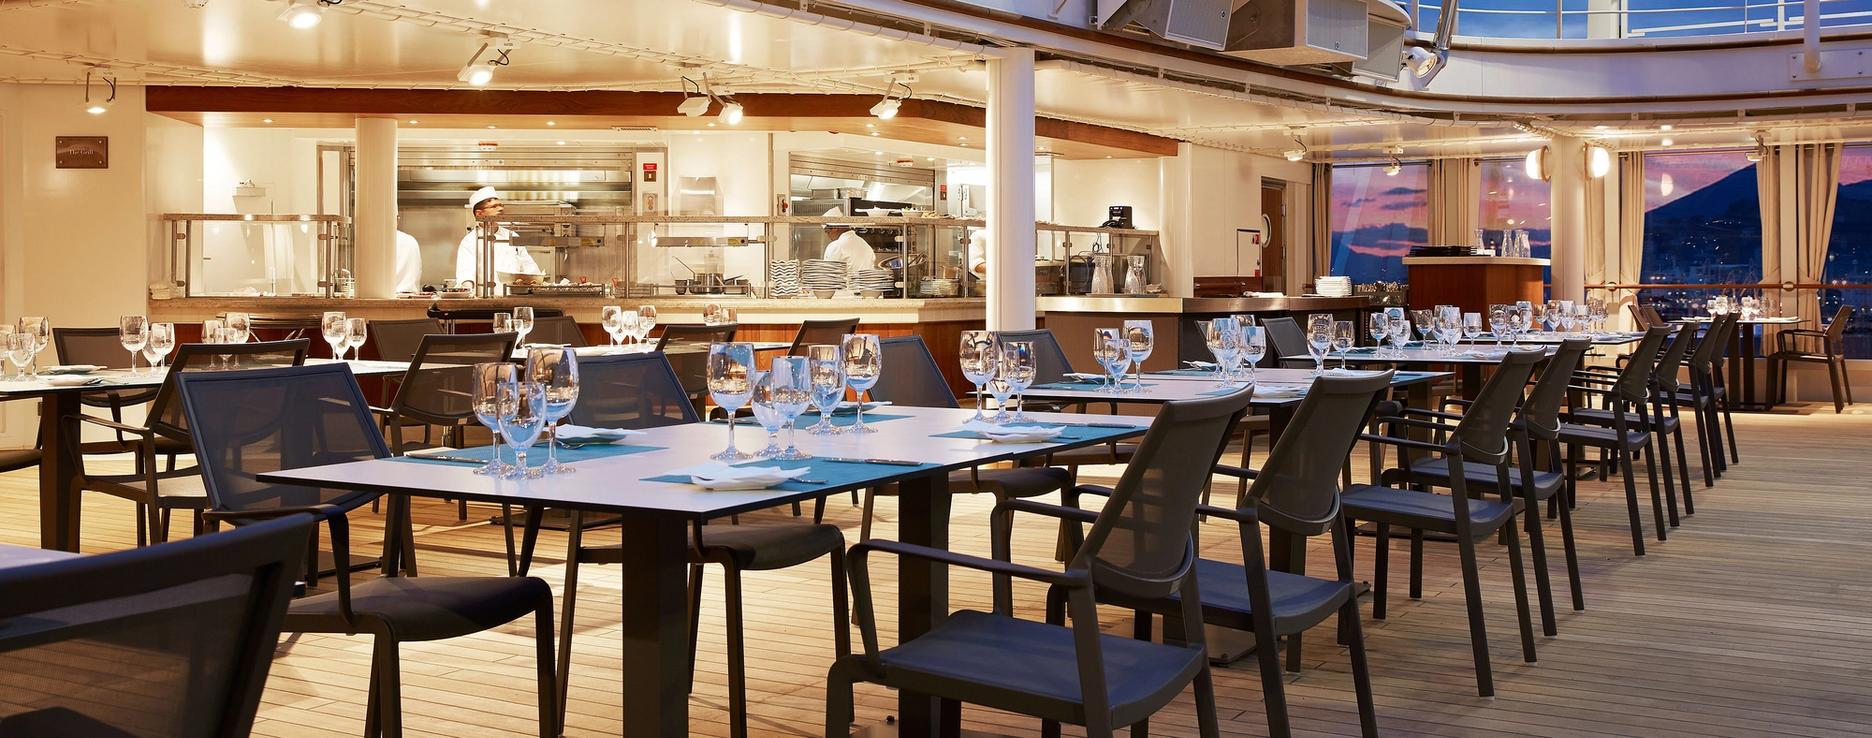
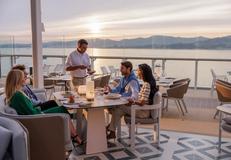
The Grill
Soft breezes and ocean views beckon at The Grill, especially as the sun goes down, when cruise guests gather for cocktails at the outdoor bar and talk about the day’s events.
The Grill
Soft breezes and ocean views beckon at The Grill, especially as the sun goes down, when cruise guests gather for cocktails at the outdoor bar and talk about the day’s events.
The Grill
Soft breezes and ocean views beckon at The Grill, especially as the sun goes down, when cruise guests gather for cocktails at the outdoor bar and talk about the day’s events.
The Grill
Soft breezes and ocean views beckon at The Grill, especially as the sun goes down, when cruise guests gather for cocktails at the outdoor bar and talk about the day’s events.
The Grill
Soft breezes and ocean views beckon at The Grill, especially as the sun goes down, when cruise guests gather for cocktails at the outdoor bar and talk about the day’s events.
The Grill
Soft breezes and ocean views beckon at The Grill, especially as the sun goes down, when cruise guests gather for cocktails at the outdoor bar and talk about the day’s events.
The Grill
Soft breezes and ocean views beckon at The Grill, especially as the sun goes down, when cruise guests gather for cocktails at the outdoor bar and talk about the day’s events.
The Grill
Soft breezes and ocean views beckon at The Grill, especially as the sun goes down, when cruise guests gather for cocktails at the outdoor bar and talk about the day’s events.
The Grill
Soft breezes and ocean views beckon at The Grill, especially as the sun goes down, when cruise guests gather for cocktails at the outdoor bar and talk about the day’s events.
The Grill
Soft breezes and ocean views beckon at The Grill, especially as the sun goes down, when cruise guests gather for cocktails at the outdoor bar and talk about the day’s events.
Shore Excursions
Adelaide, Australia
Adelaide by Private Car with Guide - Full Day
ADL-WExplore Adelaide at your leisure during your full-day (8-Hour) sightseeing tour via private car. Customise your own itinerary or choose to see an overview of the area's highlights. Depart the pier with your English-speaking guide in an air-conditioned car and discover the city and surrounding areas at your own pace. Your exclusive tour concludes back at the pier. Excursions are at an easy pace without the need for excessive walking or physical activities. Being able to board buses and negotiate steps that may be encountered Adelaide by Private Car with Guide - Full Day CODE: ADL-W DURATION 8 HOURS ACTIVITY LEVEL MINIMAL Excursions are at an easy pace without the need for excessive walking or physical activities. Being able to board buses and negotiate steps that may be encountered Explore Adelaide at your leisure during your full-day (8-Hour) sightseeing tour via private car. Customise your own itinerary or choose to see an overview of the area's highlights. Depart the pier with your English-speaking guide in an air-conditioned car and discover the city and surrounding areas at your own pace. Your exclusive tour concludes back at the pier. Please note: This tour is non-refundable if cancelled within 48 hours prior to the cruise start date. Actual vehicle type varies depending on availability. Participation is limited to 2 guests per car. The price, exclusive of meals, entrance fees and gratuities, is per vehicle. Therefore, when making your reservation, please indicate the number of vehicles, not the number of guests. Only one person in the party needs to reserve this programme. Please see the Shore Concierge Office on board the ship to arrange your individual itinerary. Please note: This tour is non-refundable if cancelled within 48 hours prior to the cruise start date. Actual vehicle type varies depending on availability. Participation is limited to 2 guests per car. The price, exclusive of meals, entrance fees and gratuities, is per vehicle. Therefore, when making your reservation, please indicate the number of vehicles, not the number of guests. Only one person in the party needs to reserve this programme. Please see the Shore Concierge Office on board the ship to arrange your individual itinerary.
Adelaide by Private Car with Guide - Half Day
ADL-VExplore Adelaide at your leisure during your half-day (4-Hour) sightseeing tour via private car. Customise your own itinerary or choose to see an overview of the area's highlights. Depart the pier with your English-speaking guide in an air-conditioned car and discover the city and surrounding areas at your own pace. Your exclusive tour concludes back at the pier. Excursions are at an easy pace without the need for excessive walking or physical activities. Being able to board buses and negotiate steps that may be encountered Adelaide by Private Car with Guide - Half Day CODE: ADL-V DURATION 4 HOURS ACTIVITY LEVEL MINIMAL Excursions are at an easy pace without the need for excessive walking or physical activities. Being able to board buses and negotiate steps that may be encountered Explore Adelaide at your leisure during your half-day (4-Hour) sightseeing tour via private car. Customise your own itinerary or choose to see an overview of the area's highlights. Depart the pier with your English-speaking guide in an air-conditioned car and discover the city and surrounding areas at your own pace. Your exclusive tour concludes back at the pier. Please note: This tour is non-refundable if cancelled within 48 hours prior to the cruise start date. Actual vehicle type varies depending on availability. Participation is limited to 2 guests per car. The price, exclusive of meals, entrance fees and gratuities, is per vehicle. Therefore, when making your reservation, please indicate the number of vehicles, not the number of guests. Only one person in the party needs to reserve this programme. Please see the Shore Concierge Office on board the ship to arrange your individual itinerary. Please note: This tour is non-refundable if cancelled within 48 hours prior to the cruise start date. Actual vehicle type varies depending on availability. Participation is limited to 2 guests per car. The price, exclusive of meals, entrance fees and gratuities, is per vehicle. Therefore, when making your reservation, please indicate the number of vehicles, not the number of guests. Only one person in the party needs to reserve this programme. Please see the Shore Concierge Office on board the ship to arrange your individual itinerary.
Adelaide by Private Van with Guide - Full Day
ADL-YExplore Adelaide at your leisure during your full-day (8-Hour) sightseeing tour via private van. Customise your own itinerary or choose to see an overview of the area's highlights. Depart the pier with your English-speaking guide in an air-conditioned van and discover the city and surrounding areas at your own pace. Your exclusive tour concludes back at the pier. Excursions are at an easy pace without the need for excessive walking or physical activities. Being able to board buses and negotiate steps that may be encountered Adelaide by Private Van with Guide - Full Day CODE: ADL-Y DURATION 8 HOURS ACTIVITY LEVEL MINIMAL Excursions are at an easy pace without the need for excessive walking or physical activities. Being able to board buses and negotiate steps that may be encountered Explore Adelaide at your leisure during your full-day (8-Hour) sightseeing tour via private van. Customise your own itinerary or choose to see an overview of the area's highlights. Depart the pier with your English-speaking guide in an air-conditioned van and discover the city and surrounding areas at your own pace. Your exclusive tour concludes back at the pier. Please note: This tour is non-refundable if cancelled within 48 hours prior to the cruise start date. Actual vehicle type varies depending on availability. Participation is limited to 4 guests per van. The price, exclusive of meals, entrance fees and gratuities, is per vehicle. Therefore, when making your reservation, please indicate the number of vehicles, not the number of guests. Only one person in the party needs to reserve this programme. Please see the Shore Concierge Office on board the ship to arrange your individual itinerary. Please note: This tour is non-refundable if cancelled within 48 hours prior to the cruise start date. Actual vehicle type varies depending on availability. Participation is limited to 4 guests per van. The price, exclusive of meals, entrance fees and gratuities, is per vehicle. Therefore, when making your reservation, please indicate the number of vehicles, not the number of guests. Only one person in the party needs to reserve this programme. Please see the Shore Concierge Office on board the ship to arrange your individual itinerary.
Adelaide by Private Van with Guide - Half Day
ADL-XExplore Adelaide at your leisure during your half-day (4-Hour) sightseeing tour via private van. Customise your own itinerary or choose to see an overview of the area's highlights. Depart the pier with your English-speaking guide in an air-conditioned van and discover the city and surrounding areas at your own pace. Your exclusive tour concludes back at the pier. Excursions are at an easy pace without the need for excessive walking or physical activities. Being able to board buses and negotiate steps that may be encountered Adelaide by Private Van with Guide - Half Day CODE: ADL-X DURATION 4 HOURS ACTIVITY LEVEL MINIMAL Excursions are at an easy pace without the need for excessive walking or physical activities. Being able to board buses and negotiate steps that may be encountered Explore Adelaide at your leisure during your half-day (4-Hour) sightseeing tour via private van. Customise your own itinerary or choose to see an overview of the area's highlights. Depart the pier with your English-speaking guide in an air-conditioned van and discover the city and surrounding areas at your own pace. Your exclusive tour concludes back at the pier. Please note: This tour is non-refundable if cancelled within 48 hours prior to the cruise start date. Actual vehicle type varies depending on availability. Participation is limited to 4 guests per van. The price, exclusive of meals, entrance fees and gratuities, is per vehicle. Therefore, when making your reservation, please indicate the number of vehicles, not the number of guests. Only one person in the party needs to reserve this programme. Please see the Shore Concierge Office on board the ship to arrange your individual itinerary. Please note: This tour is non-refundable if cancelled within 48 hours prior to the cruise start date. Actual vehicle type varies depending on availability. Participation is limited to 4 guests per van. The price, exclusive of meals, entrance fees and gratuities, is per vehicle. Therefore, when making your reservation, please indicate the number of vehicles, not the number of guests. Only one person in the party needs to reserve this programme. Please see the Shore Concierge Office on board the ship to arrange your individual itinerary.
Adelaide Highlights
ADL-ADiscover the gracious and well-planned city of Adelaide during this picturesque, half-day sightseeing tour. Adelaide Depart the pier for a scenic sightseeing tour of Adelaide. After taking the main commercial route into the city, traverse the tree-lined North Terrace and pass by the Casino situated within the handsomely-restored former Railway Building. From here, proceed past numerous stately Colonial buildings, the Botanical Gardens and the Holy Trinity Church. Your drive offers delightful views of the city's renowned, flower-fringed parks before continuing past the grand old Parliament Buildings and nearby Government House. Mt. Lofty Lookout Next, leave the city limits en route to the outlying ranges and Mt. Lofty lookout, where a photo stop is made for spectacular views over the city (weather permitting). South Australian Museum Lastly, enjoy a self-guided tour of the South Australian Museum to view the extensive gallery dedicated to the history of Aboriginal culture. The museum features six floors of exhibits that reveal fascinating stories and reflect the museum's Australian Aboriginal and Pacific collections. At the conclusion of your visit, re-board you coach for a return drive back to the pier. Guests wishing to stay longer at the museum or remain in town may do so. Shuttle bus stop is located just around the corner from the museum. Excursions are at an easy pace without the need for excessive walking or physical activities. Being able to board buses and negotiate steps that may be encountered Adelaide Highlights CODE: ADL-A DURATION 4 HOURS ACTIVITY LEVEL MINIMAL Excursions are at an easy pace without the need for excessive walking or physical activities. Being able to board buses and negotiate steps that may be encountered Discover the gracious and well-planned city of Adelaide during this picturesque, half-day sightseeing tour. Adelaide Depart the pier for a scenic sightseeing tour of Adelaide. After taking the main commercial route into the city, traverse the tree-lined North Terrace and pass by the Casino situated within the handsomely-restored former Railway Building. From here, proceed past numerous stately Colonial buildings, the Botanical Gardens and the Holy Trinity Church. Your drive offers delightful views of the city's renowned, flower-fringed parks before continuing past the grand old Parliament Buildings and nearby Government House. Mt. Lofty Lookout Next, leave the city limits en route to the outlying ranges and Mt. Lofty lookout, where a photo stop is made for spectacular views over the city (weather permitting). South Australian Museum Lastly, enjoy a self-guided tour of the South Australian Museum to view the extensive gallery dedicated to the history of Aboriginal culture. The museum features six floors of exhibits that reveal fascinating stories and reflect the museum's Australian Aboriginal and Pacific collections. At the conclusion of your visit, re-board you coach for a return drive back to the pier. Guests wishing to stay longer at the museum or remain in town may do so. Shuttle bus stop is located just around the corner from the museum. Please note: This tour requires a minimal amount of walking, with a few steps to negotiate to get on/off the coach. It is suitable for guests with limited mobility and those who utilise a wheelchair, able to embark/disembark the coach via steps. Lightweight, comfortable clothing and sun protection are recommended. Walking in the museum is at the discretion of each guest. We recommend guests to wear comfortable footwear and bring a hat, sunscreen, sunglasses and bottled water from the ship. The tour sequence may vary Please note: This tour requires a minimal amount of walking, with a few steps to negotiate to get on/off the coach. It is suitable for guests with limited mobility and those who utilise a wheelchair, able to embark/disembark the coach via steps. Lightweight, comfortable clothing and sun protection are recommended. Walking in the museum is at the discretion of each guest. We recommend guests to wear comfortable footwear and bring a hat, sunscreen, sunglasses and bottled water from the ship. The tour sequence may vary

Adelaide Sights & Wildlife Park
ADL-EExplore the landmarks, culture and wildlife of the 'City of Churches' during this picturesque, half-day sightseeing tour of Adelaide and its environs. Adelaide Depart the pier for a scenic sightseeing tour of Adelaide. After taking the main commercial route into the city, traverse the tree-lined North Terrace and pass by the Casino situated within the handsomely-restored former Railway Building. From here, proceed past numerous stately Colonial buildings, the Botanical Gardens and the Holy Trinity Church. Your drive offers delightful views of the city's renowned, flower-fringed parks before continuing past the grand old Parliament Buildings and nearby Government House. Mt. Lofty Lookout Next, leave the city limits en route to the outlying ranges and Mt. Lofty lookout, where a photo stop is made for spectacular views over the city (weather permitting). Your tour continues with a visit to the Cleland Wildlife Park, which is nestled amidst the beautiful natural bushland of the Adelaide Hills. Cleland Wildlife Park During your visit, you can get up-close to nature and interact with kangaroos, koalas, emus and other Australian animals. In addition, see popular local favourites that include wombats, dingoes and numerous reptile species. The park is also home to a variety of rare and endangered species. Following your visit, re-board your coach for the approximately 60-minute drive back to the pier. Full participation may include a limited number of steps, uneven surfaces, and/or periods of standing. Adelaide Sights & Wildlife Park CODE: ADL-E DURATION 5 HOURS ACTIVITY LEVEL MODERATE Full participation may include a limited number of steps, uneven surfaces, and/or periods of standing. Explore the landmarks, culture and wildlife of the 'City of Churches' during this picturesque, half-day sightseeing tour of Adelaide and its environs. Adelaide Depart the pier for a scenic sightseeing tour of Adelaide. After taking the main commercial route into the city, traverse the tree-lined North Terrace and pass by the Casino situated within the handsomely-restored former Railway Building. From here, proceed past numerous stately Colonial buildings, the Botanical Gardens and the Holy Trinity Church. Your drive offers delightful views of the city's renowned, flower-fringed parks before continuing past the grand old Parliament Buildings and nearby Government House. Mt. Lofty Lookout Next, leave the city limits en route to the outlying ranges and Mt. Lofty lookout, where a photo stop is made for spectacular views over the city (weather permitting). Your tour continues with a visit to the Cleland Wildlife Park, which is nestled amidst the beautiful natural bushland of the Adelaide Hills. Cleland Wildlife Park During your visit, you can get up-close to nature and interact with kangaroos, koalas, emus and other Australian animals. In addition, see popular local favourites that include wombats, dingoes and numerous reptile species. The park is also home to a variety of rare and endangered species. Following your visit, re-board your coach for the approximately 60-minute drive back to the pier. Please note: This tour requires a moderate amount of walking, with a few steps to negotiate to get on/off the coach and paved and unpaved areas, uneven surfaces, grassy areas and/or gravel pathways inside the Cleland Wildlife Park. Most areas inside the Cleland Wildlife Park are wheelchair accessible; however, those who utilise a wheelchair will not be permitted to enter the animal enclosures. Specific wildlife sightings are not guaranteed, the Koala up-close experience is subject to availability and the animals will not be brought out in high temperatures. Lightweight, comfortable clothing, flat, closed-toe walking shoes and sun protection are recommended. Order of sights may vary. Please note: This tour requires a moderate amount of walking, with a few steps to negotiate to get on/off the coach and paved and unpaved areas, uneven surfaces, grassy areas and/or gravel pathways inside the Cleland Wildlife Park. Most areas inside the Cleland Wildlife Park are wheelchair accessible; however, those who utilise a wheelchair will not be permitted to enter the animal enclosures. Specific wildlife sightings are not guaranteed, the Koala up-close experience is subject to availability and the animals will not be brought out in high temperatures. Lightweight, comfortable clothing, flat, closed-toe walking shoes and sun protection are recommended. Order of sights may vary.
Barossa Valley Food & Wine
ADL-FDiscover the splendid beauty and vineyards of the most famous wine region in Australia during this memorable, full-day excursion to the Barossa Valley. Adelaide and Barossa Valley Depart the pier for a scenic sightseeing drive through the suburbs of Adelaide. While driving through the Barossa Valley, savour the intimate charm of the local townships and view a series of orderly vineyards dotting the undulating hills. The area's historic and cultural influences were derived from German emigrants who settled here during the mid-19th century. Jacobs Creek & Seppletsfield Winery Tours and Tastings Next, a visit is made to three of the Barossa region's most renowned wineries, including such names such as Jacobs Creek & Seppletsfield Winery. Enjoy wine tasting at each venue and a lovely seasonal lunch with a glass of local wine at one of the visited wineries from the heart of the Barossa Valley. Everything is freshly made and from local produce, so allow yourself to absorb the beautiful food and the experience. Following your visit, re-board your coach for approximately 90-minute return drive to the pier. Excursions are at an easy pace without the need for excessive walking or physical activities. Being able to board buses and negotiate steps that may be encountered A meal is included in the excursion. Barossa Valley Food & Wine CODE: ADL-F DURATION 7 HOURS ACTIVITY LEVEL MINIMAL Excursions are at an easy pace without the need for excessive walking or physical activities. Being able to board buses and negotiate steps that may be encountered MEAL INCLUDED A meal is included in the excursion. Discover the splendid beauty and vineyards of the most famous wine region in Australia during this memorable, full-day excursion to the Barossa Valley. Adelaide and Barossa Valley Depart the pier for a scenic sightseeing drive through the suburbs of Adelaide. While driving through the Barossa Valley, savour the intimate charm of the local townships and view a series of orderly vineyards dotting the undulating hills. The area's historic and cultural influences were derived from German emigrants who settled here during the mid-19th century. Jacobs Creek & Seppletsfield Winery Tours and Tastings Next, a visit is made to three of the Barossa region's most renowned wineries, including such names such as Jacobs Creek & Seppletsfield Winery. Enjoy wine tasting at each venue and a lovely seasonal lunch with a glass of local wine at one of the visited wineries from the heart of the Barossa Valley. Everything is freshly made and from local produce, so allow yourself to absorb the beautiful food and the experience. Following your visit, re-board your coach for approximately 90-minute return drive to the pier. Please note: This tour requires a moderate amount of walking, with a few steps to negotiate to get on/off the coach and at the sites visited. It is not suitable for guests with limited mobility or those who utilise a wheelchair. Lightweight, comfortable clothing and sun protection are recommended. Guests must be at least 18 years old to participate in wine-tastings. The driving distance between the pier and Barossa Valley is approximately 90 minutes in each direction. The tour sequence may vary. Due to operational requirements wineries may be substituted. Please note: This tour requires a moderate amount of walking, with a few steps to negotiate to get on/off the coach and at the sites visited. It is not suitable for guests with limited mobility or those who utilise a wheelchair. Lightweight, comfortable clothing and sun protection are recommended. Guests must be at least 18 years old to participate in wine-tastings. The driving distance between the pier and Barossa Valley is approximately 90 minutes in each direction. The tour sequence may vary. Due to operational requirements wineries may be substituted.
D'Arenberg - More Than a Cellar Door
ADL-NLocated in the heart of one of Australia's oldest and most acclaimed wine regions, Mclaren Vale is a wine lover and foodie's paradise. This half-day experience will take you to the picturesque D'Arenberg Winery, home of The Cube. McLaren Vale, D'Arenberg Winery The McLaren Vale region is famous for is beautiful location and stunning wine varieties. This tour will take you on a scenic drive to the evergreen D’Arenberg Winery. Standing in prime position on this estate is the Cube, a five-storey attraction with unique architecture. As you enter the cube you will enjoy some free-time to self-guide around the Alternate Realities Museum, a contemporary art gallery that includes a fascinating wine aroma room. Wine Tasting, Local Refreshments, Blend Your Own Wine Experience Next, travel to the top floor for a wine tasting overlooking McLaren Vale, the Willunga Hills and the Gulf St Vincent. Your wine experience continues as you don your winemaker hat and blend your own personalised Shiraz. You'll work with three barrel samples of single vineyard wine as your guide takes you through the blending process. At the conclusion of your experience, take some time to shop your favourite varieties to take home before returning to the ship. Full participation may include a limited number of steps, uneven surfaces, and/or periods of standing. D'Arenberg - More Than a Cellar Door CODE: ADL-N DURATION 5.5 HOURS ACTIVITY LEVEL MODERATE Full participation may include a limited number of steps, uneven surfaces, and/or periods of standing. Located in the heart of one of Australia's oldest and most acclaimed wine regions, Mclaren Vale is a wine lover and foodie's paradise. This half-day experience will take you to the picturesque D'Arenberg Winery, home of The Cube. McLaren Vale, D'Arenberg Winery The McLaren Vale region is famous for is beautiful location and stunning wine varieties. This tour will take you on a scenic drive to the evergreen D’Arenberg Winery. Standing in prime position on this estate is the Cube, a five-storey attraction with unique architecture. As you enter the cube you will enjoy some free-time to self-guide around the Alternate Realities Museum, a contemporary art gallery that includes a fascinating wine aroma room. Wine Tasting, Local Refreshments, Blend Your Own Wine Experience Next, travel to the top floor for a wine tasting overlooking McLaren Vale, the Willunga Hills and the Gulf St Vincent. Your wine experience continues as you don your winemaker hat and blend your own personalised Shiraz. You'll work with three barrel samples of single vineyard wine as your guide takes you through the blending process. At the conclusion of your experience, take some time to shop your favourite varieties to take home before returning to the ship. Please note: This tour involves a moderate amount of walking, at times over uneven, sandy, gravel, and natural surfaces and inclines, with a few steps to negotiate. This tour is not suitable for guests with limited mobility and guests who utilise a wheelchair. Guests are advised to wear lightweight, comfortable clothing with flat walking shoes, and bring sun protection and a hat from the ship. Guests must be at least 18 years old to consume alcoholic beverages. The tour sequence and itinerary may vary. Space on this tour is extremely limited; we suggest you book well in advance to avoid disappointment. Please note: This tour involves a moderate amount of walking, at times over uneven, sandy, gravel, and natural surfaces and inclines, with a few steps to negotiate. This tour is not suitable for guests with limited mobility and guests who utilise a wheelchair. Guests are advised to wear lightweight, comfortable clothing with flat walking shoes, and bring sun protection and a hat from the ship. Guests must be at least 18 years old to consume alcoholic beverages. The tour sequence and itinerary may vary. Space on this tour is extremely limited; we suggest you book well in advance to avoid disappointment.
Historic Handorf & Adelaide Hills
ADL-DDiscover the Old World beauty and charm of southern Australia during this memorable, half-day excursion to historic Handorf. Mt. Lofty Lookout Depart the pier for a short orientation drive through Adelaide City before ascending the 2,300-foot-high (710-metre-high) Mt. Lofty. Upon arrival at the Mt. Lofty Lookout, take in superb panoramic vistas (weather permitting) over the city centre. After your photo stop here, re-board your coach and continue into the countryside, passing by the market gardens and orchards of the Adelaide Hills to Handorf. Handorf & Free Time Acclaimed as the best-known and most interesting town in this region, the German-style village of Handorf was settled by Prussian Lutheran emigrants in 1839; today, it graces numerous postcards due to its charm and history. Magnificent chestnut and elm trees line Handorf's main street, which features original buildings that have been carefully restored to their original glory. Upon arrival, free time is made available for you to browse and photograph the village's many charming craft shops, restaurants, and boutiques at your leisure. Countryside Drive Following your visit, re-board your coach and commence the approximately 75-minute drive through the countryside outside Adelaide before returning to the pier. Full participation may include a limited number of steps, uneven surfaces, and/or periods of standing. Historic Handorf & Adelaide Hills CODE: ADL-D DURATION 5 HOURS ACTIVITY LEVEL MODERATE Full participation may include a limited number of steps, uneven surfaces, and/or periods of standing. Discover the Old World beauty and charm of southern Australia during this memorable, half-day excursion to historic Handorf. Mt. Lofty Lookout Depart the pier for a short orientation drive through Adelaide City before ascending the 2,300-foot-high (710-metre-high) Mt. Lofty. Upon arrival at the Mt. Lofty Lookout, take in superb panoramic vistas (weather permitting) over the city centre. After your photo stop here, re-board your coach and continue into the countryside, passing by the market gardens and orchards of the Adelaide Hills to Handorf. Handorf & Free Time Acclaimed as the best-known and most interesting town in this region, the German-style village of Handorf was settled by Prussian Lutheran emigrants in 1839; today, it graces numerous postcards due to its charm and history. Magnificent chestnut and elm trees line Handorf's main street, which features original buildings that have been carefully restored to their original glory. Upon arrival, free time is made available for you to browse and photograph the village's many charming craft shops, restaurants, and boutiques at your leisure. Countryside Drive Following your visit, re-board your coach and commence the approximately 75-minute drive through the countryside outside Adelaide before returning to the pier. Please note: This tour involves a moderate amount of walking for approximately 0.5 miles (about 0.8 kilometres), at times over uneven gravel surfaces, with a few steps to negotiate to get on/off the coach. This tour is suitable for guests with limited mobility because walking in Handorf is at the discretion of each guest. Lightweight, comfortable clothing with flat, closed-toe walking shoes and sun protection are recommended. The driving distance between the pier and Handorf is approximately 1.5-hour in each direction. Please note: This tour involves a moderate amount of walking for approximately 0.5 miles (about 0.8 kilometres), at times over uneven gravel surfaces, with a few steps to negotiate to get on/off the coach. This tour is suitable for guests with limited mobility because walking in Handorf is at the discretion of each guest. Lightweight, comfortable clothing with flat, closed-toe walking shoes and sun protection are recommended. The driving distance between the pier and Handorf is approximately 1.5-hour in each direction.
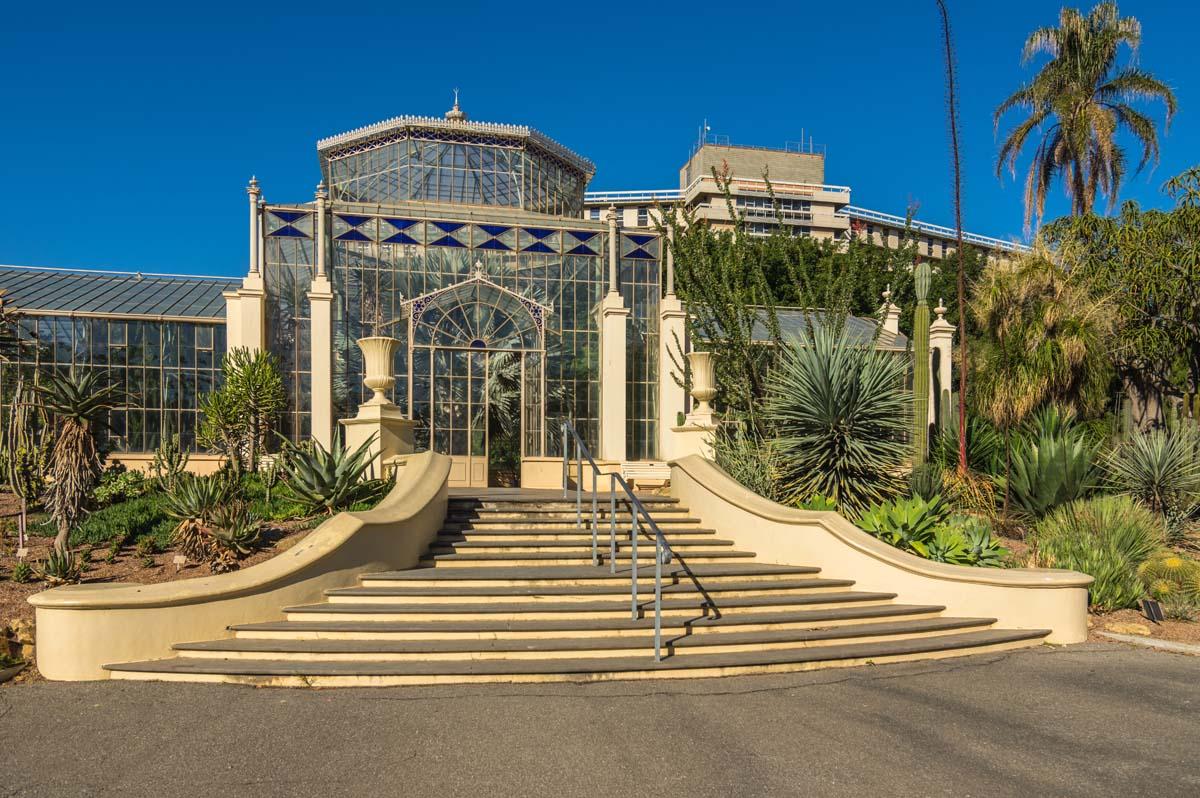
S.A.L.T. Foraging for Flavor in Adelaide’s Beautiful Botanic Garden with a Star of the South Australia Culinary Scene
ADL-RJoin Chef Tom Tilbury for an exciting day of garden foraging at the world top rated Adelaide Botanic Gardens, followed by a sit down lunch at the new, The Botanic Lodge, where guests will have four courses including the herb foraging items collect with premium paired local wines of Southern Australia. The collaborative foraging and incredible meal with wine pairing is an unforgettable S.A.L.T. Program culinary experience. Drive to Adelaide Botanical Gardens Board your coach and enjoy the short drive to the Adelaide Botanical Gardens. In the heart of the city but another world away, The Botanical Gardens showcases the beauty and diversity of plants from across Australia and around the world. Among the 50 hectares of magnificently maintained gardens and stunning architecture is the brand new Botanic Lodge opening in September of 2024. This beautiful restaurant will be the backdrop of the interactive day of foraging the gardens and upscale lunch. Foraging the Adelaide Botanical Gardens and Chef Prepared Lunch Hosted by Chef Tom Tilbury, you will assist him in garden foraging amongst the beautiful plants and herbs in the Botanic Garden. Here, Tom will explain how he forages for ingredients to create new and seasonal plates for the restaurant from its own backyard. Tom will also speak more to his approach to sustainable and ethical sourcing. During the time in the gardens, enjoy canape and Apéritif served along the way. Chef Tom will select a handful of botanicals which are palatable and can be tasted raw, and also highlight botanicals that he is using within the food and beverage menu, that are not palatable, but the guests will taste within the menu. Once gathered, everyone is invited inside The Botanic Lodge for a sit-down lunch that includes a thoughtful wine pairing from local South Australia wineries. Walk through Chihuly Exhibition After the lunch, guests have the extremely rare opportunity to walk the grounds and see the Chihuly Exhibition. In this curated outdoor exhibition, you will discover 15 large-scale glass sculptures by world-renowned artist, Dale Chihuly. Discover his signature playful forms and vibrant colours at different times of the day, for a unique experience during your visit. Chef Tom Tilbury Chef Tom Tilbury, a prominent figure in the Australian culinary scene, hails from the heart of McLaren Vale, a region synonymous with exceptional food and wine. From a young age, Tilbury was immersed in the local traditions of farming, fishing, and foraging, experiences that laid a rich foundation for his culinary journey. His passion for food was ignited at the age of eight after a memorable lunch at the Botanic Gardens Restaurant, setting him on the path to becoming a chef. Tilbury began his culinary apprenticeship in Adelaide and completed it at d'Arry's Verandah Restaurant under the mentorship of Peter Reschke and Nigel Rich. This formative period instilled in him a deep appreciation for seasonal, locally sourced produce and meticulous craftsmanship. In 2009, after completing his apprenticeship, he moved to Margaret River, where he honed his skills at Cullen Wines. Here, he cooked with produce from their biodynamic vegetable gardens, further refining his approach to sustainable and ethical sourcing. Full participation may include a limited number of steps, uneven surfaces, and/or periods of standing. A meal is included in the excursion. S.A.L.T. Foraging for Flavor in Adelaide’s Beautiful Botanic Garden with a Star of the South Australia Culinary Scene CODE: ADL-R DURATION 5 HOURS ACTIVITY LEVEL MODERATE Full participation may include a limited number of steps, uneven surfaces, and/or periods of standing. MEAL INCLUDED A meal is included in the excursion. Join Chef Tom Tilbury for an exciting day of garden foraging at the world top rated Adelaide Botanic Gardens, followed by a sit down lunch at the new, The Botanic Lodge, where guests will have four courses including the herb foraging items collect with premium paired local wines of Southern Australia. The collaborative foraging and incredible meal with wine pairing is an unforgettable S.A.L.T. Program culinary experience. Drive to Adelaide Botanical Gardens Board your coach and enjoy the short drive to the Adelaide Botanical Gardens. In the heart of the city but another world away, The Botanical Gardens showcases the beauty and diversity of plants from across Australia and around the world. Among the 50 hectares of magnificently maintained gardens and stunning architecture is the brand new Botanic Lodge opening in September of 2024. This beautiful restaurant will be the backdrop of the interactive day of foraging the gardens and upscale lunch. Foraging the Adelaide Botanical Gardens and Chef Prepared Lunch Hosted by Chef Tom Tilbury, you will assist him in garden foraging amongst the beautiful plants and herbs in the Botanic Garden. Here, Tom will explain how he forages for ingredients to create new and seasonal plates for the restaurant from its own backyard. Tom will also speak more to his approach to sustainable and ethical sourcing. During the time in the gardens, enjoy canape and Apéritif served along the way. Chef Tom will select a handful of botanicals which are palatable and can be tasted raw, and also highlight botanicals that he is using within the food and beverage menu, that are not palatable, but the guests will taste within the menu. Once gathered, everyone is invited inside The Botanic Lodge for a sit-down lunch that includes a thoughtful wine pairing from local South Australia wineries. Walk through Chihuly Exhibition After the lunch, guests have the extremely rare opportunity to walk the grounds and see the Chihuly Exhibition. In this curated outdoor exhibition, you will discover 15 large-scale glass sculptures by world-renowned artist, Dale Chihuly. Discover his signature playful forms and vibrant colours at different times of the day, for a unique experience during your visit. Chef Tom Tilbury Chef Tom Tilbury, a prominent figure in the Australian culinary scene, hails from the heart of McLaren Vale, a region synonymous with exceptional food and wine. From a young age, Tilbury was immersed in the local traditions of farming, fishing, and foraging, experiences that laid a rich foundation for his culinary journey. His passion for food was ignited at the age of eight after a memorable lunch at the Botanic Gardens Restaurant, setting him on the path to becoming a chef. Tilbury began his culinary apprenticeship in Adelaide and completed it at d'Arry's Verandah Restaurant under the mentorship of Peter Reschke and Nigel Rich. This formative period instilled in him a deep appreciation for seasonal, locally sourced produce and meticulous craftsmanship. In 2009, after completing his apprenticeship, he moved to Margaret River, where he honed his skills at Cullen Wines. Here, he cooked with produce from their biodynamic vegetable gardens, further refining his approach to sustainable and ethical sourcing. Please note: This tour involves a moderate amount of walking, at times over uneven and natural surfaces and inclines, with a few steps to negotiate to get on/off the coach. Walking at Adelaide Botanical Gardens is at the discretion of each guest. This tour is not suitable for guests prone to motion sickness, guests with limited mobility, and guests who utilise a wheelchair. Guests are advised to wear lightweight, comfortable clothing with flat, closed-toe walking shoes, and bring sun protection, a sweater or light jacket, bottled water, and Australian Dollars or credit cards for purchases from the ship. Guests must be at least 18 years old to participate on this tour; minors must be accompanied by a parent or guardian over 18 years old. Guests must be at least 18 years old to be served alcoholic beverages. Operation of this tour is subject to weather conditions. The tour sequence may vary. Space on this tour is extremely limited; we suggest you book well in advance to avoid disappointment. Please note: This tour involves a moderate amount of walking, at times over uneven and natural surfaces and inclines, with a few steps to negotiate to get on/off the coach. Walking at Adelaide Botanical Gardens is at the discretion of each guest. This tour is not suitable for guests prone to motion sickness, guests with limited mobility, and guests who utilise a wheelchair. Guests are advised to wear lightweight, comfortable clothing with flat, closed-toe walking shoes, and bring sun protection, a sweater or light jacket, bottled water, and Australian Dollars or credit cards for purchases from the ship. Guests must be at least 18 years old to participate on this tour; minors must be accompanied by a parent or guardian over 18 years old. Guests must be at least 18 years old to be served alcoholic beverages. Operation of this tour is subject to weather conditions. The tour sequence may vary. Space on this tour is extremely limited; we suggest you book well in advance to avoid disappointment.
Sailing Brindabella
ADL-PExperience Brindabella, Australia's most iconic Maxi Yacht under full sail whilst taking in the beautiful South Australia. Throughout the journey enjoy award winning South Australian drinks and a selection of delectable local seafood. An experience of all the senses! Sailing Brindabella, South Australian Coastline Meet the crew of the iconic Brindabella at the passenger terminal before heading to the Royal South Australian Yacht Squadron. Brindabella will hoist her sails and head into the gulf for a 3.5 hour sailing experience coupled with a menu of fresh South Australian seafood, wines, beers & more. This is a unique blue water sailing experience unlike anything offered anywhere else in the country, on this scale. Brindabella still sails her full sail inventory including a 450sm spinnaker, a sight to behold. At 80 feet long with a mast reaching ten stories into the sky, experience over 600 square meters of sail area as she gracefully propels her 22 tons of hull through the water. Whether you have never sailed before or are an experienced sailor you will have an extraordinary sensory experience. Guests will have the opportunity to take the helm of this historical vessel too. The professionally trained crew will look after your needs every step of the way. Upon completion crew will escort guests back to the Passenger terminal. Full participation requires being in good physical condition and may involve inclines, steps, uneven surfaces, and/or extended periods of standing. Sailing Brindabella CODE: ADL-P DURATION 4 HOURS ACTIVITY LEVEL EXTENSIVE Full participation requires being in good physical condition and may involve inclines, steps, uneven surfaces, and/or extended periods of standing. Experience Brindabella, Australia's most iconic Maxi Yacht under full sail whilst taking in the beautiful South Australia. Throughout the journey enjoy award winning South Australian drinks and a selection of delectable local seafood. An experience of all the senses! Sailing Brindabella, South Australian Coastline Meet the crew of the iconic Brindabella at the passenger terminal before heading to the Royal South Australian Yacht Squadron. Brindabella will hoist her sails and head into the gulf for a 3.5 hour sailing experience coupled with a menu of fresh South Australian seafood, wines, beers & more. This is a unique blue water sailing experience unlike anything offered anywhere else in the country, on this scale. Brindabella still sails her full sail inventory including a 450sm spinnaker, a sight to behold. At 80 feet long with a mast reaching ten stories into the sky, experience over 600 square meters of sail area as she gracefully propels her 22 tons of hull through the water. Whether you have never sailed before or are an experienced sailor you will have an extraordinary sensory experience. Guests will have the opportunity to take the helm of this historical vessel too. The professionally trained crew will look after your needs every step of the way. Upon completion crew will escort guests back to the Passenger terminal. Guests must be at least 18 years old to be served alcoholic beverages. Operation of this tour is subject to weather conditions. Guests must be able to enter in and out of the ship. Please note that some areas may have strobe or rapid movement lights. Flat soled shoes, dressed for weather, suggest windproof jacket and something warm. Guests must be at least 18 years old to be served alcoholic beverages. Operation of this tour is subject to weather conditions. Guests must be able to enter in and out of the ship. Please note that some areas may have strobe or rapid movement lights. Flat soled shoes, dressed for weather, suggest windproof jacket and something warm.
Bluff, New Zealand
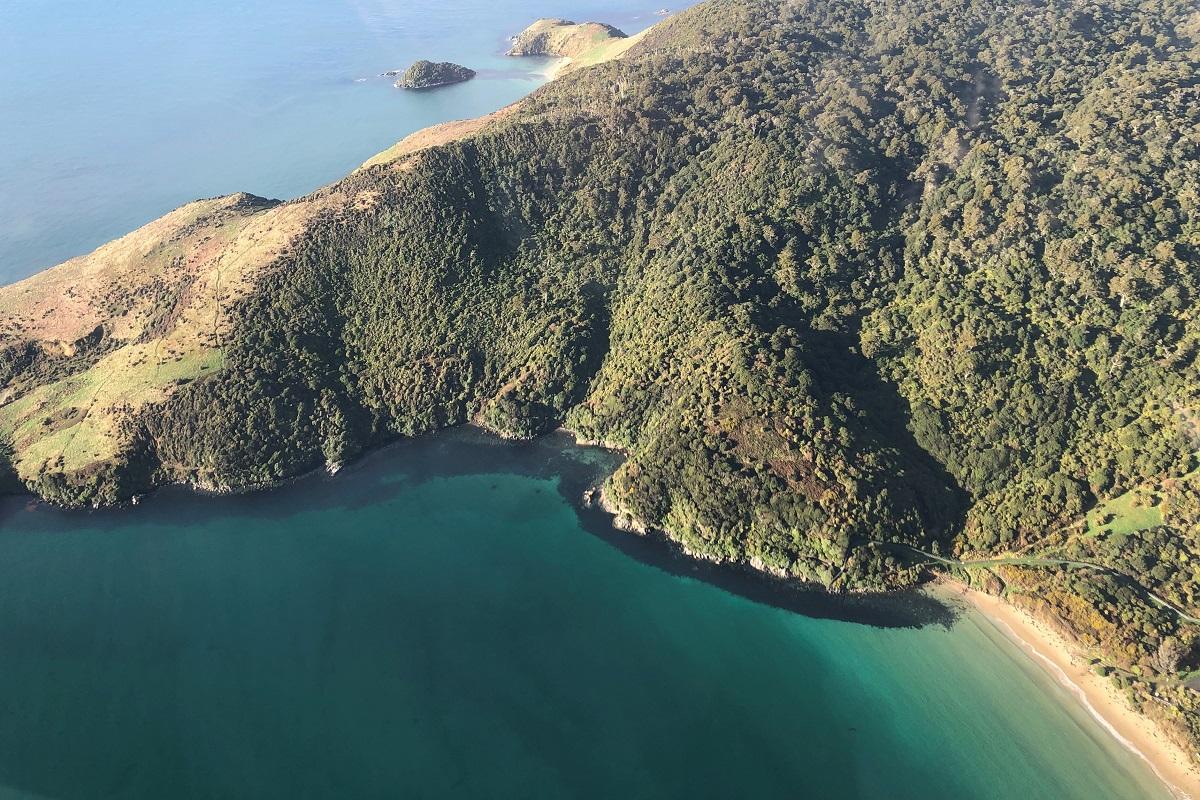
A Taste of Stewart Island
BLU-JIf you have a sense of adventure, love nature, wildlife and tranquillity, then you will get to experience all on this unique trip to New Zealand's 3rd largest Island, Stewart Island. Flight to Steward Island Unspoilt, relaxing and incredibly beautiful, Stewart Island is a showcase for untouched New Zealand. In just a 20-minute flight from Invercargill, you will find one of New Zealand's largely undiscovered eco-tourism destinations. With its network of stunning bays, inlets, golden sand beaches and densely forested hills, Stewart Island combines a spectacular mix of breath-taking landscapes and abundant wildlife. All visitors to are guaranteed a special experience - a glimpse into a simpler, slower lifestyle, in rhythm with the sea and the tides, attuned to the natural world of bush and beach. Ferry Ride to Ulva Island & Wildlife Spotting Take a short ferry ride to Ulva Island, a pristine forested island which covers an area of 269 hectares within Paterson Inlet. It is one of the few predator-free sanctuaries in New Zealand. Experience the abundant birdlife, lovely beaches and views on your guided walk through this piece of paradise. The well-maintained tracks offer easy to moderate walking for most people to enjoy. South Sea Hotel & Lunch Return to Stewart Island to feast on a delicious lunch at South Sea Hotel, an iconic hotel on the central Oban waterfront where you will be treated to a selection of food before departing on a tour to see the highlights of the island. Narrated Panoramic Drive & Photo Stops Gain an entertaining insight into New Zealand's southernmost community, and learn about the history and environment of Stewart Island. Our local guides enjoy sharing their knowledge of the area on this mini-bus tour of the Island. You will have plenty of time to get off the bus for photo stops and short walks. Flight back to the mainland At the conclusion of your visit, board your flight back to the mainland and head back to the ship after a full day of experiences that will be a highlight of any cruise through New Zealand. Full participation may include a limited number of steps, uneven surfaces, and/or periods of standing. A meal is included in the excursion. A Taste of Stewart Island CODE: BLU-J DURATION 7.5 HOURS ACTIVITY LEVEL MODERATE Full participation may include a limited number of steps, uneven surfaces, and/or periods of standing. MEAL INCLUDED A meal is included in the excursion. If you have a sense of adventure, love nature, wildlife and tranquillity, then you will get to experience all on this unique trip to New Zealand's 3rd largest Island, Stewart Island. Flight to Steward Island Unspoilt, relaxing and incredibly beautiful, Stewart Island is a showcase for untouched New Zealand. In just a 20-minute flight from Invercargill, you will find one of New Zealand's largely undiscovered eco-tourism destinations. With its network of stunning bays, inlets, golden sand beaches and densely forested hills, Stewart Island combines a spectacular mix of breath-taking landscapes and abundant wildlife. All visitors to are guaranteed a special experience - a glimpse into a simpler, slower lifestyle, in rhythm with the sea and the tides, attuned to the natural world of bush and beach. Ferry Ride to Ulva Island & Wildlife Spotting Take a short ferry ride to Ulva Island, a pristine forested island which covers an area of 269 hectares within Paterson Inlet. It is one of the few predator-free sanctuaries in New Zealand. Experience the abundant birdlife, lovely beaches and views on your guided walk through this piece of paradise. The well-maintained tracks offer easy to moderate walking for most people to enjoy. South Sea Hotel & Lunch Return to Stewart Island to feast on a delicious lunch at South Sea Hotel, an iconic hotel on the central Oban waterfront where you will be treated to a selection of food before departing on a tour to see the highlights of the island. Narrated Panoramic Drive & Photo Stops Gain an entertaining insight into New Zealand's southernmost community, and learn about the history and environment of Stewart Island. Our local guides enjoy sharing their knowledge of the area on this mini-bus tour of the Island. You will have plenty of time to get off the bus for photo stops and short walks. Flight back to the mainland At the conclusion of your visit, board your flight back to the mainland and head back to the ship after a full day of experiences that will be a highlight of any cruise through New Zealand. Please note: This tour requires an extensive amount of walking for approximately 2.5 kilometres and is not suitable for guests who utilise a wheelchair or those with limited mobility. Guests must be able to climb into fixed wing aircraft and manage approx. 60 minutes of walking on Ulva Island. The trails are well maintained and are only moderately undulating. We recommend bringing a warm, waterproof jacket and wearing sturdy, comfortable, closed-toe walking shoes. Due to weight and balance limitations, as well as guest safety and comfort, the maximum weight per passenger must not exceed 120 kilograms (265 pounds). Wildlife sighting cannot be guaranteed. Flight is subject to weather conditions and may be cancelled or altered at pilot's discretion. Space on this tour is extremely limited; we suggest you book well in advance to avoid disappointment. The coach supply in Bluff is very limited, coaches used are the best-available in the area, but may not be up to the standards of larger New Zealand ports. Please note: This tour requires an extensive amount of walking for approximately 2.5 kilometres and is not suitable for guests who utilise a wheelchair or those with limited mobility. Guests must be able to climb into fixed wing aircraft and manage approx. 60 minutes of walking on Ulva Island. The trails are well maintained and are only moderately undulating. We recommend bringing a warm, waterproof jacket and wearing sturdy, comfortable, closed-toe walking shoes. Due to weight and balance limitations, as well as guest safety and comfort, the maximum weight per passenger must not exceed 120 kilograms (265 pounds). Wildlife sighting cannot be guaranteed. Flight is subject to weather conditions and may be cancelled or altered at pilot's discretion. Space on this tour is extremely limited; we suggest you book well in advance to avoid disappointment. The coach supply in Bluff is very limited, coaches used are the best-available in the area, but may not be up to the standards of larger New Zealand ports.
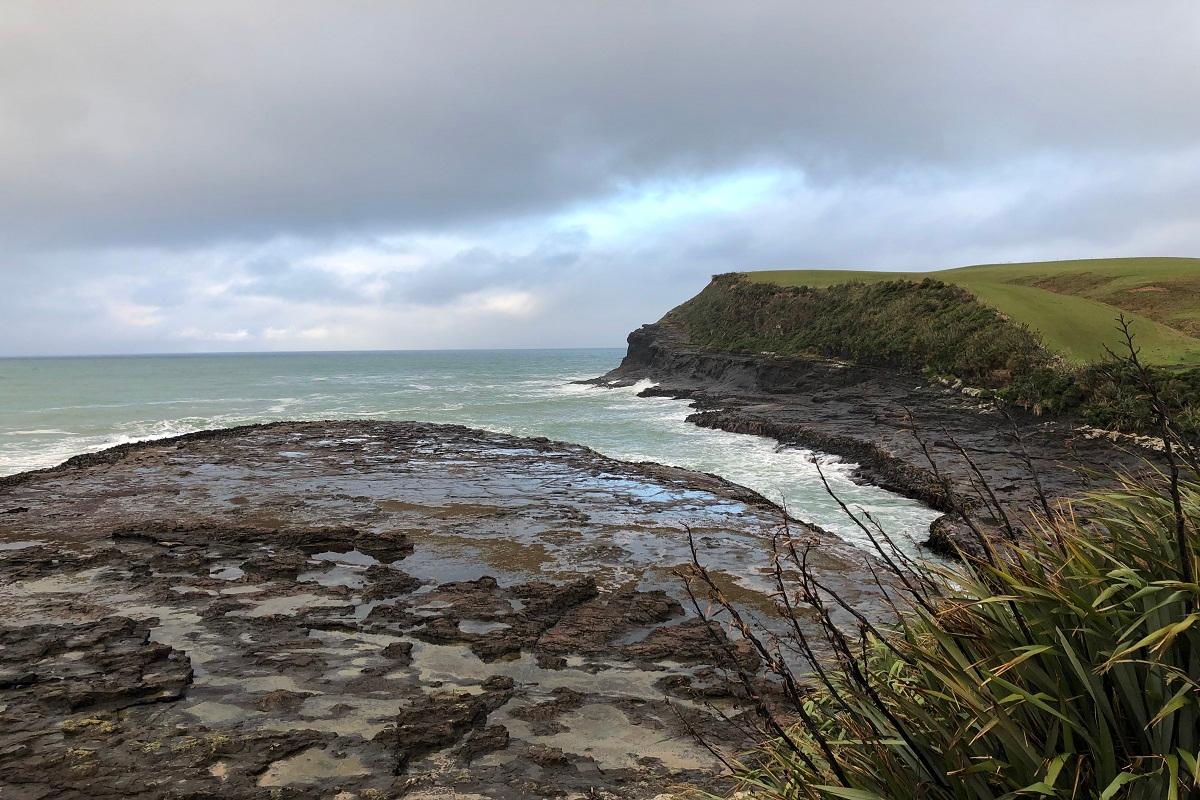
Catlins & Lake Edge Farm
BLU-CExplore one of the most beautiful parts of New Zealand and the farming lifestyle during this panoramic, full-day sightseeing excursion. Catlins Coast Depart the pier for the scenic, approximately 1.5-hour drive to the stunning Catlins Coast, an absolute jewel for the discerning traveller and one of the most beautiful parts of New Zealand. In the early days, the Waitaha and Ngati Mamoe lived and gathered along the Catlins Coast. The Nga Tahu, with leaders like Tuhawaiki and Taiaroa, claimed the land by strength. The early whalers and sealers plied their trade along the Catlins, trading with the Maori and becoming part of the land. European settlements followed, and the natural harbours amongst the rugged coast and cliffs sheltered the new occupants. Curio Bay, Beach Stroll Upon reaching the Catlins Coast, a brief stop is made at Curio Bay for a delightful stroll on the beach. Here, you may spot some local wildlife, including Hector's dolphins, yellow-eyed penguins, fur seals and/or sea lions. The area also contains the fossilized remains of an ancient forest, and has an interesting history. Following your visit, re-board your coach and head for the Skylark Farm. Lake Edge Farm, Rolling Hills, Tall Cliffs and Bluffs, Sea and Lake Views, Lunch, Mataura With its rugged, rolling hills, precipitous cliffs and bluffs, stunning sea, and exquisite lake views, Lake Edge is an area of outstanding beauty and tells the story of 200 years of settlement. It is a land of extremes, but the beauty remains the same. Upon arrival, enjoy an authentic rural experience with a local family that live and work there. Learn about the stories of farming in this area with your hosts and take a guided tour of the farm, then proceed for a lunch consisting of seasonal foods. After lunch, re-board your coach and commence the 2.25-hour drive back to the pier, with a comfort stop at Mataura en route. Full participation may include a limited number of steps, uneven surfaces, and/or periods of standing. A meal is included in the excursion. Catlins & Lake Edge Farm CODE: BLU-C DURATION 7.5 HOURS ACTIVITY LEVEL MODERATE Full participation may include a limited number of steps, uneven surfaces, and/or periods of standing. MEAL INCLUDED A meal is included in the excursion. Explore one of the most beautiful parts of New Zealand and the farming lifestyle during this panoramic, full-day sightseeing excursion. Catlins Coast Depart the pier for the scenic, approximately 1.5-hour drive to the stunning Catlins Coast, an absolute jewel for the discerning traveller and one of the most beautiful parts of New Zealand. In the early days, the Waitaha and Ngati Mamoe lived and gathered along the Catlins Coast. The Nga Tahu, with leaders like Tuhawaiki and Taiaroa, claimed the land by strength. The early whalers and sealers plied their trade along the Catlins, trading with the Maori and becoming part of the land. European settlements followed, and the natural harbours amongst the rugged coast and cliffs sheltered the new occupants. Curio Bay, Beach Stroll Upon reaching the Catlins Coast, a brief stop is made at Curio Bay for a delightful stroll on the beach. Here, you may spot some local wildlife, including Hector's dolphins, yellow-eyed penguins, fur seals and/or sea lions. The area also contains the fossilized remains of an ancient forest, and has an interesting history. Following your visit, re-board your coach and head for the Skylark Farm. Lake Edge Farm, Rolling Hills, Tall Cliffs and Bluffs, Sea and Lake Views, Lunch, Mataura With its rugged, rolling hills, precipitous cliffs and bluffs, stunning sea, and exquisite lake views, Lake Edge is an area of outstanding beauty and tells the story of 200 years of settlement. It is a land of extremes, but the beauty remains the same. Upon arrival, enjoy an authentic rural experience with a local family that live and work there. Learn about the stories of farming in this area with your hosts and take a guided tour of the farm, then proceed for a lunch consisting of seasonal foods. After lunch, re-board your coach and commence the 2.25-hour drive back to the pier, with a comfort stop at Mataura en route. Please note: This tour involves a moderate amount of walking, at times over uneven, natural, and sandy surfaces and inclines, with three-five steps to negotiate to get on/off the coach and four steps to access the restroom area. Walking at the Lake Edge Farm is at the discretion of each guest. This tour is not suitable for guests prone to motion sickness, guests with limited mobility and guests who utilise a wheelchair. Guests are advised to wear warm, comfortable clothing in layers with flat, closed-toe walking shoes, and bring sun protection and a weatherproof jacket from the ship. The driving distance from the pier to Lake Edge Farm is approximately two hours in each direction. Although frequently encountered on this type of tour, wildlife sightings are not guaranteed. The tour sequence may vary. Space on this tour is extremely limited; we suggest you book well in advance to avoid disappointment. The coach supply in Bluff is very limited, coaches used are the best-available in the area, but may not be up to the standards of larger New Zealand ports. Please note: This tour involves a moderate amount of walking, at times over uneven, natural, and sandy surfaces and inclines, with three-five steps to negotiate to get on/off the coach and four steps to access the restroom area. Walking at the Lake Edge Farm is at the discretion of each guest. This tour is not suitable for guests prone to motion sickness, guests with limited mobility and guests who utilise a wheelchair. Guests are advised to wear warm, comfortable clothing in layers with flat, closed-toe walking shoes, and bring sun protection and a weatherproof jacket from the ship. The driving distance from the pier to Lake Edge Farm is approximately two hours in each direction. Although frequently encountered on this type of tour, wildlife sightings are not guaranteed. The tour sequence may vary. Space on this tour is extremely limited; we suggest you book well in advance to avoid disappointment. The coach supply in Bluff is very limited, coaches used are the best-available in the area, but may not be up to the standards of larger New Zealand ports.
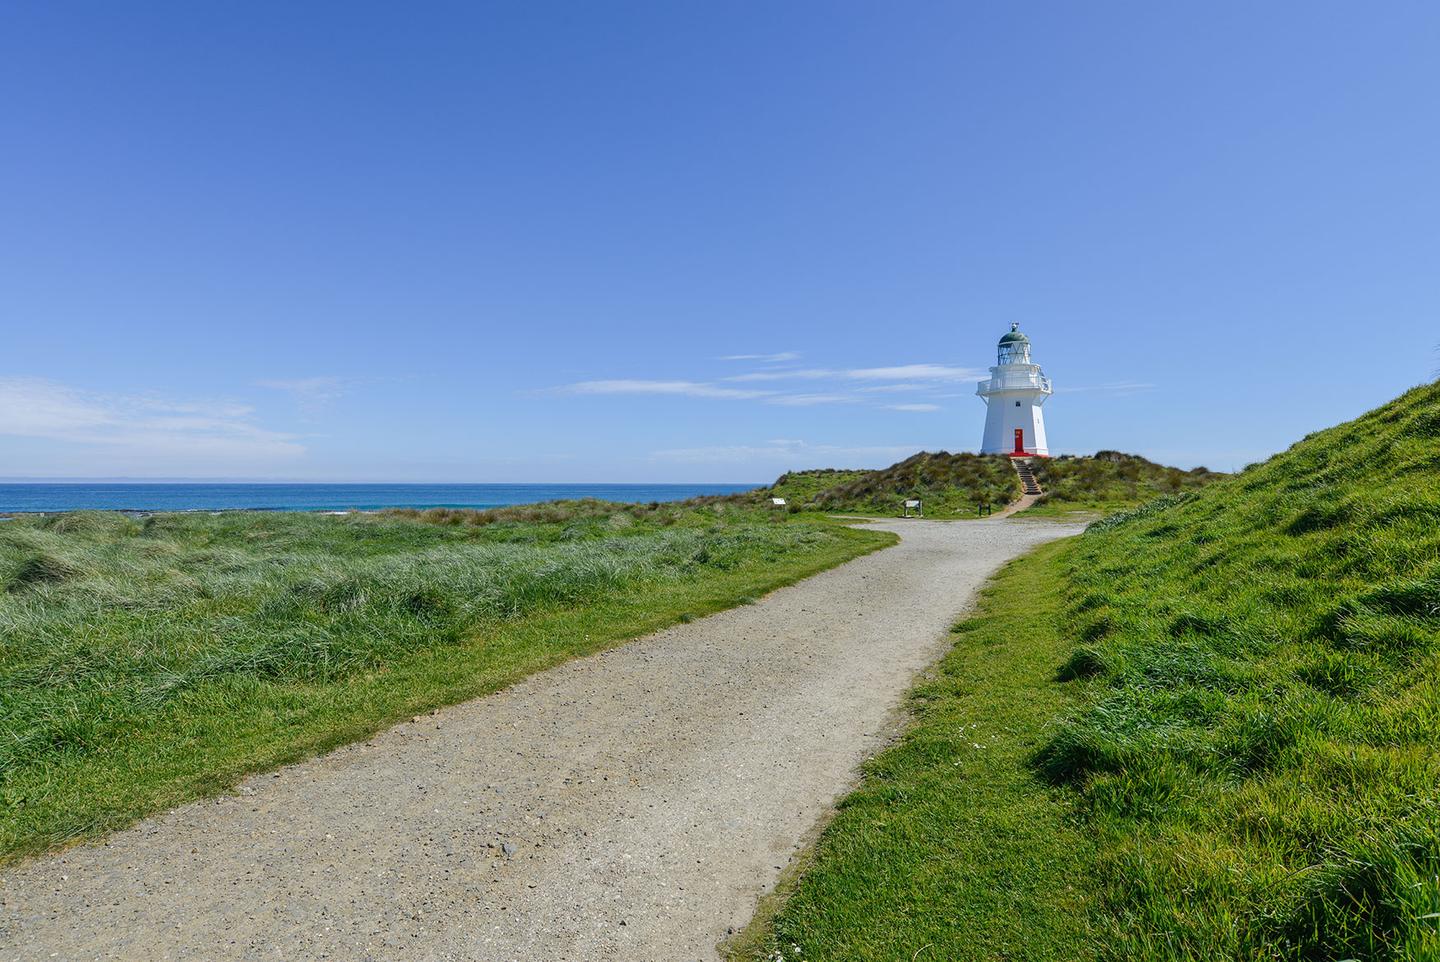
Catlins Coast Discovery
BLU-IDiscover the highlights and enjoy the stunning scenery of the Catlins region of New Zealand. Fortrose, Waipapa Point, Tararua Shipwreck Depart the pier and journey for approxmately 1.45 hour drive to Fortrose (an old whaling station) for a brief stop and a possibility to see the shipwreck (depending on the tide). Next, travel to Waipapa Point and stroll down to the beach to see an old lighthouse and New Zealand's worst civilian shipwreck, "Tararua". Here you may also spot some New Zealand seals. Continue to Slope Point for an opportunity to take a short walk to the iconic signpost at the southernmost point of the South Island or simply take in the spectacular views of windswept trees and Southern Ocean waves crashing onto the rocks. Curio Bay & Petrified Forest Afterwards, continue to Curio Bay, a bay of international significance for its Petrified Forest dating back to the Jurassic period. The tree fossils you see here, similar to Kauri and Matai, are approximately 170 million years old. The forest was alive when New Zealand was part of Gondwanaland. Living Forest Walkway, Lunch, Tumu Toka Curioscape Curio Bay's Petrified Forest is best viewed at low tide from the viewing platform. You may choose to walk through the Living Forest walkway to witness how the Petrified Forest may have looked millions of years ago. This is a special occurrence in the world to witness a fossil forest so close to its living counterpart. After lunch, visit Tumu Toka Curioscape, a world-class interpretive center intended to educate and share the special stories of Curio Bay. At the conclusion of your visit, re-board your coach for the 1.45 hour drive back to the pier. Full participation may include a limited number of steps, uneven surfaces, and/or periods of standing. A meal is included in the excursion. Catlins Coast Discovery CODE: BLU-I DURATION 7.5 HOURS ACTIVITY LEVEL MODERATE Full participation may include a limited number of steps, uneven surfaces, and/or periods of standing. MEAL INCLUDED A meal is included in the excursion. Discover the highlights and enjoy the stunning scenery of the Catlins region of New Zealand. Fortrose, Waipapa Point, Tararua Shipwreck Depart the pier and journey for approxmately 1.45 hour drive to Fortrose (an old whaling station) for a brief stop and a possibility to see the shipwreck (depending on the tide). Next, travel to Waipapa Point and stroll down to the beach to see an old lighthouse and New Zealand's worst civilian shipwreck, "Tararua". Here you may also spot some New Zealand seals. Continue to Slope Point for an opportunity to take a short walk to the iconic signpost at the southernmost point of the South Island or simply take in the spectacular views of windswept trees and Southern Ocean waves crashing onto the rocks. Curio Bay & Petrified Forest Afterwards, continue to Curio Bay, a bay of international significance for its Petrified Forest dating back to the Jurassic period. The tree fossils you see here, similar to Kauri and Matai, are approximately 170 million years old. The forest was alive when New Zealand was part of Gondwanaland. Living Forest Walkway, Lunch, Tumu Toka Curioscape Curio Bay's Petrified Forest is best viewed at low tide from the viewing platform. You may choose to walk through the Living Forest walkway to witness how the Petrified Forest may have looked millions of years ago. This is a special occurrence in the world to witness a fossil forest so close to its living counterpart. After lunch, visit Tumu Toka Curioscape, a world-class interpretive center intended to educate and share the special stories of Curio Bay. At the conclusion of your visit, re-board your coach for the 1.45 hour drive back to the pier. Please note: This tour involves a moderate amount of walking for approximately 4 kilometres, at times over uneven, natural, and sandy surfaces and inclines, with some steps to negotiate at the sites visited. This tour is not suitable guests with limited mobility and guests who utilise a wheelchair. Guests are advised to wear warm, comfortable clothing in layers with flat, closed-toe walking shoes, and bring sun protection and a weatherproof jacket from the ship. Although frequently encountered on this type of tour, wildlife sightings are not guaranteed. The tour sequence may vary. The coach supply in Bluff is very limited, coaches used are the best-available in the area, but may not be up to the standards of larger New Zealand ports. Please note: This tour involves a moderate amount of walking for approximately 4 kilometres, at times over uneven, natural, and sandy surfaces and inclines, with some steps to negotiate at the sites visited. This tour is not suitable guests with limited mobility and guests who utilise a wheelchair. Guests are advised to wear warm, comfortable clothing in layers with flat, closed-toe walking shoes, and bring sun protection and a weatherproof jacket from the ship. Although frequently encountered on this type of tour, wildlife sightings are not guaranteed. The tour sequence may vary. The coach supply in Bluff is very limited, coaches used are the best-available in the area, but may not be up to the standards of larger New Zealand ports.
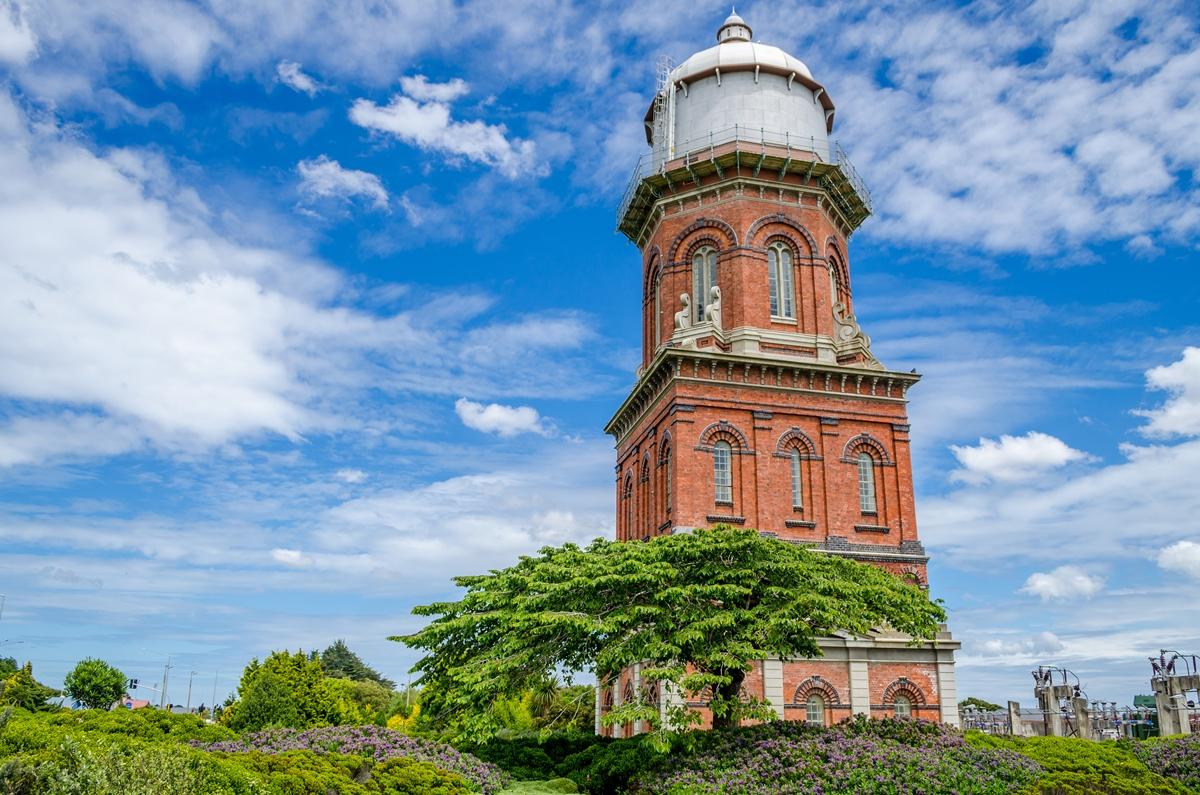
Southland Panorama
BLU-DExplore the local region on this easy panoramic experience. Bluff, Bluff Hill (Motupohue) Depart the pier and travel through Bluff - Pearl of the South - home of the world famous Bluff Oyster, and the oldest continuously occupied European settlement in New Zealand. Visit Stirling Point, with its famous signpost and walking tracks, is the beginning of State Highway 1 which traverses the length of the country to Cape Reinga in the far north - the journey really does begin here in Bluff. Enjoy the panoramic views over Bluff port and town from the viewing platform on top of Bluff Hill (Motupohue). Invercargill Invercargill is the regional capital and commercial hub of Southland. Founded in the 1850's, it is New Zealand's southernmost city - and one of the southernmost cities in the world. Fondly dubbed the "City of Water and Light", referring to the long summer daylight hours, frequent appearances of the Aurora Australis (Southern Lights), and the city's position beside the Waihopai River estuary, Invercargill has plenty of character and a friendly, laid-back atmosphere. Queens Park The pride of Invercargill is Queens Park, a magnificent public park in the heart of the city. The park sprawls across 80 hectares of beautifully kept gardens, wildlife habitats, and sports areas. Highlights of this New Zealand Garden of National Significance include a stunning rose garden, a rhododendron dell, an azalea garden, a Japanese garden, bush paths through a selection of native plants, rock and herb gardens, and a stumpery. An indoor Winter Garden features tropical and flowering plants, and a range of cacti are displayed in an adjoining structure. The park also houses an impressive bird aviary, farmyard area, and animal enclosures. Excursions are at an easy pace without the need for excessive walking or physical activities. Being able to board buses and negotiate steps that may be encountered Southland Panorama CODE: BLU-D DURATION 3 HOURS ACTIVITY LEVEL MINIMAL Excursions are at an easy pace without the need for excessive walking or physical activities. Being able to board buses and negotiate steps that may be encountered Explore the local region on this easy panoramic experience. Bluff, Bluff Hill (Motupohue) Depart the pier and travel through Bluff - Pearl of the South - home of the world famous Bluff Oyster, and the oldest continuously occupied European settlement in New Zealand. Visit Stirling Point, with its famous signpost and walking tracks, is the beginning of State Highway 1 which traverses the length of the country to Cape Reinga in the far north - the journey really does begin here in Bluff. Enjoy the panoramic views over Bluff port and town from the viewing platform on top of Bluff Hill (Motupohue). Invercargill Invercargill is the regional capital and commercial hub of Southland. Founded in the 1850's, it is New Zealand's southernmost city - and one of the southernmost cities in the world. Fondly dubbed the "City of Water and Light", referring to the long summer daylight hours, frequent appearances of the Aurora Australis (Southern Lights), and the city's position beside the Waihopai River estuary, Invercargill has plenty of character and a friendly, laid-back atmosphere. Queens Park The pride of Invercargill is Queens Park, a magnificent public park in the heart of the city. The park sprawls across 80 hectares of beautifully kept gardens, wildlife habitats, and sports areas. Highlights of this New Zealand Garden of National Significance include a stunning rose garden, a rhododendron dell, an azalea garden, a Japanese garden, bush paths through a selection of native plants, rock and herb gardens, and a stumpery. An indoor Winter Garden features tropical and flowering plants, and a range of cacti are displayed in an adjoining structure. The park also houses an impressive bird aviary, farmyard area, and animal enclosures. Please note: This tour involves a minimal amount of walking and is suitable for guests with limited mobility and those guests who utilize a wheelchair. Guests however must be able to embark and disembark 3-5 steps onto the coach without assistance. Guests are advised to wear warm, comfortable clothing in layers with flat, closed-toe walking shoes, and bring sun protection and a weatherproof jacket and local currency for purchases from the ship. The tour sequence may vary. The coach supply in Bluff is very limited, coaches used are the best-available in the area, but may not be up to the standards of larger New Zealand ports. Please note: This tour involves a minimal amount of walking and is suitable for guests with limited mobility and those guests who utilize a wheelchair. Guests however must be able to embark and disembark 3-5 steps onto the coach without assistance. Guests are advised to wear warm, comfortable clothing in layers with flat, closed-toe walking shoes, and bring sun protection and a weatherproof jacket and local currency for purchases from the ship. The tour sequence may vary. The coach supply in Bluff is very limited, coaches used are the best-available in the area, but may not be up to the standards of larger New Zealand ports.
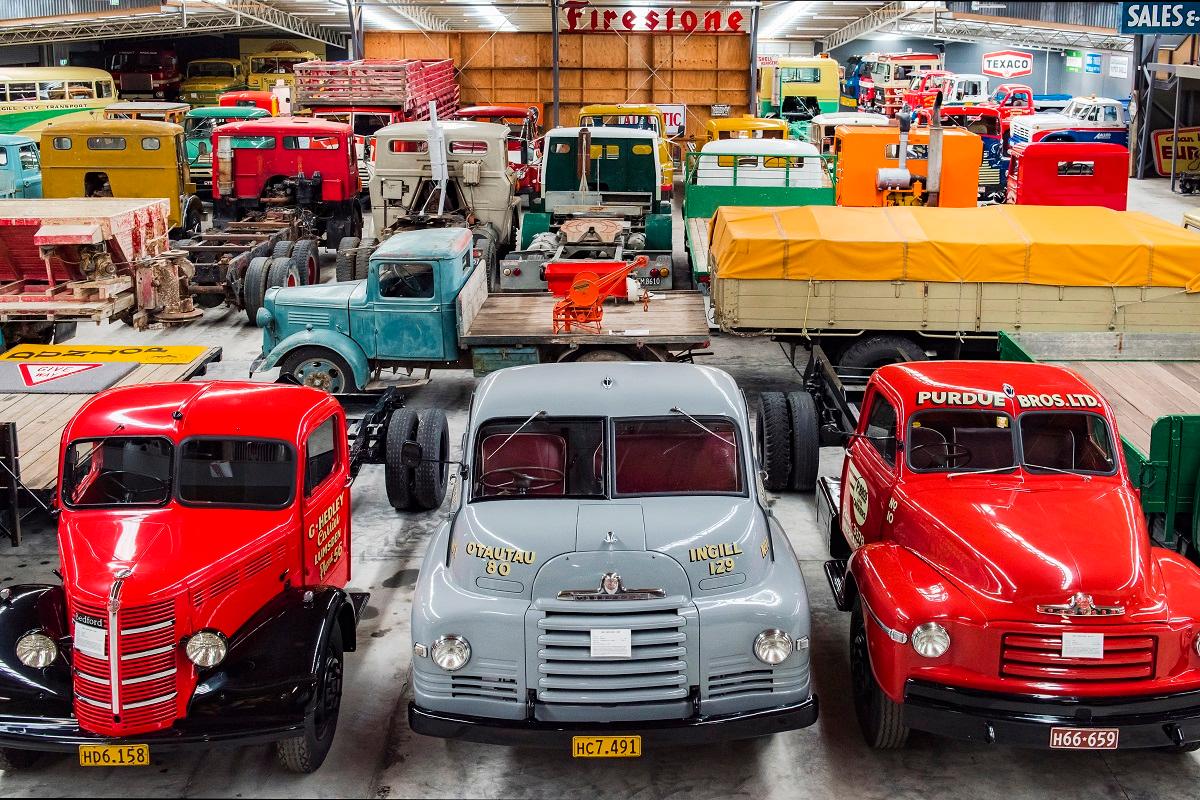
Transport World & Motorcycle Mecca
BLU-BIf you are looking for a unique experience, then a visit to Bill Richardson's Transport World and Motorcycle Mecca could be just for you. Experience a family legacy that has become the largest private automotive museum of its type in the world. Stunningly crafted within a world-class facility, Bill Richardson Transport World has something for everyone. Hugely popular, discover more than 300 vehicles including trucks, rare classic vehicles, racing cars, tractors, farm machinery, motoring memorabilia and over 200 vintage petrol pumps, and learn about how it all began on your informative guided tour. Outside of the extraordinary vehicle range, you will also find a growing wearable arts collection, movie theatre, children's play zones and the quirky themed bathrooms are fast becoming as famous as the vehicles. Visit Classic Motorcycle Mecca for a guided tour through the Southern Hemisphere's leading motorcycle museum, regularly described as 'stunning' and 'mind-blowing' in scale. Offering New Zealand's most diverse collection, find displays of classic British, European and American bikes as well as Japanese, Motocross and Speedway, including solo, sidecar and even three wheeled automobiles and machinery dating from 1902 onwards. A tribute to legend Burt Munro and an internationally significant hero bike display of Britten and Brough Superior is also on offer. Enjoy an intimate, up-close experience of the bikes and packed with quirky details, quality exhibits and interactive displays, Classic Motorcycle Mecca is a truly mind-blowing experience. The tour concludes back at the pier. Full participation may include a limited number of steps, uneven surfaces, and/or periods of standing. Transport World & Motorcycle Mecca CODE: BLU-B DURATION 4 HOURS ACTIVITY LEVEL MODERATE Full participation may include a limited number of steps, uneven surfaces, and/or periods of standing. If you are looking for a unique experience, then a visit to Bill Richardson's Transport World and Motorcycle Mecca could be just for you. Experience a family legacy that has become the largest private automotive museum of its type in the world. Stunningly crafted within a world-class facility, Bill Richardson Transport World has something for everyone. Hugely popular, discover more than 300 vehicles including trucks, rare classic vehicles, racing cars, tractors, farm machinery, motoring memorabilia and over 200 vintage petrol pumps, and learn about how it all began on your informative guided tour. Outside of the extraordinary vehicle range, you will also find a growing wearable arts collection, movie theatre, children's play zones and the quirky themed bathrooms are fast becoming as famous as the vehicles. Visit Classic Motorcycle Mecca for a guided tour through the Southern Hemisphere's leading motorcycle museum, regularly described as 'stunning' and 'mind-blowing' in scale. Offering New Zealand's most diverse collection, find displays of classic British, European and American bikes as well as Japanese, Motocross and Speedway, including solo, sidecar and even three wheeled automobiles and machinery dating from 1902 onwards. A tribute to legend Burt Munro and an internationally significant hero bike display of Britten and Brough Superior is also on offer. Enjoy an intimate, up-close experience of the bikes and packed with quirky details, quality exhibits and interactive displays, Classic Motorcycle Mecca is a truly mind-blowing experience. The tour concludes back at the pier. Please note: This tour involves a moderate amount of walking for approximately 1 kilometre; involving many stairs at both venues and although distance covered is not great and surfaces are flat, guests will be on their feet for a prolonged period. This tour is not suitable for guests with limited mobility and is not wheelchair-accessible. Guests are advised to wear comfortable footwear. The tour sequence may vary. The coach supply in Bluff is very limited, coaches used are the best-available in the area, but may not be up to the standards of larger New Zealand ports. Please note: This tour involves a moderate amount of walking for approximately 1 kilometre; involving many stairs at both venues and although distance covered is not great and surfaces are flat, guests will be on their feet for a prolonged period. This tour is not suitable for guests with limited mobility and is not wheelchair-accessible. Guests are advised to wear comfortable footwear. The tour sequence may vary. The coach supply in Bluff is very limited, coaches used are the best-available in the area, but may not be up to the standards of larger New Zealand ports.

Waikaka Valley Farm Experience
BLU-AImmerse yourself in the extraordinary legacy and daily life at Rosedale Farm during this interactive, full-day farming and culinary excursion. Waikaka Valley, Rosedale Farm Depart the pier for the scenic, approximately 75-minute drive to the Waikaka Valley for a visit to Rosedale Farm, one of the most iconic properties in New Zealand. Upon arrival, meet the growers and producers from Rosedale; worldly hosts who have lived, worked and cared for this land for generations, and are so much more than breeders of top-performing sheep. With governance roles in both their local community and abroad, as well as existing agri-tourism ventures, this community-centric family brings 200 years of stories; stories of whanau (family) and clanship, meeting-and-growing over time, and moving from, and coming back to, the whenua (land). Lush, Rolling Hills, Flowing Private River From its lush, rolling hills to its flowing private river, this property ties together two cultures and almost two centuries of history. From this property sprang a village and community, still supported to this day by both the commercial operations and involvement of the property owners. This is a land with many stories. It is deeply local; a land where you stop and breathe. This is the heartland of the Southland. Farm Tour, Lunch, Interactive Sheep-Shearing Demonstrations Upon arrival, meet your growers and enjoy a hot beverage. Next, depart for a guided orientation tour of the farm and see a working animal display, then proceed for a farm-to-table-style lunch featuring lamb, artisan breads and home-made baked goods. After lunch, take in interactive, dog-and-sheep and sheep-shearing demonstrations. At the conclusion of your visit, re-board your coach and commence the approximately 75-minute drive back to the pier. Excursions are at an easy pace without the need for excessive walking or physical activities. Being able to board buses and negotiate steps that may be encountered A meal is included in the excursion. Waikaka Valley Farm Experience CODE: BLU-A DURATION 7 HOURS ACTIVITY LEVEL MINIMAL Excursions are at an easy pace without the need for excessive walking or physical activities. Being able to board buses and negotiate steps that may be encountered MEAL INCLUDED A meal is included in the excursion. Immerse yourself in the extraordinary legacy and daily life at Rosedale Farm during this interactive, full-day farming and culinary excursion. Waikaka Valley, Rosedale Farm Depart the pier for the scenic, approximately 75-minute drive to the Waikaka Valley for a visit to Rosedale Farm, one of the most iconic properties in New Zealand. Upon arrival, meet the growers and producers from Rosedale; worldly hosts who have lived, worked and cared for this land for generations, and are so much more than breeders of top-performing sheep. With governance roles in both their local community and abroad, as well as existing agri-tourism ventures, this community-centric family brings 200 years of stories; stories of whanau (family) and clanship, meeting-and-growing over time, and moving from, and coming back to, the whenua (land). Lush, Rolling Hills, Flowing Private River From its lush, rolling hills to its flowing private river, this property ties together two cultures and almost two centuries of history. From this property sprang a village and community, still supported to this day by both the commercial operations and involvement of the property owners. This is a land with many stories. It is deeply local; a land where you stop and breathe. This is the heartland of the Southland. Farm Tour, Lunch, Interactive Sheep-Shearing Demonstrations Upon arrival, meet your growers and enjoy a hot beverage. Next, depart for a guided orientation tour of the farm and see a working animal display, then proceed for a farm-to-table-style lunch featuring lamb, artisan breads and home-made baked goods. After lunch, take in interactive, dog-and-sheep and sheep-shearing demonstrations. At the conclusion of your visit, re-board your coach and commence the approximately 75-minute drive back to the pier. Please note: This tour involves a minimal amount of walking, at times over uneven and natural surfaces, with three-five steps to negotiate to get on/off the coach and four steps to access the restroom area. Walking at the Rosedale Farm is at the discretion of each guest. This tour is not suitable for guests with limited mobility and guests who utilise a wheelchair. Guests are advised to wear warm, comfortable clothing in layers with flat, closed-toe walking shoes, and bring sun protection and a weatherproof jacket from the ship. Guests must be at least 18 years old to be served alcoholic beverages. The tour sequence may vary. Space on this tour is extremely limited; we suggest you book well in advance to avoid disappointment. The coach supply in Bluff is very limited, coaches used are the best-available in the area, but may not be up to the standards of larger New Zealand ports. Please note: This tour involves a minimal amount of walking, at times over uneven and natural surfaces, with three-five steps to negotiate to get on/off the coach and four steps to access the restroom area. Walking at the Rosedale Farm is at the discretion of each guest. This tour is not suitable for guests with limited mobility and guests who utilise a wheelchair. Guests are advised to wear warm, comfortable clothing in layers with flat, closed-toe walking shoes, and bring sun protection and a weatherproof jacket from the ship. Guests must be at least 18 years old to be served alcoholic beverages. The tour sequence may vary. Space on this tour is extremely limited; we suggest you book well in advance to avoid disappointment. The coach supply in Bluff is very limited, coaches used are the best-available in the area, but may not be up to the standards of larger New Zealand ports.
Dunedin (Port Chalmers), New Zealand
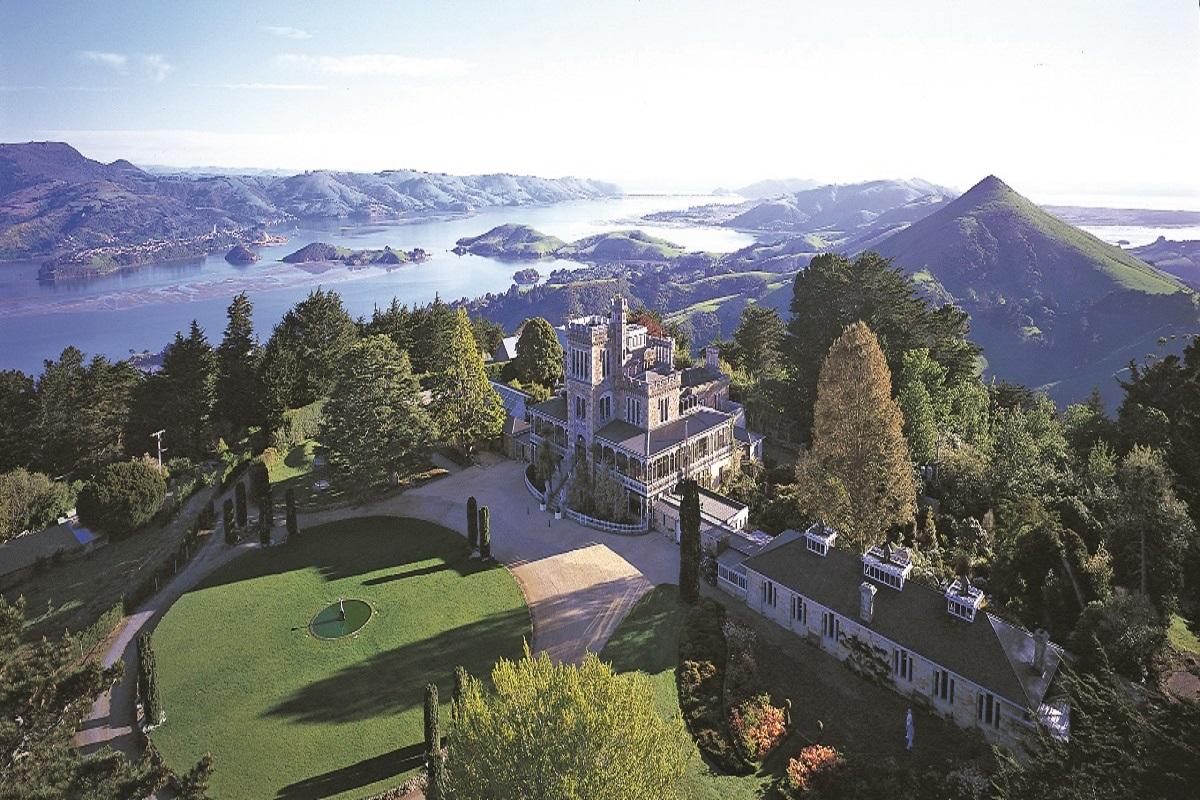
Dunedin City Sights & Larnach Castle
PCH-LDiscover the beautiful city of Dunedin that has one of the best collections of Edwardian and Victorian architecture in the southern hemisphere. Your half-day excursion also includes guided visit to the magnificent Larnach Castle, the only castle in New Zealand. Dunedin City Sights Depart the pier and enjoy an orientation drive through Dunedin that will introduce you to a well-preserved Victorian city. Soak up the grandeur of its architecture, from the classical ANZ Bank to the buildings surrounding the Octagon, an eight-sided plaza that forms the core of Dunedin's lively business district. Pass by notable landmarks such as the Town Hall, the Municipal Chambers and St Paul's Cathedral, all watched over by the statue of poet Robert Burns. Larnach Castle, Guides Tour, Free Time Next, proceed to the highlight of your half-day excursion - Larnach Castle. Beautifully situated in the tranquil countryside, this magnificent neo-Gothic estate was built for William and Eliza Larnach and their six children, and commands the highest point on the Otago Peninsula. Inside the castle, see thrill to magnificent wood ceilings carved by the best European craftsmen and a superb collection of New Zealand antiques, including a unique, nine-piece totara knot suite, all masterfully incorporated into the castle's 43 different rooms. As you stroll from room-to-room, your guide brings the castle to life with stories about the brilliant, yet tumultuous, career of William Larnach. At the conclusion of your visit, re-board your coach for your drive back to the pier. Full participation may include a limited number of steps, uneven surfaces, and/or periods of standing. Dunedin City Sights & Larnach Castle CODE: PCH-L DURATION 4 HOURS ACTIVITY LEVEL MODERATE Full participation may include a limited number of steps, uneven surfaces, and/or periods of standing. Discover the beautiful city of Dunedin that has one of the best collections of Edwardian and Victorian architecture in the southern hemisphere. Your half-day excursion also includes guided visit to the magnificent Larnach Castle, the only castle in New Zealand. Dunedin City Sights Depart the pier and enjoy an orientation drive through Dunedin that will introduce you to a well-preserved Victorian city. Soak up the grandeur of its architecture, from the classical ANZ Bank to the buildings surrounding the Octagon, an eight-sided plaza that forms the core of Dunedin's lively business district. Pass by notable landmarks such as the Town Hall, the Municipal Chambers and St Paul's Cathedral, all watched over by the statue of poet Robert Burns. Larnach Castle, Guides Tour, Free Time Next, proceed to the highlight of your half-day excursion - Larnach Castle. Beautifully situated in the tranquil countryside, this magnificent neo-Gothic estate was built for William and Eliza Larnach and their six children, and commands the highest point on the Otago Peninsula. Inside the castle, see thrill to magnificent wood ceilings carved by the best European craftsmen and a superb collection of New Zealand antiques, including a unique, nine-piece totara knot suite, all masterfully incorporated into the castle's 43 different rooms. As you stroll from room-to-room, your guide brings the castle to life with stories about the brilliant, yet tumultuous, career of William Larnach. At the conclusion of your visit, re-board your coach for your drive back to the pier. Please note: This tour involves a moderate amount of walking, at times over uneven surfaces, with a few steps to negotiate to get on/off the coach and 50 steps at Larnach Castle. This tour is not suitable for guests with limited mobility and guests who utilise a wheelchair. Guests are advised to wear lightweight, comfortable clothing with flat, closed-toe walking shoes, and bring sun protection and a weatherproof coat or jacket from the ship. Photography is not permitted inside the Larnach Castle. Please note: This tour involves a moderate amount of walking, at times over uneven surfaces, with a few steps to negotiate to get on/off the coach and 50 steps at Larnach Castle. This tour is not suitable for guests with limited mobility and guests who utilise a wheelchair. Guests are advised to wear lightweight, comfortable clothing with flat, closed-toe walking shoes, and bring sun protection and a weatherproof coat or jacket from the ship. Photography is not permitted inside the Larnach Castle.
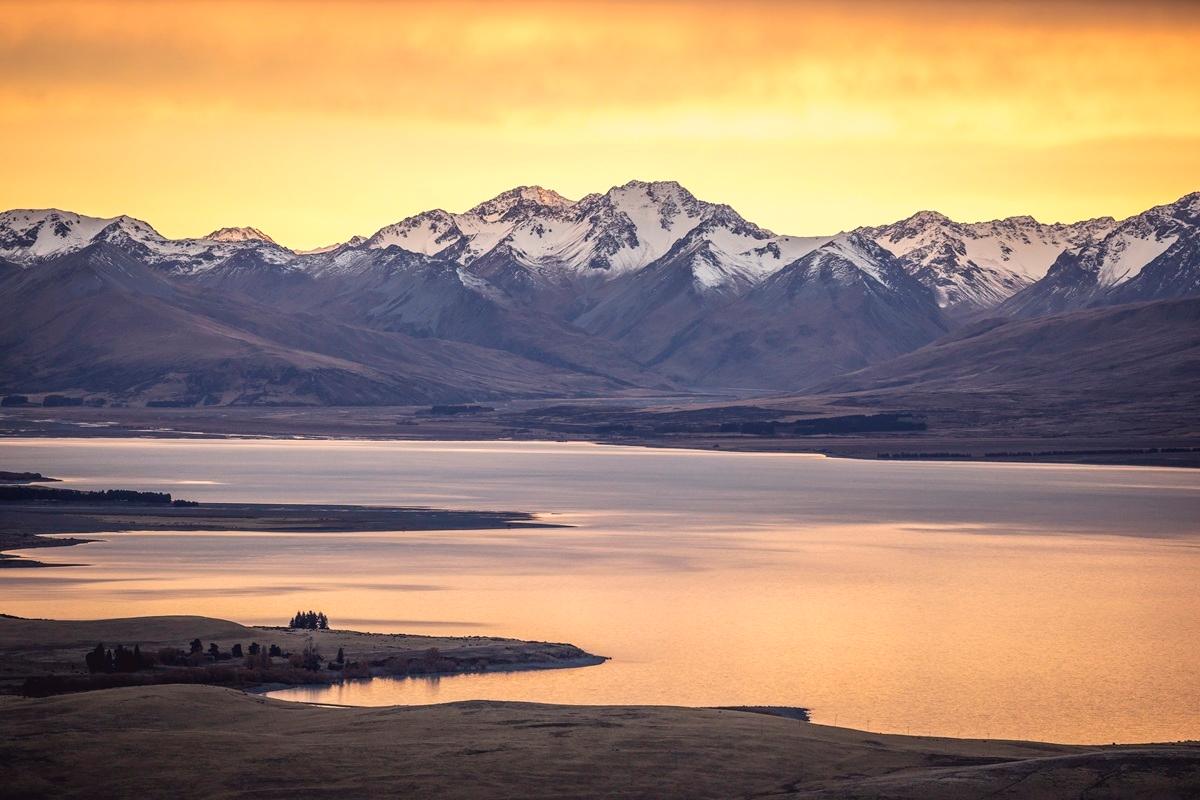
Mid-Voyage Land Adventure: Spectacular Mount Cook - The ‘Top’ of New Zealand
01MIDPCH-BIndulge your senses with the stunning natural splendour at the 'top' of New Zealand during this unforgettable overnight excursion to majestic Mount Cook and its surrounds. Mid-Voyage Land Adventure: Spectacular Mount Cook - The 'Top' of New Zealand Duration: 2 Days/1 Night Departs from: Port Chalmers (Dunedin) at approx. 8:30am Re-join ship: Lyttelton (Christchurch) at approx. 5:15pm Reserve by: At least 90 days prior to sailing IMPORTANT NOTE This Silver Shore Mid-Land Adventure requires advance booking through Silversea Reservations no later than 90 days prior to the sail date. Requests received after this date may be accommodated on a space-available basis. Tickets are available in limited quantities, and participation cannot be guaranteed for those guests not booking well in advance. A minimum number of participants is required to operate this programme. If this minimum number is not met, Silversea reserves the right to offer the programme at a different rate based on private arrangements, or to cancel the specific departure. Cancellation fee, unless otherwise advised, 90 - 0 days prior to the initial sailing date: 100% of the programme fare per person is due. Payment-in-full is due within 120 days prior to sailing. Booking made within 120 days of sailing require full payment within seven days of booking or sooner, as specified by Silversea. Onboard Spending Credit may not be applied to the purchase of this programme. All Land Adventure fares are subject to change, and not guaranteed until payment is received in full by Silversea. All Land Adventures are non-transferable, and non-refundable, within 90 days of sailing. Minors under the age of 18 must be accompanied by someone 18 years of age or older. All Land Adventures are owned by independent contractors, and Silversea makes no representations and assumes no responsibility for the services provided by these operators. Land Adventures may be modified by the operators at their sole discretion. This Land Adventure is a small group luxury tour, providing bespoke cultural and sightseeing experiences. We limit the tour to a small group in order to ensure your experience is a high-quality one. Spots are available on a first come, first serve basis. If the program fills up, you'll be accommodated on a space-available basis. VISA INFORMATION Please check with your travel professional for details regarding visa requirements for New Zealand. It is the responsibility of each guest to obtain all appropriate visas before cruising. LOCAL CURRENCY The local currency is New Zealand Dollar; credit cards are accepted; local ATMs are available in most locations visited. FULL DESCRIPTION DAY ONE - Port Chalmers/Moeraki Boulders/Riverstone Kitchen (Oamaru)/Lake Tekapo Take a scenic drive north along the picturesque Ashburton After disembarking the ship, meet your driver-guide and depart for a short City Sights Tour followed by the scenic driver to Koekohe Beach and marvel at the giant Moeraki Boulders. Stop at Koekohe Beach to stroll on the beach and marvel at the giant Moeraki Boulders Take a stroll on Koekohe Beach and marvel at the giant Moeraki Boulders- these giant Moeraki Boulders are scattered across the beach. Each of these enigmatic, spherical boulders weighs several tonnes, and are up to 6.5 feet (about two metres) in height. Scientists explain the boulders as calcite concretions formed about 65 million years ago. According to Maori legend, the boulders are gourds washed ashore from the great voyaging canoe, Araiteuru, when it was wrecked upon landfall in New Zealand hundreds of years ago. Drive to Oamaru Leaving the Moeraki Boulders, re-board your coach and travel to nearby Oamaru (Riverstone Kitchen) for a gourmet lunch at a local restaurant. At Riverstone also enjoy the Gardens, replica castle and shops at Riverstone Kitchen. Begin your exhilarating flight-seeing adventure exploring the striking Omarara Cliffs Arrive at Tekapo Airport for your amazing 45-minute scenic Fixed Wing flight showcasing the Southern Alps, Glaciers and other amazing landscapes including Mt Cook, New Zealand’s highest mountain. You will receive your safety and tour instructions, then board your plane for a flight-seeing journey towards the approximately 12,218-foot-high (about 3,724-metre-high) Aoraki (Mount Cook), the highest mountain in New Zealand and Tasman Glacier. The flight concludes back at the airport, where you will re-join the coach for an approximate 30 minute drive to Lake Tekapo. Transfer to Lake Tekapo Arrive back from the flight and visit the famous Church of the Good Shepherd at Lake Tekapo. Check into Peppers Bluewater Resort Hotel Relax and admire the amazing views before meeting downstairs and a short transfer to restaurant for dinner Dinner and overnight accommodation at Peppers Bluewater Resort Hotel DAY TWO - Lake Tekapo/Geraldine/Lyttleton After breakfast and check-out, take a scenic 4WD tour deep into Lake Tekapo's natural landscape After breakfast and check-out, embark on a scenic 4WD tour deep into Lake Tekapo's natural landscape Take a 4WD vehicle and depart for a scenic drive that takes you deep into the legendary natural landscapes of Lake Tekapo. Discover towering mountains, glaciers, river crossings, and incredible scenery whilst learning about the unique geology, ecology, and history that comprises this part of New Zealand's South Island. A picturesque drive from Tekapo to Geraldine and Ashburton Included is a stop off at the magnificent St. Thomas' Anglican Church with lunch at the iconic Barkers of Geraldine. You will enjoy a delicious lunch and time to wander around the village – many gift and interest shops. Before returning to the ship, enjoy a brief stop at Ashburton. Transfer to the pier and your ship Travel approximately 1.5 hours via Christchurch and upon arrival at Lyttleton, transfer to the pier and embark on the ship. Please note: This description is a general overview of the highlights of this program. The local Silversea representative will do everything possible to ensure that all of the sites described here are visited, though the tour sequence and specific sites mentioned is subject to change. Closure of some sites due to local or national holiday observances, flight schedules or other factors may affect the program, and the local operator reserves the right to substitute other sites if necessary. This Mid-Voyage Land Adventure involves a moderate amount of off-road driving and a moderate amount of walking for approximately 1.08 miles (about 1.75 kilometres), at times over uneven, natural, and snowy surfaces, with a few steps to negotiate. This tour is not suitable for guests with neck and/or back problems, guests with heart and/or respiratory conditions, guests prone to motion sickness, guests with limited mobility, and guests who utilise a wheelchair. Guests are advised to wear warm, comfortable clothing in layers with flat, closed-toe walking or hiking shoes, and bring sun protection, a weatherproof jacket, insect repellent, any necessary medication from the ship. Guests must carry their passports and ship's ID at all times. Guests must be at least 18 years old to be served alcoholic beverages. Due to prevailing weather conditions, the tour sequence, timings, and itinerary are subject to change without prior notice. A signed waiver is required to participate on this tour. Space on this tour is extremely limited; we suggest you book well in advance to avoid disappointment. Programme Includes: Private mini coach with an experience English-speaking driver-guide. Overnight stay at Peppers Bluewater Resort (One Bedroom Mountian Villa) One breakfasts, two lunches and one dinner, with drinks included All sightseeing and transfers as per itinerary Local escort travelling when there is a minimum of 10 guests travelling together Not Included: Any meals and drinks not specified above, gratuities to drivers and tour guides, laundry, telephone calls, cancellation insurance, and other personal items. Full participation may include a limited number of steps, uneven surfaces, and/or periods of standing. A meal is included in the excursion. Mid-Voyage Land Adventure: Spectacular Mount Cook - The ‘Top’ of New Zealand CODE: 01MIDPCH-B DURATION 31 HOURS ACTIVITY LEVEL MODERATE Full participation may include a limited number of steps, uneven surfaces, and/or periods of standing. MEAL INCLUDED A meal is included in the excursion. Indulge your senses with the stunning natural splendour at the 'top' of New Zealand during this unforgettable overnight excursion to majestic Mount Cook and its surrounds. Mid-Voyage Land Adventure: Spectacular Mount Cook - The 'Top' of New Zealand Duration: 2 Days/1 Night Departs from: Port Chalmers (Dunedin) at approx. 8:30am Re-join ship: Lyttelton (Christchurch) at approx. 5:15pm Reserve by: At least 90 days prior to sailing IMPORTANT NOTE This Silver Shore Mid-Land Adventure requires advance booking through Silversea Reservations no later than 90 days prior to the sail date. Requests received after this date may be accommodated on a space-available basis. Tickets are available in limited quantities, and participation cannot be guaranteed for those guests not booking well in advance. A minimum number of participants is required to operate this programme. If this minimum number is not met, Silversea reserves the right to offer the programme at a different rate based on private arrangements, or to cancel the specific departure. Cancellation fee, unless otherwise advised, 90 - 0 days prior to the initial sailing date: 100% of the programme fare per person is due. Payment-in-full is due within 120 days prior to sailing. Booking made within 120 days of sailing require full payment within seven days of booking or sooner, as specified by Silversea. Onboard Spending Credit may not be applied to the purchase of this programme. All Land Adventure fares are subject to change, and not guaranteed until payment is received in full by Silversea. All Land Adventures are non-transferable, and non-refundable, within 90 days of sailing. Minors under the age of 18 must be accompanied by someone 18 years of age or older. All Land Adventures are owned by independent contractors, and Silversea makes no representations and assumes no responsibility for the services provided by these operators. Land Adventures may be modified by the operators at their sole discretion. This Land Adventure is a small group luxury tour, providing bespoke cultural and sightseeing experiences. We limit the tour to a small group in order to ensure your experience is a high-quality one. Spots are available on a first come, first serve basis. If the program fills up, you'll be accommodated on a space-available basis. VISA INFORMATION Please check with your travel professional for details regarding visa requirements for New Zealand. It is the responsibility of each guest to obtain all appropriate visas before cruising. LOCAL CURRENCY The local currency is New Zealand Dollar; credit cards are accepted; local ATMs are available in most locations visited. FULL DESCRIPTION DAY ONE - Port Chalmers/Moeraki Boulders/Riverstone Kitchen (Oamaru)/Lake Tekapo Take a scenic drive north along the picturesque Ashburton After disembarking the ship, meet your driver-guide and depart for a short City Sights Tour followed by the scenic driver to Koekohe Beach and marvel at the giant Moeraki Boulders. Stop at Koekohe Beach to stroll on the beach and marvel at the giant Moeraki Boulders Take a stroll on Koekohe Beach and marvel at the giant Moeraki Boulders- these giant Moeraki Boulders are scattered across the beach. Each of these enigmatic, spherical boulders weighs several tonnes, and are up to 6.5 feet (about two metres) in height. Scientists explain the boulders as calcite concretions formed about 65 million years ago. According to Maori legend, the boulders are gourds washed ashore from the great voyaging canoe, Araiteuru, when it was wrecked upon landfall in New Zealand hundreds of years ago. Drive to Oamaru Leaving the Moeraki Boulders, re-board your coach and travel to nearby Oamaru (Riverstone Kitchen) for a gourmet lunch at a local restaurant. At Riverstone also enjoy the Gardens, replica castle and shops at Riverstone Kitchen. Begin your exhilarating flight-seeing adventure exploring the striking Omarara Cliffs Arrive at Tekapo Airport for your amazing 45-minute scenic Fixed Wing flight showcasing the Southern Alps, Glaciers and other amazing landscapes including Mt Cook, New Zealand’s highest mountain. You will receive your safety and tour instructions, then board your plane for a flight-seeing journey towards the approximately 12,218-foot-high (about 3,724-metre-high) Aoraki (Mount Cook), the highest mountain in New Zealand and Tasman Glacier. The flight concludes back at the airport, where you will re-join the coach for an approximate 30 minute drive to Lake Tekapo. Transfer to Lake Tekapo Arrive back from the flight and visit the famous Church of the Good Shepherd at Lake Tekapo. Check into Peppers Bluewater Resort Hotel Relax and admire the amazing views before meeting downstairs and a short transfer to restaurant for dinner Dinner and overnight accommodation at Peppers Bluewater Resort Hotel DAY TWO - Lake Tekapo/Geraldine/Lyttleton After breakfast and check-out, take a scenic 4WD tour deep into Lake Tekapo's natural landscape After breakfast and check-out, embark on a scenic 4WD tour deep into Lake Tekapo's natural landscape Take a 4WD vehicle and depart for a scenic drive that takes you deep into the legendary natural landscapes of Lake Tekapo. Discover towering mountains, glaciers, river crossings, and incredible scenery whilst learning about the unique geology, ecology, and history that comprises this part of New Zealand's South Island. A picturesque drive from Tekapo to Geraldine and Ashburton Included is a stop off at the magnificent St. Thomas' Anglican Church with lunch at the iconic Barkers of Geraldine. You will enjoy a delicious lunch and time to wander around the village – many gift and interest shops. Before returning to the ship, enjoy a brief stop at Ashburton. Transfer to the pier and your ship Travel approximately 1.5 hours via Christchurch and upon arrival at Lyttleton, transfer to the pier and embark on the ship. Please note: This description is a general overview of the highlights of this program. The local Silversea representative will do everything possible to ensure that all of the sites described here are visited, though the tour sequence and specific sites mentioned is subject to change. Closure of some sites due to local or national holiday observances, flight schedules or other factors may affect the program, and the local operator reserves the right to substitute other sites if necessary. This Mid-Voyage Land Adventure involves a moderate amount of off-road driving and a moderate amount of walking for approximately 1.08 miles (about 1.75 kilometres), at times over uneven, natural, and snowy surfaces, with a few steps to negotiate. This tour is not suitable for guests with neck and/or back problems, guests with heart and/or respiratory conditions, guests prone to motion sickness, guests with limited mobility, and guests who utilise a wheelchair. Guests are advised to wear warm, comfortable clothing in layers with flat, closed-toe walking or hiking shoes, and bring sun protection, a weatherproof jacket, insect repellent, any necessary medication from the ship. Guests must carry their passports and ship's ID at all times. Guests must be at least 18 years old to be served alcoholic beverages. Due to prevailing weather conditions, the tour sequence, timings, and itinerary are subject to change without prior notice. A signed waiver is required to participate on this tour. Space on this tour is extremely limited; we suggest you book well in advance to avoid disappointment. Programme Includes: Private mini coach with an experience English-speaking driver-guide. Overnight stay at Peppers Bluewater Resort (One Bedroom Mountian Villa) One breakfasts, two lunches and one dinner, with drinks included All sightseeing and transfers as per itinerary Local escort travelling when there is a minimum of 10 guests travelling together Not Included: Any meals and drinks not specified above, gratuities to drivers and tour guides, laundry, telephone calls, cancellation insurance, and other personal items.
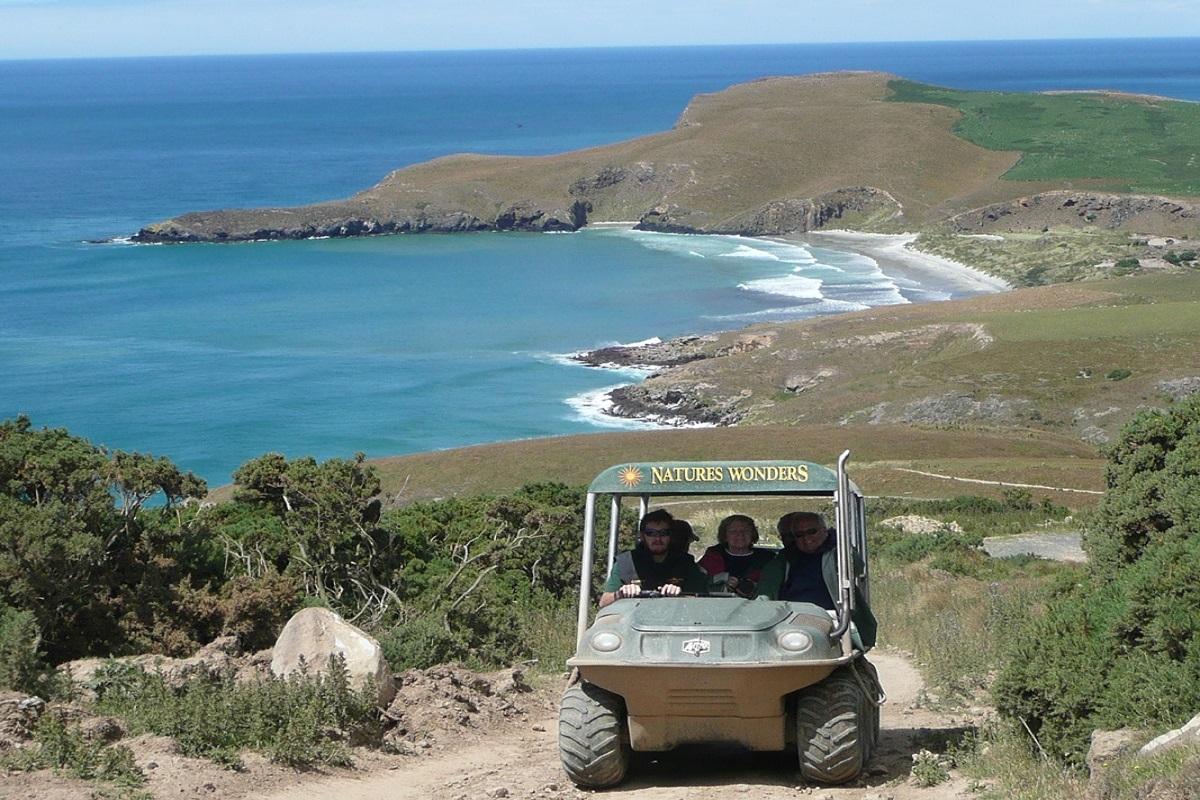
Nature's Wonders
PCH-JStunning scenery and viewing seals, penguins and other marine birds are the highlights of this off-road experience in a specially-designed six-seater Argo vehicle. Argos are amphibious, all-terrain, off-road vehicles that venture into areas others cannot. Otago Harbour Depart the pier via coach with your driver-guide, travel from Port Chalmers along the shore Otago Harbour and Sawyers Bay to Dunedin. From there, continue out to Otago Peninsula and along the pretty coastline to Taiaroa Head. Taiaroa Head is unique for the diversity of wildlife which abounds on this small headland and includes the only mainland albatross colony in the world. Historically, the headland was in use by the Maori as a defensive retreat, long before being fortified by European settlers in the 1880s. Taiaroa Head At Taiaroa Head, board your argo vehicle for a special one-hour tour to view the many wildlife inhabitants in the area. Highlights of the journey are the New Zealand fur seals that live on the rocks and the sea lions that are naturally sand dwellers. Experience the thrill of the ride on the Argo that takes you places other vehicles would find difficult to access. Half way through the tour, the groups will switch over and continue the tour via 4WD coaster bus. Re-board the coach and return to the ship via the Otago Peninsula's High Road. Full participation requires being in good physical condition and may involve inclines, steps, uneven surfaces, and/or extended periods of standing. Nature's Wonders CODE: PCH-J DURATION 4 HOURS ACTIVITY LEVEL EXTENSIVE Full participation requires being in good physical condition and may involve inclines, steps, uneven surfaces, and/or extended periods of standing. Stunning scenery and viewing seals, penguins and other marine birds are the highlights of this off-road experience in a specially-designed six-seater Argo vehicle. Argos are amphibious, all-terrain, off-road vehicles that venture into areas others cannot. Otago Harbour Depart the pier via coach with your driver-guide, travel from Port Chalmers along the shore Otago Harbour and Sawyers Bay to Dunedin. From there, continue out to Otago Peninsula and along the pretty coastline to Taiaroa Head. Taiaroa Head is unique for the diversity of wildlife which abounds on this small headland and includes the only mainland albatross colony in the world. Historically, the headland was in use by the Maori as a defensive retreat, long before being fortified by European settlers in the 1880s. Taiaroa Head At Taiaroa Head, board your argo vehicle for a special one-hour tour to view the many wildlife inhabitants in the area. Highlights of the journey are the New Zealand fur seals that live on the rocks and the sea lions that are naturally sand dwellers. Experience the thrill of the ride on the Argo that takes you places other vehicles would find difficult to access. Half way through the tour, the groups will switch over and continue the tour via 4WD coaster bus. Re-board the coach and return to the ship via the Otago Peninsula's High Road. Please note: This tour involves off-road exploring in an all-terrain vehicle, over undulating, unpaved tracks. The ride will be rough and guests may experience bumpy, jerking motions. This tour is not recommended for guests with back/neck problems, limited mobility or those who utilise a wheelchair. The drive to the Otago Peninsula is approximately one hour on winding roads. Therefore, this tour is not recommended for guests who suffer from motion sickness. Flat-soled shoes and a windbreaker are recommended. Argo vehicles are not air-conditioned and opened. The ride will be very windy and dusty. Guests should wear clothing to cover from the dust and do not mind getting dirty. Rain jackets if needed are available at the vehicle station. Remember to bring your camera. Although frequently encountered on this type of tour, wildlife and marine life sightings are not guaranteed. Please note: This tour involves off-road exploring in an all-terrain vehicle, over undulating, unpaved tracks. The ride will be rough and guests may experience bumpy, jerking motions. This tour is not recommended for guests with back/neck problems, limited mobility or those who utilise a wheelchair. The drive to the Otago Peninsula is approximately one hour on winding roads. Therefore, this tour is not recommended for guests who suffer from motion sickness. Flat-soled shoes and a windbreaker are recommended. Argo vehicles are not air-conditioned and opened. The ride will be very windy and dusty. Guests should wear clothing to cover from the dust and do not mind getting dirty. Rain jackets if needed are available at the vehicle station. Remember to bring your camera. Although frequently encountered on this type of tour, wildlife and marine life sightings are not guaranteed.
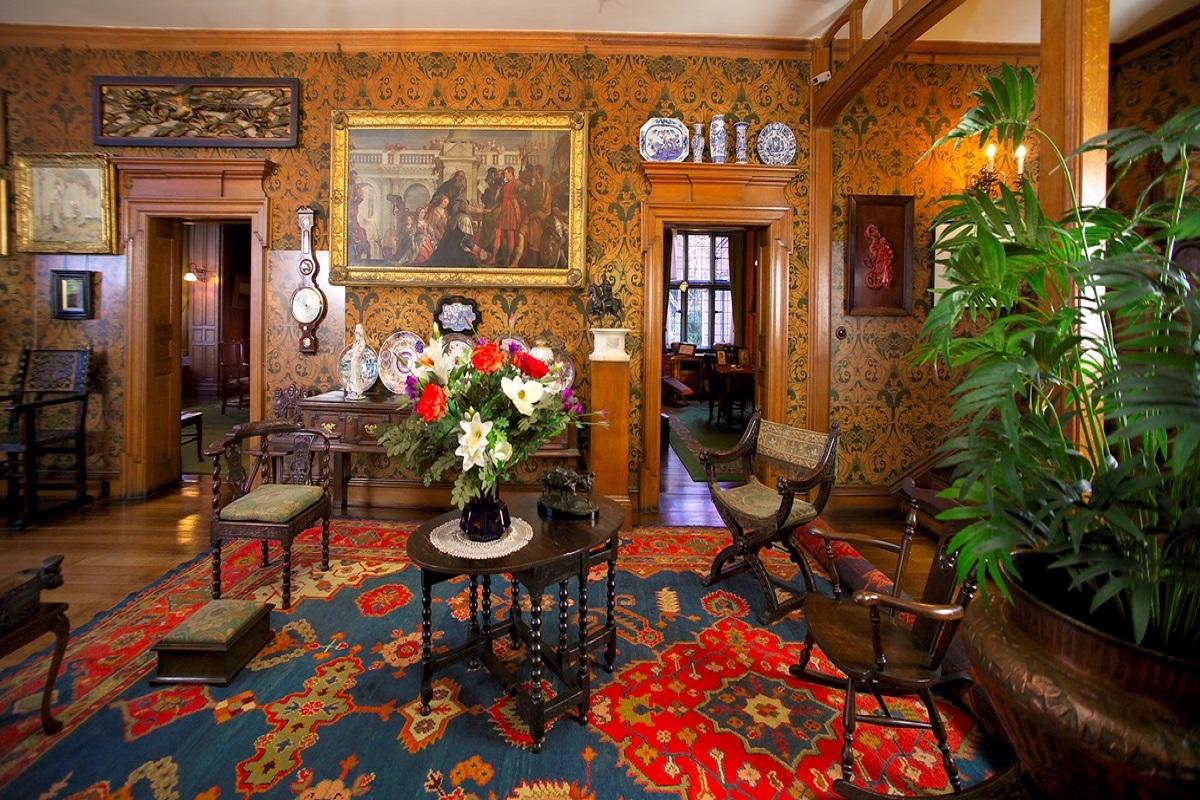
Olveston Home & Dunedin Botanic Garden
PCH-KDiscover a boutique city of Dunedin and its beautiful Botanic Gardens today. Your half-day excursion also includes a visit of the Olveston House, a 35-room Edwardian mansion filled with treasures from around the world. Take a stroll through the beautiful Botanic Gardens before returning to the port. Olveston House, Manicured Gardens Depart the pier for approximately 30-minute drive on to historic Olveston House. Designed by London architect, Sir Ernest George, and built between 1904 and 1907, the home is set amidst an acre of manicured gardens and abuts the lush parkland, or 'Town Belt', that surrounds the centre of Dunedin. Upon arrival, take a guided walking tour of this 35-room Edwardian mansion, which is filled with treasures from all over the world. At the conclusion of your visit, re-board your coach and commence the approximately 30-minute drive back to the pier. Dunedin Botanic Garden Next, continue to the glorious gardens, ponds and meandering paths of the internationally renowned Dunedin Botanic Garden. Let your imagination run wild as you explore New Zealand's oldest public garden, sited next to New Zealand's oldest college, the prestigious Otago University. Established in 1863 and extensively enlarged during the early years of the 20th century, this 72-acre oasis forms part of Dunedin's Town Belt, a circle of green that surrounds the inner city. Scenic Drive, Otago Harbour, Octagon, Dunedin, Railway Station Afterwards, enjoy a scenic drive highlighting expansive views of lovely Otago Harbour and its colorful beach communities plus photo stops at two of the city's most notable attractions. Visit the Octagon, an eight-sided plaza that forms the core of Dunedin's imposing business district, and pass by the Dunedin Railway Station, a jewel in New Zealand's architectural crown. Your tour concludes back at the pier. Full participation may include a limited number of steps, uneven surfaces, and/or periods of standing. Olveston Home & Dunedin Botanic Garden CODE: PCH-K DURATION 3.75 HOURS ACTIVITY LEVEL MODERATE Full participation may include a limited number of steps, uneven surfaces, and/or periods of standing. Discover a boutique city of Dunedin and its beautiful Botanic Gardens today. Your half-day excursion also includes a visit of the Olveston House, a 35-room Edwardian mansion filled with treasures from around the world. Take a stroll through the beautiful Botanic Gardens before returning to the port. Olveston House, Manicured Gardens Depart the pier for approximately 30-minute drive on to historic Olveston House. Designed by London architect, Sir Ernest George, and built between 1904 and 1907, the home is set amidst an acre of manicured gardens and abuts the lush parkland, or 'Town Belt', that surrounds the centre of Dunedin. Upon arrival, take a guided walking tour of this 35-room Edwardian mansion, which is filled with treasures from all over the world. At the conclusion of your visit, re-board your coach and commence the approximately 30-minute drive back to the pier. Dunedin Botanic Garden Next, continue to the glorious gardens, ponds and meandering paths of the internationally renowned Dunedin Botanic Garden. Let your imagination run wild as you explore New Zealand's oldest public garden, sited next to New Zealand's oldest college, the prestigious Otago University. Established in 1863 and extensively enlarged during the early years of the 20th century, this 72-acre oasis forms part of Dunedin's Town Belt, a circle of green that surrounds the inner city. Scenic Drive, Otago Harbour, Octagon, Dunedin, Railway Station Afterwards, enjoy a scenic drive highlighting expansive views of lovely Otago Harbour and its colorful beach communities plus photo stops at two of the city's most notable attractions. Visit the Octagon, an eight-sided plaza that forms the core of Dunedin's imposing business district, and pass by the Dunedin Railway Station, a jewel in New Zealand's architectural crown. Your tour concludes back at the pier. Please note: This tour involves a moderate amount of walking, at times over uneven surfaces, with a few steps to negotiate to get on/off the coach and 50 steps at Olveston House; there is no elevator access to the upper-stories of the house. Walking in Botanic Garden is at the discretion of each guest. This tour is not suitable for guests with limited mobility and guests who utilise a wheelchair. Guests are advised to wear lightweight, comfortable clothing with flat, closed-toe walking shoes, and bring sun protection and a weatherproof coat or jacket from the ship. Photography is not permitted inside the Olveston House. Please note: This tour involves a moderate amount of walking, at times over uneven surfaces, with a few steps to negotiate to get on/off the coach and 50 steps at Olveston House; there is no elevator access to the upper-stories of the house. Walking in Botanic Garden is at the discretion of each guest. This tour is not suitable for guests with limited mobility and guests who utilise a wheelchair. Guests are advised to wear lightweight, comfortable clothing with flat, closed-toe walking shoes, and bring sun protection and a weatherproof coat or jacket from the ship. Photography is not permitted inside the Olveston House.
Orokonui Ecosanctuary
PCH-GExperience the sights and sounds of a native New Zealand cloud forest during this captivating, half-day visit to the Orokonui Ecosanctuary. Orokonui Ecosanctuary, Flora and Flora, Coastal Forest Depart the pier for the scenic, approximately 45-minute drive to the Orokonui Ecosanctuary, a flagship biodiversity project for New Zealand's South Island. The Orokonui Ecosanctuary offers a unique opportunity to see real New Zealand fauna and flora in a well-protected, but natural space. Multiple species of plants and animals including rare and endangered species are protected by a predator-proof fence surrounding approximately 760 acres (about 307.5 hectares) of Otago's coastal forest. Cloud Forest, Orokonui Grassland, Regenerating Forest, Ancient Forest Habitat, Fauna, Birdlife Upon arrival, take a guided walking tour and experience the sights and sounds of a native New Zealand cloud forest. Your tour takes you through Orokonui's grassland, regenerating forest and the start of the ancient forest habitat. This cross-section of habitats is commonly home to a range of endemic fauna, including tuatara, Otago skinks, korimako, tui, and kaka. The birdlife is abundant here, and easy to see and photograph thanks to the bird-feeders located along the paths. Orokunui's History & Conservation Stories, Old Podocarp Broadleaved Forest, Visitor Centre Your guide also imparts their knowledge of Orokonui's history and conservation stories, and discusses any taoka (treasured) native species you may encounter along the way. The tour also includes a stop at the viewing platform for spectacular views amidst a 600-year-old podocarp/broadleaved forest. Following your guided tour, some free time is made available to explore the Visitor Centre. At the conclusion of your visit, re-board your coach and commence the short drive back to the pier. Full participation may include a limited number of steps, uneven surfaces, and/or periods of standing. Orokonui Ecosanctuary CODE: PCH-G DURATION 3.5 HOURS ACTIVITY LEVEL MODERATE Full participation may include a limited number of steps, uneven surfaces, and/or periods of standing. Experience the sights and sounds of a native New Zealand cloud forest during this captivating, half-day visit to the Orokonui Ecosanctuary. Orokonui Ecosanctuary, Flora and Flora, Coastal Forest Depart the pier for the scenic, approximately 45-minute drive to the Orokonui Ecosanctuary, a flagship biodiversity project for New Zealand's South Island. The Orokonui Ecosanctuary offers a unique opportunity to see real New Zealand fauna and flora in a well-protected, but natural space. Multiple species of plants and animals including rare and endangered species are protected by a predator-proof fence surrounding approximately 760 acres (about 307.5 hectares) of Otago's coastal forest. Cloud Forest, Orokonui Grassland, Regenerating Forest, Ancient Forest Habitat, Fauna, Birdlife Upon arrival, take a guided walking tour and experience the sights and sounds of a native New Zealand cloud forest. Your tour takes you through Orokonui's grassland, regenerating forest and the start of the ancient forest habitat. This cross-section of habitats is commonly home to a range of endemic fauna, including tuatara, Otago skinks, korimako, tui, and kaka. The birdlife is abundant here, and easy to see and photograph thanks to the bird-feeders located along the paths. Orokunui's History & Conservation Stories, Old Podocarp Broadleaved Forest, Visitor Centre Your guide also imparts their knowledge of Orokonui's history and conservation stories, and discusses any taoka (treasured) native species you may encounter along the way. The tour also includes a stop at the viewing platform for spectacular views amidst a 600-year-old podocarp/broadleaved forest. Following your guided tour, some free time is made available to explore the Visitor Centre. At the conclusion of your visit, re-board your coach and commence the short drive back to the pier. Please note: This tour involves a moderate amount of walking for up to 0.6 miles (about one kilometre), at times over inclines, with a few steps to negotiate to get on/off the coach and 10 steps at the venue. This tour is not suitable for guests with limited mobility and guests who utilise a wheelchair. Walking at the Orokonui Ecosanctuary is at the discretion of each guest. Guests are advised to dress warmly in layers with flat, closed-toe walking shoes, and bring sun protection, a waterproof jacket, bottled water, and NZD$ and/or credit cards for purchases from the ship; the weather may be changeable in this area. Guests must be at least 12 years old to participate on this tour. Although frequently encountered on this type of tour, wildlife sightings are not guaranteed. The tour sequence may vary. Please note: This tour involves a moderate amount of walking for up to 0.6 miles (about one kilometre), at times over inclines, with a few steps to negotiate to get on/off the coach and 10 steps at the venue. This tour is not suitable for guests with limited mobility and guests who utilise a wheelchair. Walking at the Orokonui Ecosanctuary is at the discretion of each guest. Guests are advised to dress warmly in layers with flat, closed-toe walking shoes, and bring sun protection, a waterproof jacket, bottled water, and NZD$ and/or credit cards for purchases from the ship; the weather may be changeable in this area. Guests must be at least 12 years old to participate on this tour. Although frequently encountered on this type of tour, wildlife sightings are not guaranteed. The tour sequence may vary.
Otago Wildlife Cruise
PCH-DDiscover the abundant migratory seabirds, penguins, seals and other wildlife along the Otago Peninsula during this panoramic sightseeing cruise. Port Chalmers, MV Monarch, Cruise & Coastal Views Board your coach for a short transfer to the motorised sightseeing vessel, the MV Monarch. Upon arrival, receive your safety and tour instructions, embark the boat and begin your scenic, approximately two-hour cruise showcasing amazing local wildlife in its natural habitat. As you pull away from the dock, take in expansive views of picturesque Port Chalmers. Founded in 1844 during the Otago Gold Rush, this bohemian seaside town raised a memorial to commemorate Port Chalmers as the departure point for the Antarctic expeditions of Captain Robert Falcon Scott of 1901 and 1910. Something of an artists' colony today, several galleries, a small seafaring museum and a host of charming eateries make this a popular weekend excursion for locals. Otago Peninsula, Taiaroa Head, Lighthouse This voyage of discovery, rich with gems of geological and historical significance, is enhanced by the expert, insightful commentary of your skipper and crew. As your narrated cruise glides along the scenic Otago Peninsula, view Taiaroa Head. Named after a Maori chieftain, Taiaroa Head is unique in the world for the variety and richness of the bird and marine life found here. Learn about the history of the Cape with its dramatic, 1860s lighthouse, 100-year-old Fort, network of tunnels and the unique albatross-breeding colony that draws thousands of visitors every year. As the skipper steers his vessel in close to the headland, learn about the ongoing campaign to protect this magnificent seabird from extinction. Albatross Colony, Penguins, Fur Seals, Sea Lions The first Taiaroa-reared albatross chick flew in 1938, and this now-protected nature reserve is home to an established colony with a population of around 140 birds. Marvel at the sight of a soaring albatross. Held aloft on slim wings up to 10 feet (about three metres) across, they provide awesome aerial displays, and are just as intriguing to watch as they go about their daily activities of courtship, nest-building and chick-rearing. In addition, take in spectacular views and photographs of other inhabitants of Taiaroa Head. Observe blue penguins, New Zealand fur seals, and Hooker's sea lions as they fish for their supper along the rocky ledges. Upon your return, disembark the boat and commence the short drive back to the ship. Full participation may include a limited number of steps, uneven surfaces, and/or periods of standing. Otago Wildlife Cruise CODE: PCH-D DURATION 2.5 HOURS ACTIVITY LEVEL MODERATE Full participation may include a limited number of steps, uneven surfaces, and/or periods of standing. Discover the abundant migratory seabirds, penguins, seals and other wildlife along the Otago Peninsula during this panoramic sightseeing cruise. Port Chalmers, MV Monarch, Cruise & Coastal Views Board your coach for a short transfer to the motorised sightseeing vessel, the MV Monarch. Upon arrival, receive your safety and tour instructions, embark the boat and begin your scenic, approximately two-hour cruise showcasing amazing local wildlife in its natural habitat. As you pull away from the dock, take in expansive views of picturesque Port Chalmers. Founded in 1844 during the Otago Gold Rush, this bohemian seaside town raised a memorial to commemorate Port Chalmers as the departure point for the Antarctic expeditions of Captain Robert Falcon Scott of 1901 and 1910. Something of an artists' colony today, several galleries, a small seafaring museum and a host of charming eateries make this a popular weekend excursion for locals. Otago Peninsula, Taiaroa Head, Lighthouse This voyage of discovery, rich with gems of geological and historical significance, is enhanced by the expert, insightful commentary of your skipper and crew. As your narrated cruise glides along the scenic Otago Peninsula, view Taiaroa Head. Named after a Maori chieftain, Taiaroa Head is unique in the world for the variety and richness of the bird and marine life found here. Learn about the history of the Cape with its dramatic, 1860s lighthouse, 100-year-old Fort, network of tunnels and the unique albatross-breeding colony that draws thousands of visitors every year. As the skipper steers his vessel in close to the headland, learn about the ongoing campaign to protect this magnificent seabird from extinction. Albatross Colony, Penguins, Fur Seals, Sea Lions The first Taiaroa-reared albatross chick flew in 1938, and this now-protected nature reserve is home to an established colony with a population of around 140 birds. Marvel at the sight of a soaring albatross. Held aloft on slim wings up to 10 feet (about three metres) across, they provide awesome aerial displays, and are just as intriguing to watch as they go about their daily activities of courtship, nest-building and chick-rearing. In addition, take in spectacular views and photographs of other inhabitants of Taiaroa Head. Observe blue penguins, New Zealand fur seals, and Hooker's sea lions as they fish for their supper along the rocky ledges. Upon your return, disembark the boat and commence the short drive back to the ship. Please note: This tour involves a moderate amount of walking for approximately 600 yards (about 547 metres), at times over uneven surfaces, with a steep ramp and a few steps to negotiate to embark/disembark the boat. This tour is not suitable for guests prone to seasickness, guests with limited mobility and guests who utilise a wheelchair. Guests are advised to wear lightweight, comfortable clothing with flat, closed-toe walking shoes, and bring sun protection and a weatherproof coat or jacket from the ship. Although frequently encountered on this type of tour, wildlife, bird and marine life sightings are not guaranteed. Operation of this tour is subject to weather conditions, and may be cancelled on short notice. Please note: This tour involves a moderate amount of walking for approximately 600 yards (about 547 metres), at times over uneven surfaces, with a steep ramp and a few steps to negotiate to embark/disembark the boat. This tour is not suitable for guests prone to seasickness, guests with limited mobility and guests who utilise a wheelchair. Guests are advised to wear lightweight, comfortable clothing with flat, closed-toe walking shoes, and bring sun protection and a weatherproof coat or jacket from the ship. Although frequently encountered on this type of tour, wildlife, bird and marine life sightings are not guaranteed. Operation of this tour is subject to weather conditions, and may be cancelled on short notice.
Port Chalmers by Private Car with Guide - Full Day
PCH-WExplore Dunedin at your leisure during your full-day (8-Hour) sightseeing tour via private car. Customise your own itinerary or choose to see an overview of the area's highlights. Depart the pier with your English-speaking driver/guide in an air-conditioned car and discover the city and surrounding areas at your own pace. Your exclusive tour concludes back at the pier. Excursions are at an easy pace without the need for excessive walking or physical activities. Being able to board buses and negotiate steps that may be encountered Port Chalmers by Private Car with Guide - Full Day CODE: PCH-W DURATION 8 HOURS ACTIVITY LEVEL MINIMAL Excursions are at an easy pace without the need for excessive walking or physical activities. Being able to board buses and negotiate steps that may be encountered Explore Dunedin at your leisure during your full-day (8-Hour) sightseeing tour via private car. Customise your own itinerary or choose to see an overview of the area's highlights. Depart the pier with your English-speaking driver/guide in an air-conditioned car and discover the city and surrounding areas at your own pace. Your exclusive tour concludes back at the pier. Please note: This tour is non-refundable if cancelled within 48 hours prior to the cruise start date. Actual vehicle type varies depending on availability. Participation is limited to 3 guests per car. The price, exclusive of meals, entrance fees and gratuities, is per vehicle. Therefore, when making your reservation, please indicate the number of vehicles, not the number of guests. Only one person in the party needs to reserve this program. Please see the Shore Concierge Office on board the ship to arrange your individual itinerary. Please note: This tour is non-refundable if cancelled within 48 hours prior to the cruise start date. Actual vehicle type varies depending on availability. Participation is limited to 3 guests per car. The price, exclusive of meals, entrance fees and gratuities, is per vehicle. Therefore, when making your reservation, please indicate the number of vehicles, not the number of guests. Only one person in the party needs to reserve this program. Please see the Shore Concierge Office on board the ship to arrange your individual itinerary.
Port Chalmers by Private Car with Guide - Half Day
PCH-VExplore Dunedin at your leisure during your half-day (4-Hour) sightseeing tour via private car. Customise your own itinerary or choose to see an overview of the area's highlights. Depart the pier with your English-speaking driver/guide in an air-conditioned car and discover the city and surrounding areas at your own pace. Your exclusive tour concludes back at the pier. Excursions are at an easy pace without the need for excessive walking or physical activities. Being able to board buses and negotiate steps that may be encountered Port Chalmers by Private Car with Guide - Half Day CODE: PCH-V DURATION 4 HOURS ACTIVITY LEVEL MINIMAL Excursions are at an easy pace without the need for excessive walking or physical activities. Being able to board buses and negotiate steps that may be encountered Explore Dunedin at your leisure during your half-day (4-Hour) sightseeing tour via private car. Customise your own itinerary or choose to see an overview of the area's highlights. Depart the pier with your English-speaking driver/guide in an air-conditioned car and discover the city and surrounding areas at your own pace. Your exclusive tour concludes back at the pier. Please note: This tour is non-refundable if cancelled within 48 hours prior to the cruise start date. Actual vehicle type varies depending on availability. Participation is limited to 3 guests per car. The price, exclusive of meals, entrance fees and gratuities, is per vehicle. Therefore, when making your reservation, please indicate the number of vehicles, not the number of guests. Only one person in the party needs to reserve this program. Please see the Shore Concierge Office on board the ship to arrange your individual itinerary. Please note: This tour is non-refundable if cancelled within 48 hours prior to the cruise start date. Actual vehicle type varies depending on availability. Participation is limited to 3 guests per car. The price, exclusive of meals, entrance fees and gratuities, is per vehicle. Therefore, when making your reservation, please indicate the number of vehicles, not the number of guests. Only one person in the party needs to reserve this program. Please see the Shore Concierge Office on board the ship to arrange your individual itinerary.
Port Chalmers by Private Van with Guide - Full Day
PCH-YExplore Dunedin at your leisure during your full-day (8-Hour) sightseeing tour via private van. Customise your own itinerary or choose to see an overview of the area's highlights. Depart the pier with your English-speaking driver/guide in an air-conditioned van and discover the city and surrounding areas at your own pace. Your exclusive tour concludes back at the pier. Excursions are at an easy pace without the need for excessive walking or physical activities. Being able to board buses and negotiate steps that may be encountered Port Chalmers by Private Van with Guide - Full Day CODE: PCH-Y DURATION 8 HOURS ACTIVITY LEVEL MINIMAL Excursions are at an easy pace without the need for excessive walking or physical activities. Being able to board buses and negotiate steps that may be encountered Explore Dunedin at your leisure during your full-day (8-Hour) sightseeing tour via private van. Customise your own itinerary or choose to see an overview of the area's highlights. Depart the pier with your English-speaking driver/guide in an air-conditioned van and discover the city and surrounding areas at your own pace. Your exclusive tour concludes back at the pier. Please note: This tour is non-refundable if cancelled within 48 hours prior to the cruise start date. Actual vehicle type varies depending on availability. Participation is limited to 6 guest per van. The price, exclusive of meals, entrance fees and gratuities, is per vehicle. Therefore, when making your reservation, please indicate the number of vehicles, not the number of guests. Only one person in the party needs to reserve this programme. Please see the Shore Concierge Office on board the ship to arrange your individual itinerary. Please note: This tour is non-refundable if cancelled within 48 hours prior to the cruise start date. Actual vehicle type varies depending on availability. Participation is limited to 6 guest per van. The price, exclusive of meals, entrance fees and gratuities, is per vehicle. Therefore, when making your reservation, please indicate the number of vehicles, not the number of guests. Only one person in the party needs to reserve this programme. Please see the Shore Concierge Office on board the ship to arrange your individual itinerary.
Port Chalmers by Private Van with Guide - Half Day
PCH-XExplore Dunedin at your leisure during your half-day (4-Hour) sightseeing tour via private van. Customise your own itinerary or choose to see an overview of the area's highlights. Depart the pier with your English-speaking driver/guide in an air-conditioned van and discover the city and surrounding areas at your own pace. Your exclusive tour concludes back at the pier. Excursions are at an easy pace without the need for excessive walking or physical activities. Being able to board buses and negotiate steps that may be encountered Port Chalmers by Private Van with Guide - Half Day CODE: PCH-X DURATION 4 HOURS ACTIVITY LEVEL MINIMAL Excursions are at an easy pace without the need for excessive walking or physical activities. Being able to board buses and negotiate steps that may be encountered Explore Dunedin at your leisure during your half-day (4-Hour) sightseeing tour via private van. Customise your own itinerary or choose to see an overview of the area's highlights. Depart the pier with your English-speaking driver/guide in an air-conditioned van and discover the city and surrounding areas at your own pace. Your exclusive tour concludes back at the pier. Please note: This tour is non-refundable if cancelled within 48 hours prior to the cruise start date. Actual vehicle type varies depending on availability. Participation is limited to 6 guest per van. The price, exclusive of meals, entrance fees and gratuities, is per vehicle. Therefore, when making your reservation, please indicate the number of vehicles, not the number of guests. Only one person in the party needs to reserve this program. Please see the Shore Concierge Office on board the ship to arrange your individual itinerary. Please note: This tour is non-refundable if cancelled within 48 hours prior to the cruise start date. Actual vehicle type varies depending on availability. Participation is limited to 6 guest per van. The price, exclusive of meals, entrance fees and gratuities, is per vehicle. Therefore, when making your reservation, please indicate the number of vehicles, not the number of guests. Only one person in the party needs to reserve this program. Please see the Shore Concierge Office on board the ship to arrange your individual itinerary.
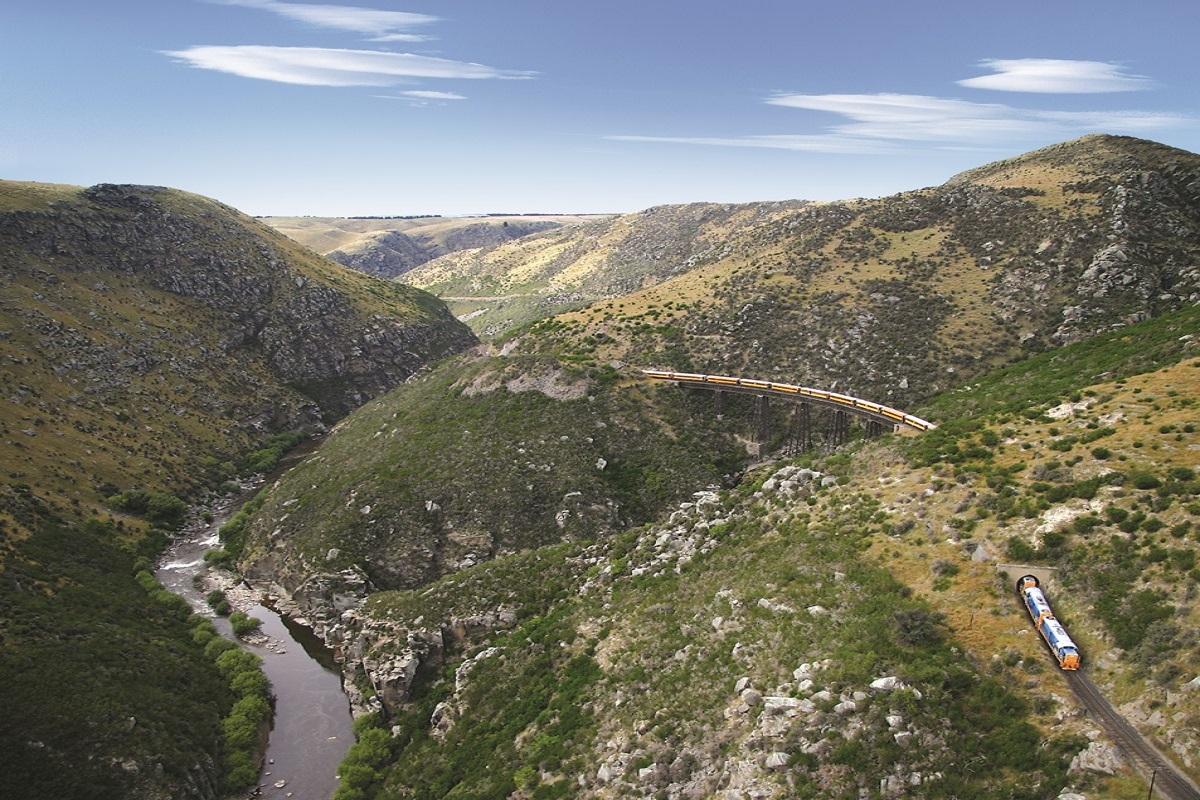
Taieri Gorge Railway Experience
PCH-BThere’s simply no other ride like this one. Sit back and relax in your comfortable table seat aboard a fully enclosed 1940s carriage as the Taieri River Railway carries you through a spectacular New Zealand landscape only accessible via this train. During the seven-hour experience, find yourself more than once dumbfounded that early New Zealand engineers, masons, and laborers could even build a railway through such dramatically rugged terrain. Traverse handmade stone bridges that span the Taieri River rapids. Feel the wonder of passing through ten historic tunnels cut into the mountain rock, including the Caversham Tunnel, one of the longest on the South Island. Witness the Wingatui Viaduct, a marvel of 1880s engineering and the largest wrought iron structure in New Zealand. As you near the turnaround point at Pukerangi, witness the amazing Flat Stream station and the Notch’s – four lengthy bridges that cling to the side of Taieri Gorge, offering jaw-dropping views of the river below. Onboard commentary reveals the rich history of the 1860's Central Otago gold rush, which served as the original engine driving this Otago Central railway line to connect prosperous Dunedin with the weathered goldfields of Cromwell. The refreshing beverages and nutritious snacks served at your table seat help satisfy your afternoon appetite. The train ride begins and ends on the wharf and includes a stop on the return at 1906 Dunedin Railway Station – an iconic demonstration of urban design and architecture as impressive as any sight you’ve seen day. No wonder it’s deemed the most photographed structure in the country. Your ship awaits in Port Chalmers harbor, about a 30-minute train Journey away. Excursions are at an easy pace without the need for excessive walking or physical activities. Being able to board buses and negotiate steps that may be encountered A meal is included in the excursion. Taieri Gorge Railway Experience CODE: PCH-B DURATION 7 HOURS ACTIVITY LEVEL MINIMAL Excursions are at an easy pace without the need for excessive walking or physical activities. Being able to board buses and negotiate steps that may be encountered MEAL INCLUDED A meal is included in the excursion. There’s simply no other ride like this one. Sit back and relax in your comfortable table seat aboard a fully enclosed 1940s carriage as the Taieri River Railway carries you through a spectacular New Zealand landscape only accessible via this train. During the seven-hour experience, find yourself more than once dumbfounded that early New Zealand engineers, masons, and laborers could even build a railway through such dramatically rugged terrain. Traverse handmade stone bridges that span the Taieri River rapids. Feel the wonder of passing through ten historic tunnels cut into the mountain rock, including the Caversham Tunnel, one of the longest on the South Island. Witness the Wingatui Viaduct, a marvel of 1880s engineering and the largest wrought iron structure in New Zealand. As you near the turnaround point at Pukerangi, witness the amazing Flat Stream station and the Notch’s – four lengthy bridges that cling to the side of Taieri Gorge, offering jaw-dropping views of the river below. Onboard commentary reveals the rich history of the 1860's Central Otago gold rush, which served as the original engine driving this Otago Central railway line to connect prosperous Dunedin with the weathered goldfields of Cromwell. The refreshing beverages and nutritious snacks served at your table seat help satisfy your afternoon appetite. The train ride begins and ends on the wharf and includes a stop on the return at 1906 Dunedin Railway Station – an iconic demonstration of urban design and architecture as impressive as any sight you’ve seen day. No wonder it’s deemed the most photographed structure in the country. Your ship awaits in Port Chalmers harbor, about a 30-minute train Journey away. Please note: This easy excursion involves some 500m /1,600 ft of walking over paved surfaces with some stairs onto bus and train. Guests must be able to walk unaided to and from transportation and up steps into train carriage. A maximum of two guests who utilise a wheelchair may be accommodated onboard with 72-hr advance notice. Wear weather-appropriate clothing and comfortable footwear. An array of snack and beverage items are included on train. The order of sights and activities may vary. Please note: This easy excursion involves some 500m /1,600 ft of walking over paved surfaces with some stairs onto bus and train. Guests must be able to walk unaided to and from transportation and up steps into train carriage. A maximum of two guests who utilise a wheelchair may be accommodated onboard with 72-hr advance notice. Wear weather-appropriate clothing and comfortable footwear. An array of snack and beverage items are included on train. The order of sights and activities may vary.
Hobart, Tasmania, Australia
Hobart by Private Car with Guide - Full Day
HBA-WExplore Hobart at your leisure during your full-day (8-Hour) sightseeing tour via private car. Customise your own itinerary or choose to see an overview of the area's highlights. Depart the pier with your English-speaking guide in an air-conditioned car and discover the city and surrounding areas at your own pace. Your exclusive tour concludes back at the pier. Excursions are at an easy pace without the need for excessive walking or physical activities. Being able to board buses and negotiate steps that may be encountered Hobart by Private Car with Guide - Full Day CODE: HBA-W DURATION 8 HOURS ACTIVITY LEVEL MINIMAL Excursions are at an easy pace without the need for excessive walking or physical activities. Being able to board buses and negotiate steps that may be encountered Explore Hobart at your leisure during your full-day (8-Hour) sightseeing tour via private car. Customise your own itinerary or choose to see an overview of the area's highlights. Depart the pier with your English-speaking guide in an air-conditioned car and discover the city and surrounding areas at your own pace. Your exclusive tour concludes back at the pier. Please note: This tour is non-refundable if cancelled within 48 hours prior to the cruise start date. Actual vehicle type varies depending on availability. Participation is limited to 2 guests per car. The price, exclusive of meals, entrance fees and gratuities, is per vehicle. Therefore, when making your reservation, please indicate the number of vehicles, not the number of guests. Only one person in the party needs to reserve this programme. Please see the Shore Concierge Office on board the ship to arrange your individual itinerary. Please note: This tour is non-refundable if cancelled within 48 hours prior to the cruise start date. Actual vehicle type varies depending on availability. Participation is limited to 2 guests per car. The price, exclusive of meals, entrance fees and gratuities, is per vehicle. Therefore, when making your reservation, please indicate the number of vehicles, not the number of guests. Only one person in the party needs to reserve this programme. Please see the Shore Concierge Office on board the ship to arrange your individual itinerary.
Hobart by Private Car with Guide - Half Day
HBA-VExplore Hobart at your leisure during your half-day (4-Hour) sightseeing tour via private car. Customise your own itinerary or choose to see an overview of the area's highlights. Depart the pier with your English-speaking guide in an air-conditioned car and discover the city and surrounding areas at your own pace. Your exclusive tour concludes back at the pier. Excursions are at an easy pace without the need for excessive walking or physical activities. Being able to board buses and negotiate steps that may be encountered Hobart by Private Car with Guide - Half Day CODE: HBA-V DURATION 4 HOURS ACTIVITY LEVEL MINIMAL Excursions are at an easy pace without the need for excessive walking or physical activities. Being able to board buses and negotiate steps that may be encountered Explore Hobart at your leisure during your half-day (4-Hour) sightseeing tour via private car. Customise your own itinerary or choose to see an overview of the area's highlights. Depart the pier with your English-speaking guide in an air-conditioned car and discover the city and surrounding areas at your own pace. Your exclusive tour concludes back at the pier. Please note: This tour is non-refundable if cancelled within 48 hours prior to the cruise start date. Actual vehicle type varies depending on availability. Participation is limited to 2 guests per car. The price, exclusive of meals, entrance fees and gratuities, is per vehicle. Therefore, when making your reservation, please indicate the number of vehicles, not the number of guests. Only one person in the party needs to reserve this programme. Please see the Shore Concierge Office on board the ship to arrange your individual itinerary. Please note: This tour is non-refundable if cancelled within 48 hours prior to the cruise start date. Actual vehicle type varies depending on availability. Participation is limited to 2 guests per car. The price, exclusive of meals, entrance fees and gratuities, is per vehicle. Therefore, when making your reservation, please indicate the number of vehicles, not the number of guests. Only one person in the party needs to reserve this programme. Please see the Shore Concierge Office on board the ship to arrange your individual itinerary.
Hobart by Private Van with Guide - Full Day
HBA-YExplore Hobart at your leisure during your full-day (8-Hour) sightseeing tour via private van. Customise your own itinerary or choose to see an overview of the area's highlights. Depart the pier with your English-speaking guide in an air-conditioned van and discover the city and surrounding areas at your own pace. Your exclusive tour concludes back at the pier. Excursions are at an easy pace without the need for excessive walking or physical activities. Being able to board buses and negotiate steps that may be encountered Hobart by Private Van with Guide - Full Day CODE: HBA-Y DURATION 8 HOURS ACTIVITY LEVEL MINIMAL Excursions are at an easy pace without the need for excessive walking or physical activities. Being able to board buses and negotiate steps that may be encountered Explore Hobart at your leisure during your full-day (8-Hour) sightseeing tour via private van. Customise your own itinerary or choose to see an overview of the area's highlights. Depart the pier with your English-speaking guide in an air-conditioned van and discover the city and surrounding areas at your own pace. Your exclusive tour concludes back at the pier. Please note: This tour is non-refundable if cancelled within 48 hours prior to the cruise start date. Actual vehicle type varies depending on availability. Participation is limited to 6 guests per van. The price, exclusive of meals, entrance fees and gratuities, is per vehicle. Therefore, when making your reservation, please indicate the number of vehicles, not the number of guests. Only one person in the party needs to reserve this programme. Please see the Shore Concierge Office on board the ship to arrange your individual itinerary. Please note: This tour is non-refundable if cancelled within 48 hours prior to the cruise start date. Actual vehicle type varies depending on availability. Participation is limited to 6 guests per van. The price, exclusive of meals, entrance fees and gratuities, is per vehicle. Therefore, when making your reservation, please indicate the number of vehicles, not the number of guests. Only one person in the party needs to reserve this programme. Please see the Shore Concierge Office on board the ship to arrange your individual itinerary.
Hobart by Private Van with Guide - Half Day
HBA-XExplore Hobart at your leisure during your half-day (4-Hour) sightseeing tour via private van. Customise your own itinerary or choose to see an overview of the area's highlights. Depart the pier with your English-speaking guide in an air-conditioned van and discover the city and surrounding areas at your own pace. Your exclusive tour concludes back at the pier. Excursions are at an easy pace without the need for excessive walking or physical activities. Being able to board buses and negotiate steps that may be encountered Hobart by Private Van with Guide - Half Day CODE: HBA-X DURATION 4 HOURS ACTIVITY LEVEL MINIMAL Excursions are at an easy pace without the need for excessive walking or physical activities. Being able to board buses and negotiate steps that may be encountered Explore Hobart at your leisure during your half-day (4-Hour) sightseeing tour via private van. Customise your own itinerary or choose to see an overview of the area's highlights. Depart the pier with your English-speaking guide in an air-conditioned van and discover the city and surrounding areas at your own pace. Your exclusive tour concludes back at the pier. Please note: This tour is non-refundable if cancelled within 48 hours prior to the cruise start date. Actual vehicle type varies depending on availability. Participation is limited to 6 guests per van. The price, exclusive of meals, entrance fees and gratuities, is per vehicle. Therefore, when making your reservation, please indicate the number of vehicles, not the number of guests. Only one person in the party needs to reserve this programme. Please see the Shore Concierge Office on board the ship to arrange your individual itinerary. Please note: This tour is non-refundable if cancelled within 48 hours prior to the cruise start date. Actual vehicle type varies depending on availability. Participation is limited to 6 guests per van. The price, exclusive of meals, entrance fees and gratuities, is per vehicle. Therefore, when making your reservation, please indicate the number of vehicles, not the number of guests. Only one person in the party needs to reserve this programme. Please see the Shore Concierge Office on board the ship to arrange your individual itinerary.
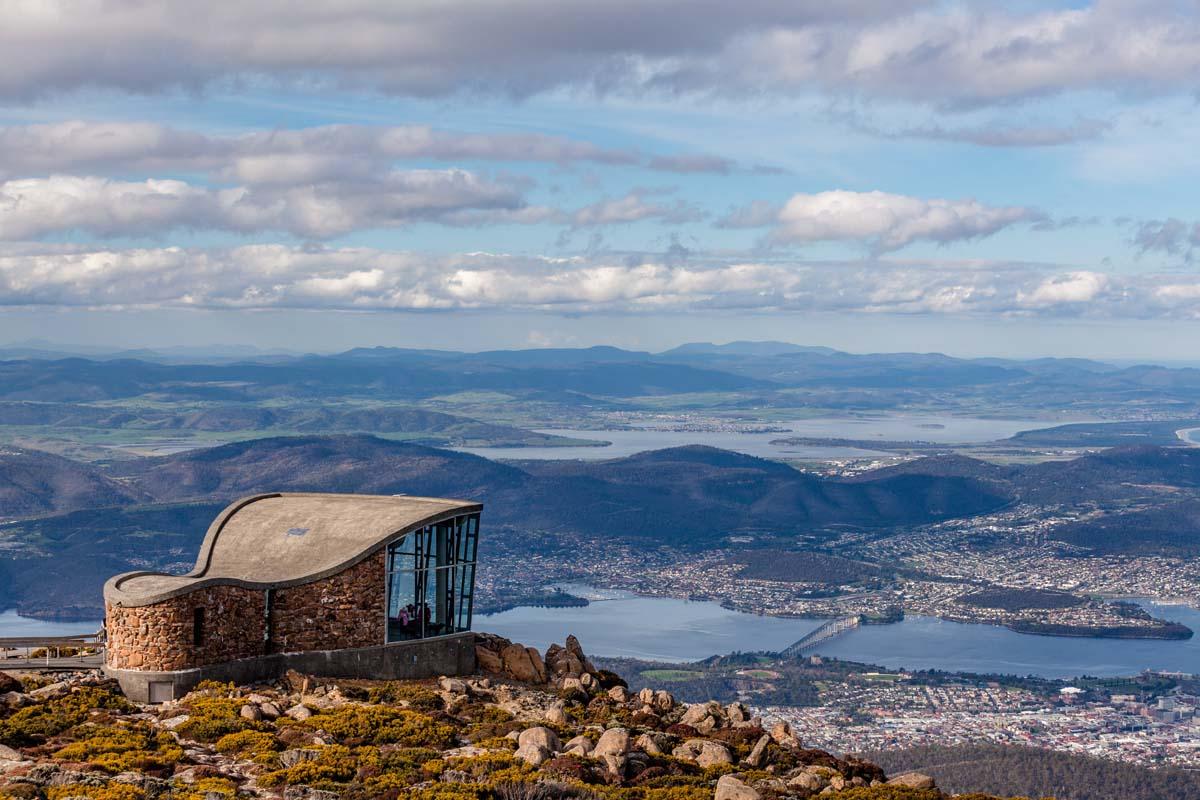
Hobart Highlights
HBA-ADiscover the highlights of the 'Jewel of the South' with very little walking during this scenic, half-day tour of Hobart via coach. Salamanca Place & Battery Point Depart the pier for a narrated, panoramic sightseeing drive designed for passengers who prefer to discover the history and landmarks of Hobart with little or no walking. Proceed past the historic warehouse complex of Salamanca Place, which now houses shops and restaurants. Along the way, see the elegant, 19th-century mansions and quaint cottages of Battery Point. Mt. Wellington Next, ascend Mt. Wellington (or Mt. Nelson, depending on weather conditions), which towers nearly 4,000 feet (1,230 metres) above sea level and is among the area's tallest mountains. Upon arrival, take in spectacular vistas of Hobart City and the south-eastern shores. After your photo stop, re-board your coach and drive by Australia's oldest brewery en route to Queens Domain and the Botanical Gardens. Royal Tasmanian Botanical Gardens Your tour continues with a visit to the Royal Tasmanian Botanical Gardens. Established in 1818 at an Aboriginal site on the Derwent, the botanical gardens feature historic plant collections, 19th-century trees and native Tasmanian species. Upon arrival, some free time is made available for a leisurely stroll about the grounds. Hobart City Following your visit, re-board your coach for an orientation drive past the picturesque shops, government buildings and landmarks of downtown Hobart before returning to the pier. Excursions are at an easy pace without the need for excessive walking or physical activities. Being able to board buses and negotiate steps that may be encountered Hobart Highlights CODE: HBA-A DURATION 4 HOURS ACTIVITY LEVEL MINIMAL Excursions are at an easy pace without the need for excessive walking or physical activities. Being able to board buses and negotiate steps that may be encountered Discover the highlights of the 'Jewel of the South' with very little walking during this scenic, half-day tour of Hobart via coach. Salamanca Place & Battery Point Depart the pier for a narrated, panoramic sightseeing drive designed for passengers who prefer to discover the history and landmarks of Hobart with little or no walking. Proceed past the historic warehouse complex of Salamanca Place, which now houses shops and restaurants. Along the way, see the elegant, 19th-century mansions and quaint cottages of Battery Point. Mt. Wellington Next, ascend Mt. Wellington (or Mt. Nelson, depending on weather conditions), which towers nearly 4,000 feet (1,230 metres) above sea level and is among the area's tallest mountains. Upon arrival, take in spectacular vistas of Hobart City and the south-eastern shores. After your photo stop, re-board your coach and drive by Australia's oldest brewery en route to Queens Domain and the Botanical Gardens. Royal Tasmanian Botanical Gardens Your tour continues with a visit to the Royal Tasmanian Botanical Gardens. Established in 1818 at an Aboriginal site on the Derwent, the botanical gardens feature historic plant collections, 19th-century trees and native Tasmanian species. Upon arrival, some free time is made available for a leisurely stroll about the grounds. Hobart City Following your visit, re-board your coach for an orientation drive past the picturesque shops, government buildings and landmarks of downtown Hobart before returning to the pier. Please note: This tour requires a minimal amount of walking, with a few steps to negotiate to get on/off the coach. This tour is suitable for guests with limited mobility and guests who utilise a wheelchair; however, guests must be able to get on/off the coach without assistance. Walking at the gardens is at the discretion of each guest. Lightweight, comfortable clothing and sun protection are recommended. We also recommend bringing a light jacket as it can get quite windy on the top of Mt. Wellingon (Mt. Nelson). The tour sequence may vary. Please note that in some cases, this tour is mainly guided by the driver and may not have a seperate guide escorting the tour. Please note: This tour requires a minimal amount of walking, with a few steps to negotiate to get on/off the coach. This tour is suitable for guests with limited mobility and guests who utilise a wheelchair; however, guests must be able to get on/off the coach without assistance. Walking at the gardens is at the discretion of each guest. Lightweight, comfortable clothing and sun protection are recommended. We also recommend bringing a light jacket as it can get quite windy on the top of Mt. Wellingon (Mt. Nelson). The tour sequence may vary. Please note that in some cases, this tour is mainly guided by the driver and may not have a seperate guide escorting the tour.
Hobart Storyteller Walk
HBA-HExperience past and present-day Hobart in a unique and nostalgic new way during this scenic 'viewfinder' excursion on-foot. Hobart, Viewfinder Walking Tour Meet your Storyteller guide and receive your tour instructions and Viewfinder, then begin your guided walking tour of Hobart. Along the way, wind back the hands of time with your customised Viewfinder, which contains photos of years past, and enables you to combine old-and-new Hobart in a novel and entertaining new way. Fishing Boats, Sandstone Warehouses, City Highlights, Franklin Square Your leisurely guided walking tour takes you past fishing boats and convict-built sandstone warehouses en route to the heart of the city, where you can explore its hidden and historic highlights. Your Viewfinder-assisted tour ends at Franklin Square. From here, commence the short walk back to the pier. Full participation requires being in good physical condition and may involve inclines, steps, uneven surfaces, and/or extended periods of standing. Hobart Storyteller Walk CODE: HBA-H DURATION 1.75 HOURS ACTIVITY LEVEL EXTENSIVE Full participation requires being in good physical condition and may involve inclines, steps, uneven surfaces, and/or extended periods of standing. Experience past and present-day Hobart in a unique and nostalgic new way during this scenic 'viewfinder' excursion on-foot. Hobart, Viewfinder Walking Tour Meet your Storyteller guide and receive your tour instructions and Viewfinder, then begin your guided walking tour of Hobart. Along the way, wind back the hands of time with your customised Viewfinder, which contains photos of years past, and enables you to combine old-and-new Hobart in a novel and entertaining new way. Fishing Boats, Sandstone Warehouses, City Highlights, Franklin Square Your leisurely guided walking tour takes you past fishing boats and convict-built sandstone warehouses en route to the heart of the city, where you can explore its hidden and historic highlights. Your Viewfinder-assisted tour ends at Franklin Square. From here, commence the short walk back to the pier. Please note: This tour involves an extensive amount of walking and standing for approximately 1.24 miles (about two kilometres), at times over uneven surfaces and inclines. This tour is not suitable for guests with limited mobility and guests who utilise a wheelchair. Guests are advised to wear warm, comfortable clothing with flat, closed-toe walking shoes, and bring sun protection, bottle water and a light jacket from the ship. This tour does not operate on Christmas Day and New Year's Day. The tour sequence may vary. Tour operates in all weather conditions except extreme weather. Space on this tour is very limited; we suggest you book in advance to avoid disappointment. Please note: This tour involves an extensive amount of walking and standing for approximately 1.24 miles (about two kilometres), at times over uneven surfaces and inclines. This tour is not suitable for guests with limited mobility and guests who utilise a wheelchair. Guests are advised to wear warm, comfortable clothing with flat, closed-toe walking shoes, and bring sun protection, bottle water and a light jacket from the ship. This tour does not operate on Christmas Day and New Year's Day. The tour sequence may vary. Tour operates in all weather conditions except extreme weather. Space on this tour is very limited; we suggest you book in advance to avoid disappointment.
MONA - Discovery in Style
HBA-BIndulge your senses on this half-day exploration of Australia's provocative Museum of Old and New Art (MONA). Ferry Transfer Depart the pier for the short transfer to the ferry terminal. Travel by ferry in the Posh Pit across the Derwent River to the MONA. Enjoy the sights of scenic Hobart from an exclusive lounge and separate deck with extra comfortable seating, table service and complimentary canapes, pastries and locally produced beverages. Museum of Old & New Art After the half hour crossing, you will be given a hosted introduction to Mona. Explore the Museum of New Art and discover what has made this such a talked about and famous collection. This radically innovative institution that opened on the banks of the Derwent River in January 2011, showcases the largest private collection of art in Australia. The property is a cultural haven where outstanding art, architecture and antiquities are fused with the surrounding, natural landscape. Its $100 million private collection focuses heavily on themes of sex and death, and is presented in a uniquely creative setting, a purpose-built $75 million edifice that challenges our notions of what an art museum should be. There are none of the traditional 'white cube' gallery spaces. Instead, labyrinthine passageways and Escher-like stairways connect three underground levels. The artwork is not labelled; instead you are each given an iPod touch called the 'O' that permits random exploration. After time in the museum, re-board the ferry back to Hobart to your waiting transfer to the ship. Full participation may include a limited number of steps, uneven surfaces, and/or periods of standing. MONA - Discovery in Style CODE: HBA-B DURATION 4 HOURS ACTIVITY LEVEL MODERATE Full participation may include a limited number of steps, uneven surfaces, and/or periods of standing. Indulge your senses on this half-day exploration of Australia's provocative Museum of Old and New Art (MONA). Ferry Transfer Depart the pier for the short transfer to the ferry terminal. Travel by ferry in the Posh Pit across the Derwent River to the MONA. Enjoy the sights of scenic Hobart from an exclusive lounge and separate deck with extra comfortable seating, table service and complimentary canapes, pastries and locally produced beverages. Museum of Old & New Art After the half hour crossing, you will be given a hosted introduction to Mona. Explore the Museum of New Art and discover what has made this such a talked about and famous collection. This radically innovative institution that opened on the banks of the Derwent River in January 2011, showcases the largest private collection of art in Australia. The property is a cultural haven where outstanding art, architecture and antiquities are fused with the surrounding, natural landscape. Its $100 million private collection focuses heavily on themes of sex and death, and is presented in a uniquely creative setting, a purpose-built $75 million edifice that challenges our notions of what an art museum should be. There are none of the traditional 'white cube' gallery spaces. Instead, labyrinthine passageways and Escher-like stairways connect three underground levels. The artwork is not labelled; instead you are each given an iPod touch called the 'O' that permits random exploration. After time in the museum, re-board the ferry back to Hobart to your waiting transfer to the ship. Please note: This tour requires a moderate amount of walking and is not recommended for guests with limited mobility. All areas visited are wheelchair accessible; however, guests must be able to embark/disembark the ferry by themselves. There are 99 steps on arrival at the museum and concrete walkways to navigate. Walking inside the museum is at each guest's discretion. The museum features some art with sexual, religious and death themes and may not be to everyone's taste. Please make sure to schedule a late lunch with your butler as this tour will not be back in time for lunch on board. Please note that the museum is closed on Tuesdays. Please note: This tour requires a moderate amount of walking and is not recommended for guests with limited mobility. All areas visited are wheelchair accessible; however, guests must be able to embark/disembark the ferry by themselves. There are 99 steps on arrival at the museum and concrete walkways to navigate. Walking inside the museum is at each guest's discretion. The museum features some art with sexual, religious and death themes and may not be to everyone's taste. Please make sure to schedule a late lunch with your butler as this tour will not be back in time for lunch on board. Please note that the museum is closed on Tuesdays.
Oysters & Wine
HBA-LSavour the exquisite flavour of fine wine and oysters of the Coal Valley during this leisurely, half-day culinary excursion with tastings at a renowned oyster farm and winery. Barilla Oyster Farm, Guided Tour Depart the pier for the scenic, approximately 30-minute drive to the Barilla Oyster Farm, a world-class oyster production facility. These delicious morsels owe their delicate taste and texture to the cold, clean southern ocean waters in which they are cultivated. Upon arrival, take a guided tour of the facility. Along the way, your guides explain the history of Barilla Bay's pristine waters and the importance of tides, show you how oysters are grown from a tiny spat to full maturity, and teach you the secret to shucking an oyster. In addition, learn about the Forrest family business, and its commitment to ensuring the preservation and conservation of the pure Tasmanian waters. Tasting of Barilla Bay Oysters Following your tour, proceed for a tasting of fresh, mouth-watering Barilla Bay oysters. Local Winery, Tour and Tastings, Hobart City Tour Leaving the oyster farm, re-board your coach and continue on to a renowned local winery, Puddleduck Vineyard. Upon arrival, proceed for a tasting of some of the best wine the region has to offer whilst enjoying the splendid scenery. At the conclusion of your visit, re-board your coach and commence the approximately one-hour drive back to the pier, with a brief orientation tour of Hobart City en route. Excursions are at an easy pace without the need for excessive walking or physical activities. Being able to board buses and negotiate steps that may be encountered Oysters & Wine CODE: HBA-L DURATION 4 HOURS ACTIVITY LEVEL MINIMAL Excursions are at an easy pace without the need for excessive walking or physical activities. Being able to board buses and negotiate steps that may be encountered Savour the exquisite flavour of fine wine and oysters of the Coal Valley during this leisurely, half-day culinary excursion with tastings at a renowned oyster farm and winery. Barilla Oyster Farm, Guided Tour Depart the pier for the scenic, approximately 30-minute drive to the Barilla Oyster Farm, a world-class oyster production facility. These delicious morsels owe their delicate taste and texture to the cold, clean southern ocean waters in which they are cultivated. Upon arrival, take a guided tour of the facility. Along the way, your guides explain the history of Barilla Bay's pristine waters and the importance of tides, show you how oysters are grown from a tiny spat to full maturity, and teach you the secret to shucking an oyster. In addition, learn about the Forrest family business, and its commitment to ensuring the preservation and conservation of the pure Tasmanian waters. Tasting of Barilla Bay Oysters Following your tour, proceed for a tasting of fresh, mouth-watering Barilla Bay oysters. Local Winery, Tour and Tastings, Hobart City Tour Leaving the oyster farm, re-board your coach and continue on to a renowned local winery, Puddleduck Vineyard. Upon arrival, proceed for a tasting of some of the best wine the region has to offer whilst enjoying the splendid scenery. At the conclusion of your visit, re-board your coach and commence the approximately one-hour drive back to the pier, with a brief orientation tour of Hobart City en route. Please note: This tour involves a moderate amount of walking and standing for approximately 328 yards (about 300 metres), at times over uneven and gravel surfaces, and inclines, with a few steps to negotiate to get on/off the coach. This tour is not suitable for guests with limited mobility and guests who utilise a wheelchair. Guests must be at least 18 years old to participate in tastings of alcoholic beverages. The tour sequence may vary. Venues visted are subject to change and not guaranteed. Please note: This tour involves a moderate amount of walking and standing for approximately 328 yards (about 300 metres), at times over uneven and gravel surfaces, and inclines, with a few steps to negotiate to get on/off the coach. This tour is not suitable for guests with limited mobility and guests who utilise a wheelchair. Guests must be at least 18 years old to participate in tastings of alcoholic beverages. The tour sequence may vary. Venues visted are subject to change and not guaranteed.
Port Arthur Discovery
HBA-FEnjoy the natural beauty of the Tasman Peninsula and visit one of Australia's most feared penal colonies during this guided walking tour of Port Arthur. Tasman Peninsula, Port Arthur Guided Walk, Scenic Harbour Cruise Depart the pier for the 60-mile (96-kilometre) drive from Hobart to the Tasman Peninsula and listen as your driver provides commentary. Head towards infamous Port Arthur, where upon arrival, you are met by a park ranger who leads you on an approximate 40-minute guided walking tour through one of Australia's most feared penal colonies followed by a scenic harbour cruise discovering the secrets of this historic site. Established on the Tasman Peninsula as a timber-cutting station in 1830, Port Arthur grew in size and importance in the last decades of transportation. More than 10,000 convicts were transported here from England during the forty years the prison was used and it was these same prisoners who eventually became the settlers of this new land. Now an historic site, Port Arthur has been carefully restored, making it easier to explore these fascinating ruins. Church, Penitentiary, Hospital, Old Guard House, Free Time During your tour, visit interesting sites that include the church, which was designed by an inmate, along with the penitentiary, hospital, old guard house, and a model prison - a radical experiment in prison design for the time. Some free time will also be made for independent exploration at your leisure. At the appointed time, re-board your coach for the transfer back to Hobart and the ship. Full participation requires being in good physical condition and may involve inclines, steps, uneven surfaces, and/or extended periods of standing. Port Arthur Discovery CODE: HBA-F DURATION 6 HOURS ACTIVITY LEVEL EXTENSIVE Full participation requires being in good physical condition and may involve inclines, steps, uneven surfaces, and/or extended periods of standing. Enjoy the natural beauty of the Tasman Peninsula and visit one of Australia's most feared penal colonies during this guided walking tour of Port Arthur. Tasman Peninsula, Port Arthur Guided Walk, Scenic Harbour Cruise Depart the pier for the 60-mile (96-kilometre) drive from Hobart to the Tasman Peninsula and listen as your driver provides commentary. Head towards infamous Port Arthur, where upon arrival, you are met by a park ranger who leads you on an approximate 40-minute guided walking tour through one of Australia's most feared penal colonies followed by a scenic harbour cruise discovering the secrets of this historic site. Established on the Tasman Peninsula as a timber-cutting station in 1830, Port Arthur grew in size and importance in the last decades of transportation. More than 10,000 convicts were transported here from England during the forty years the prison was used and it was these same prisoners who eventually became the settlers of this new land. Now an historic site, Port Arthur has been carefully restored, making it easier to explore these fascinating ruins. Church, Penitentiary, Hospital, Old Guard House, Free Time During your tour, visit interesting sites that include the church, which was designed by an inmate, along with the penitentiary, hospital, old guard house, and a model prison - a radical experiment in prison design for the time. Some free time will also be made for independent exploration at your leisure. At the appointed time, re-board your coach for the transfer back to Hobart and the ship. Please note: Although the amount of walking and sites seen at Port Arthur are at each guest's discretion, an extensive amount of walking is required to see Port Arthur fully. It is a pedestrian-only site. Walking distance is approximately 1.5-2 miles (2-3.5 kilometres), some of which is over natural, uneven ground and involves stairs. Some ruins have cobbled, uneven flooring and steps, and narrow doorways that must be negotiated. This tour is not recommended for guests with limited mobility or those who utilise a wheelchair. The drive to Port Arthur is approximately 90 minutes in duration. Lunch is at guests own expense; bring Australian dollars or a major credit card for any purchases. Please note: Although the amount of walking and sites seen at Port Arthur are at each guest's discretion, an extensive amount of walking is required to see Port Arthur fully. It is a pedestrian-only site. Walking distance is approximately 1.5-2 miles (2-3.5 kilometres), some of which is over natural, uneven ground and involves stairs. Some ruins have cobbled, uneven flooring and steps, and narrow doorways that must be negotiated. This tour is not recommended for guests with limited mobility or those who utilise a wheelchair. The drive to Port Arthur is approximately 90 minutes in duration. Lunch is at guests own expense; bring Australian dollars or a major credit card for any purchases.
Rugged Tasmanian Coast via RIB-Boat
HBA-ODiscover the rugged beauty and waterways along the picturesque Tasmanian coastline during this scenic and exhilarating, half-day excursion via RIB-boat. RIB-Boat Cruise Following a short walk to the pier, embark a rigid-inflatable boat (RIB) for a scenic, approximately 2.5-hour cruise along the rugged Tassie coastline. Your new RIB-boat features spacious, enclosed cabins and comfortable leather seats with large awning windows that enable you to immerse yourself in your beautiful surrounds. There is also standing room outside the cabin, if you prefer to feel the rush of the wind around you as the RIB-boat speeds through the water. Derwent River, Battery Point, Wrest Point Casino, Iron Pot Lighthouse, Mount Wellington Cruising down the Derwent River, pass by Battery Point, now one of Tasmania's premium residential addresses, as well as iconic landmarks such as the Wrest Point Casino, Iron Pot Lighthouse and the Shot Tower. Further south, you can appreciate the scale of Mount Wellington as it towers over the city. Storm Bay, Betsey Island, Seabirds, Hope Beach, Indian Ocean Next, cruise into Storm Bay en route to Betsey Island, an uninhabited island that is home to a variety of seabirds, including gulls, cormorants and the majestic, white-bellied sea eagle. As you circumnavigate Betsey Island, spot isolated Hope Beach and feel the swell of the Indian Ocean. At the conclusion of your visit, return to the pier, disembark the RIB-boat and commence the short walk back to the pier. Full participation may include a limited number of steps, uneven surfaces, and/or periods of standing. Rugged Tasmanian Coast via RIB-Boat CODE: HBA-O DURATION 3.5 HOURS ACTIVITY LEVEL MODERATE Full participation may include a limited number of steps, uneven surfaces, and/or periods of standing. Discover the rugged beauty and waterways along the picturesque Tasmanian coastline during this scenic and exhilarating, half-day excursion via RIB-boat. RIB-Boat Cruise Following a short walk to the pier, embark a rigid-inflatable boat (RIB) for a scenic, approximately 2.5-hour cruise along the rugged Tassie coastline. Your new RIB-boat features spacious, enclosed cabins and comfortable leather seats with large awning windows that enable you to immerse yourself in your beautiful surrounds. There is also standing room outside the cabin, if you prefer to feel the rush of the wind around you as the RIB-boat speeds through the water. Derwent River, Battery Point, Wrest Point Casino, Iron Pot Lighthouse, Mount Wellington Cruising down the Derwent River, pass by Battery Point, now one of Tasmania's premium residential addresses, as well as iconic landmarks such as the Wrest Point Casino, Iron Pot Lighthouse and the Shot Tower. Further south, you can appreciate the scale of Mount Wellington as it towers over the city. Storm Bay, Betsey Island, Seabirds, Hope Beach, Indian Ocean Next, cruise into Storm Bay en route to Betsey Island, an uninhabited island that is home to a variety of seabirds, including gulls, cormorants and the majestic, white-bellied sea eagle. As you circumnavigate Betsey Island, spot isolated Hope Beach and feel the swell of the Indian Ocean. At the conclusion of your visit, return to the pier, disembark the RIB-boat and commence the short walk back to the pier. Please note: This tour involves a moderate amount of walking for approximately 0.6 miles (about one kilometre), with a few steps to negotiate to embark/disembark the RIB-boat. This tour is not suitable for guests prone to seasickness, guests with limited mobility and guests who utilise a wheelchair. Guests are advised to wear warm, comfortable clothing with flat, closed-toe walking shoes, and bring sun protection and a light jacket from the ship. Operation of this tour is subject to weather conditions. Space on this tour is very limited; we suggest you book in advance to avoid disappointment. Please note: This tour involves a moderate amount of walking for approximately 0.6 miles (about one kilometre), with a few steps to negotiate to embark/disembark the RIB-boat. This tour is not suitable for guests prone to seasickness, guests with limited mobility and guests who utilise a wheelchair. Guests are advised to wear warm, comfortable clothing with flat, closed-toe walking shoes, and bring sun protection and a light jacket from the ship. Operation of this tour is subject to weather conditions. Space on this tour is very limited; we suggest you book in advance to avoid disappointment.
S.A.L.T. Tasmania’s Wild Tastes with Hunting, Fishing, Wood-Fire Cooking Star Chef Analiese Gregory
HBA-003Combining two of Hobart’s local treasures - Analiese Gregory, one of the world’s best sustainable cooking chefs and The Bowmont heritage-listed building, you’ll discover Tasmania’s culinary heritage during this interactive S.A.L.T. Program culinary experience. Scenic Drive Board your coach and enjoy driving around the distinct Tasmanian landscape to the nearby town of Franklin. You’ll arrive at the Bowmont, a two-story heritage listed building on the banks of the Huon River. The Bowmont Originally built in 1906 by renowned builders J. Dunn & Son, the Federation Free-style design and construction was typical of the builder’s work which can still be found throughout many parts of Hobart. A much-loved building of the Huon Valley, the former bank and maternity hospital has been reimagined using traditional methods that cherish and preserve its colourful history. Hear about its many previous lives and the unique stories it holds during your time emersed with Analiese Gregory’s masterclass of techniques with local ingredients before enjoying lunch prepared by the world-renowned chef. Masterclass and Chef Prepared Lunch Upon arrival be greeted by Chef Analiese Gregory and her team. Watch, learn and taste as Analiese takes you on a cooking journey over an open fire demonstration. You will enjoy the canapes made by Analiese as she brings the rugged food culture to the forefront. Continue inside the Bowmont, where the excitement continues with a up close cooking demonstration. As Analiese finishes the menu items in front of group, she will talk through the way the ingredients are used. Of course, the cooking experience will be followed by a tasty lunch! After the lunch, take a short walk back to board the bus to return to the ship. Chef Analiese Gregory Hailed as one of the most exciting chefs of her generation, Analiese Gregory has swapped the dazzling Michelin star restaurants of Paris’s Le Meurice and Sydney’s Quay for rugged Tasmania, where she forged a new life in a century old cottage at the bottom of the world in Tasmania. She is the author of the recently published book How Wild Things Are, has been 2IC at Sydney's three hat Quay, and honed her skills in the kitchens of Michelin-starred stalwarts The Ledbury, Mugaritz, and Michel Bras restaurants in UK and Europe. You will be mesmerized on how the described ‘forage-master’ recounts learning to hunt, fish, forage and live seasonally, closer to nature. Excursions are at an easy pace without the need for excessive walking or physical activities. Being able to board buses and negotiate steps that may be encountered S.A.L.T. Tasmania’s Wild Tastes with Hunting, Fishing, Wood-Fire Cooking Star Chef Analiese Gregory CODE: HBA-003 DURATION 4 HOURS ACTIVITY LEVEL MINIMAL Excursions are at an easy pace without the need for excessive walking or physical activities. Being able to board buses and negotiate steps that may be encountered Combining two of Hobart’s local treasures - Analiese Gregory, one of the world’s best sustainable cooking chefs and The Bowmont heritage-listed building, you’ll discover Tasmania’s culinary heritage during this interactive S.A.L.T. Program culinary experience. Scenic Drive Board your coach and enjoy driving around the distinct Tasmanian landscape to the nearby town of Franklin. You’ll arrive at the Bowmont, a two-story heritage listed building on the banks of the Huon River. The Bowmont Originally built in 1906 by renowned builders J. Dunn & Son, the Federation Free-style design and construction was typical of the builder’s work which can still be found throughout many parts of Hobart. A much-loved building of the Huon Valley, the former bank and maternity hospital has been reimagined using traditional methods that cherish and preserve its colourful history. Hear about its many previous lives and the unique stories it holds during your time emersed with Analiese Gregory’s masterclass of techniques with local ingredients before enjoying lunch prepared by the world-renowned chef. Masterclass and Chef Prepared Lunch Upon arrival be greeted by Chef Analiese Gregory and her team. Watch, learn and taste as Analiese takes you on a cooking journey over an open fire demonstration. You will enjoy the canapes made by Analiese as she brings the rugged food culture to the forefront. Continue inside the Bowmont, where the excitement continues with a up close cooking demonstration. As Analiese finishes the menu items in front of group, she will talk through the way the ingredients are used. Of course, the cooking experience will be followed by a tasty lunch! After the lunch, take a short walk back to board the bus to return to the ship. Chef Analiese Gregory Hailed as one of the most exciting chefs of her generation, Analiese Gregory has swapped the dazzling Michelin star restaurants of Paris’s Le Meurice and Sydney’s Quay for rugged Tasmania, where she forged a new life in a century old cottage at the bottom of the world in Tasmania. She is the author of the recently published book How Wild Things Are, has been 2IC at Sydney's three hat Quay, and honed her skills in the kitchens of Michelin-starred stalwarts The Ledbury, Mugaritz, and Michel Bras restaurants in UK and Europe. You will be mesmerized on how the described ‘forage-master’ recounts learning to hunt, fish, forage and live seasonally, closer to nature. Please note: This tour requires a minimal amount of walking, with a few steps to negotiate to get on/off the coach. This tour is suitable for guests with limited mobility and guests who utilise a wheelchair; however, guests must be able to get on/off the coach without assistance. Lightweight, comfortable clothing and sun protection are recommended. The tour sequence may vary. Please note: This tour requires a minimal amount of walking, with a few steps to negotiate to get on/off the coach. This tour is suitable for guests with limited mobility and guests who utilise a wheelchair; however, guests must be able to get on/off the coach without assistance. Lightweight, comfortable clothing and sun protection are recommended. The tour sequence may vary.
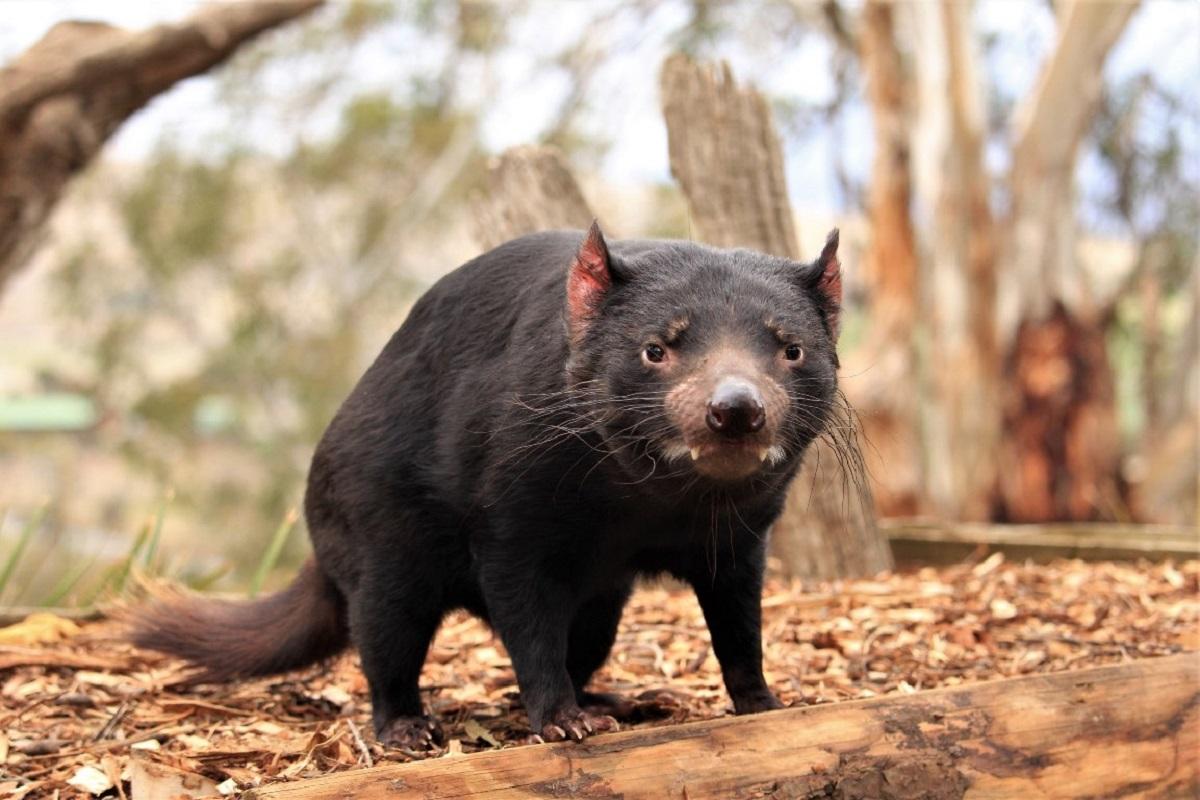
Tassie Devils & Richmond
HBA-EExplore the history of Richmond, and the area's beautiful and diverse wildlife, during this picturesque, half-day sightseeing excursion. Bonorong Wildlife Sanctuary Depart the pier for the scenic, approximately 30-minute drive to the Bonorong Wildlife Sanctuary in Hobart, a Tasmanian sanctuary for orphaned or injured animals. During your visit, free time is made available to explore the sanctuary's unique animals, including Tasmania devils, quolls, wombats, kangaroos, and wallabies, and learn about their inspiring survival stories. Richmond Bridge & Town Next, re-board your coach for the short ride across the Richmond Bridge, the oldest bridge in the city, to the historic town of Richmond, a former military staging post and convict station located in the Coal River Valley. Upon arrival, take a guided walking tour of the town, which is highlighted by fine Georgian architecture. Following your tour, some free time is made available to discover Richmond's wonderful galleries, cafés and boutiques at your leisure. At the conclusion of your visit, re-board your coach and commence the short drive back to the pier. Full participation requires being in good physical condition and may involve inclines, steps, uneven surfaces, and/or extended periods of standing. Tassie Devils & Richmond CODE: HBA-E DURATION 4 HOURS ACTIVITY LEVEL EXTENSIVE Full participation requires being in good physical condition and may involve inclines, steps, uneven surfaces, and/or extended periods of standing. Explore the history of Richmond, and the area's beautiful and diverse wildlife, during this picturesque, half-day sightseeing excursion. Bonorong Wildlife Sanctuary Depart the pier for the scenic, approximately 30-minute drive to the Bonorong Wildlife Sanctuary in Hobart, a Tasmanian sanctuary for orphaned or injured animals. During your visit, free time is made available to explore the sanctuary's unique animals, including Tasmania devils, quolls, wombats, kangaroos, and wallabies, and learn about their inspiring survival stories. Richmond Bridge & Town Next, re-board your coach for the short ride across the Richmond Bridge, the oldest bridge in the city, to the historic town of Richmond, a former military staging post and convict station located in the Coal River Valley. Upon arrival, take a guided walking tour of the town, which is highlighted by fine Georgian architecture. Following your tour, some free time is made available to discover Richmond's wonderful galleries, cafés and boutiques at your leisure. At the conclusion of your visit, re-board your coach and commence the short drive back to the pier. Please note: This tour involves an extensive amount of walking for approximately 1.24 miles (about two kilometres), at times over uneven surfaces, with a few steps to negotiate to get on/off the coach. Walking at the Bonorong Wildlife Park and Richmond is at the discretion of each guest. This tour is not suitable for guests with limited mobility and guests who utilise a wheelchair. Guests are advised to wear lightweight, comfortable clothing in layers with flat, closed-toe walking shoes, and bring sun protection and a light jacket from the ship. Please note that in some cases, this tour is mainly guided by the driver and may not have a seperate guide escorting the tour. Please note: This tour involves an extensive amount of walking for approximately 1.24 miles (about two kilometres), at times over uneven surfaces, with a few steps to negotiate to get on/off the coach. Walking at the Bonorong Wildlife Park and Richmond is at the discretion of each guest. This tour is not suitable for guests with limited mobility and guests who utilise a wheelchair. Guests are advised to wear lightweight, comfortable clothing in layers with flat, closed-toe walking shoes, and bring sun protection and a light jacket from the ship. Please note that in some cases, this tour is mainly guided by the driver and may not have a seperate guide escorting the tour.
Kangaroo Island, Australia

A Taste of Kangaroo Island
KAG-AExperience the splendid beauty, wildlife and flavours of Kangaroo Island during this half-day tour that showcases some local producers including a shearing demonstration, honey farm and Eucalyptus distillery. Rob's Sheep Shearing Depart the pier for the scenic, narrated drive to the Rob's Sheep Shearing. Robs Shearing Demonstration which provides a chance to watch KI local farmer Rob work together with his well-trained sheepdogs to round up sheep in the yards. Rob then puts his expert shearing skills on show, by shearing one of his flock and entertaining you with his local stories. Rob will then use a spinning wheel to spin wool into a fine, even string creating a lovely ball of merino yarn. Clifford's Honey Farm Next, re-board your coach and drive south for a visit to Clifford's Honey Farm, where over 22,000 pounds (10,000 kilograms) of honey is produced annually. Kangaroo Island is the only place in the world where a pure strain of Ligurian bee exists. Upon arrival, take a guided tour of the Honey Room and facility, explore the honey collection, extraction and production processes, and participate in a tasting of honey varieties. Emu Ridge Eucalyptus Distillery Your last stop is at the Emu Ridge Eucalyptus Distillery, the only commercial eucalyptus distillery operating in South Australia. Take a guided tour of the distillery and sample Kangaroo Island Cider. Re-board your coach and commence the approximately 30-minute ride back to the pier. Full participation may include a limited number of steps, uneven surfaces, and/or periods of standing. A Taste of Kangaroo Island CODE: KAG-A DURATION 4.5 HOURS ACTIVITY LEVEL MODERATE Full participation may include a limited number of steps, uneven surfaces, and/or periods of standing. Experience the splendid beauty, wildlife and flavours of Kangaroo Island during this half-day tour that showcases some local producers including a shearing demonstration, honey farm and Eucalyptus distillery. Rob's Sheep Shearing Depart the pier for the scenic, narrated drive to the Rob's Sheep Shearing. Robs Shearing Demonstration which provides a chance to watch KI local farmer Rob work together with his well-trained sheepdogs to round up sheep in the yards. Rob then puts his expert shearing skills on show, by shearing one of his flock and entertaining you with his local stories. Rob will then use a spinning wheel to spin wool into a fine, even string creating a lovely ball of merino yarn. Clifford's Honey Farm Next, re-board your coach and drive south for a visit to Clifford's Honey Farm, where over 22,000 pounds (10,000 kilograms) of honey is produced annually. Kangaroo Island is the only place in the world where a pure strain of Ligurian bee exists. Upon arrival, take a guided tour of the Honey Room and facility, explore the honey collection, extraction and production processes, and participate in a tasting of honey varieties. Emu Ridge Eucalyptus Distillery Your last stop is at the Emu Ridge Eucalyptus Distillery, the only commercial eucalyptus distillery operating in South Australia. Take a guided tour of the distillery and sample Kangaroo Island Cider. Re-board your coach and commence the approximately 30-minute ride back to the pier. Please note: This tour requires a moderate amount of walking for approximately 250 yards (about 229 metres), at times over natural, uneven and slippery ground, with a few steps to negotiate to get on/off the coach and at the venues. This tour is not suitable for guests with limited mobility or those who utilise a wheelchair. Lightweight, comfortable layered clothing, flat, closed-toe walking shoes, sun protection and a sweater are recommended. Guests must be at least 18 years old to participate in tastings of alcoholic beverages. Facilities are eco-based and rustic at times. The tour sequence may vary. Please note: This tour requires a moderate amount of walking for approximately 250 yards (about 229 metres), at times over natural, uneven and slippery ground, with a few steps to negotiate to get on/off the coach and at the venues. This tour is not suitable for guests with limited mobility or those who utilise a wheelchair. Lightweight, comfortable layered clothing, flat, closed-toe walking shoes, sun protection and a sweater are recommended. Guests must be at least 18 years old to participate in tastings of alcoholic beverages. Facilities are eco-based and rustic at times. The tour sequence may vary.
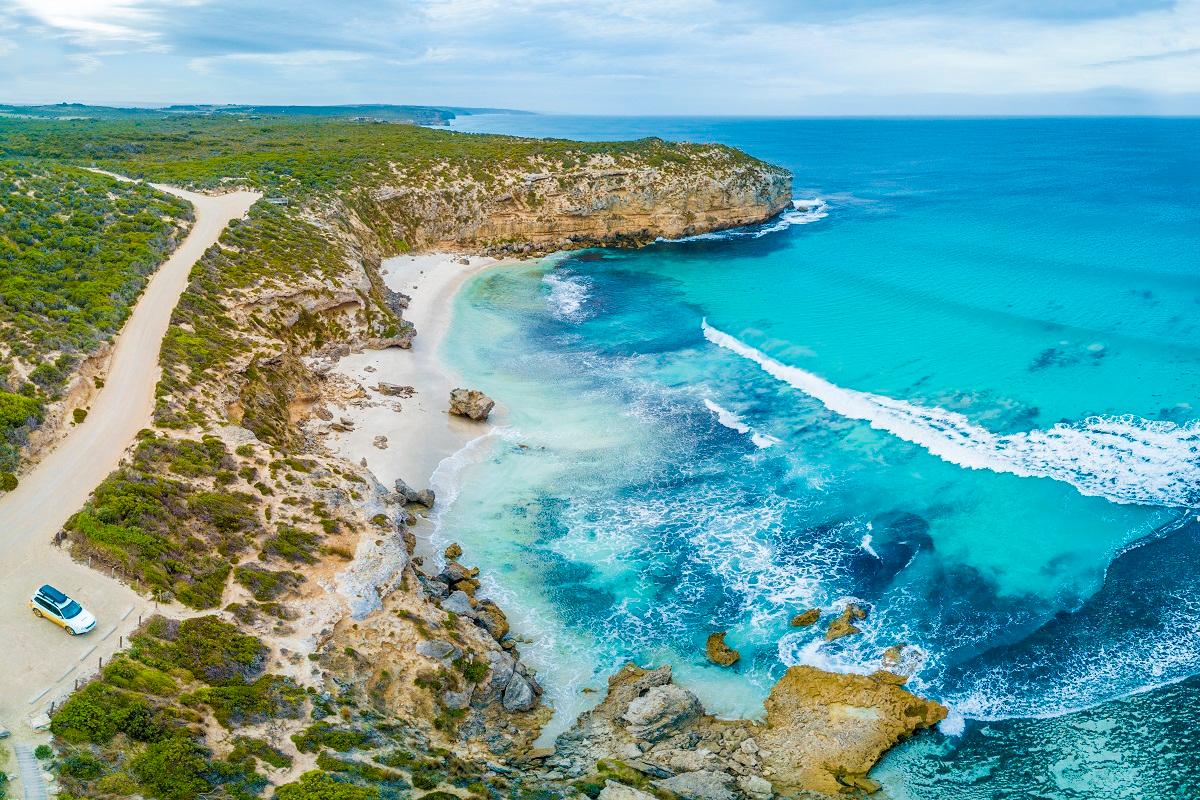
Kangaroo Island Wildlife Park & Beach
KAG-EDiscover the scenic splendour and wildlife of Kangaroo Island during this picturesque, half-day sightseeing excursion. Penneshaw, Kangaroo Island, Pennington Bay, Free Time, Ocean & Coastal Views, Crashing Waves Depart the pier for the short drive to Pennington Bay, an extremely popular surfing and fishing beach. Upon arrival, some free time is made available to relax, stroll the beach and/or take in splendid panoramic views of the coast and ocean. Extreme care should be taken due to the very strong rip currents here, and crashing huge waves on the shore that can be heard at the American River, located approximately 5.6 miles (about nine kilometres) away. Kangaroo Island Wildlife Park, Rare and Unique Wildlife from Kangaroo Island and Australia Next, re-board your coach and proceed to the Kangaroo Island Wildlife Park. With a wide range of Kangaroo Island and Australia's rare, unique and special wildlife, this park offers a unique, hands-on experience in a safe, friendly and educational environment. During your guided walking tour, you get an up-close and hands on experience with many of the parks animals, most of which have been rescued over the years. There may also be the opportunity to hold a koala weather permitting at your own expense. At the conclusion of your visit, re-board your coach and commence the approximately 70-minute drive back to the pier. Full participation may include a limited number of steps, uneven surfaces, and/or periods of standing. Kangaroo Island Wildlife Park & Beach CODE: KAG-E DURATION 4 HOURS ACTIVITY LEVEL MODERATE Full participation may include a limited number of steps, uneven surfaces, and/or periods of standing. Discover the scenic splendour and wildlife of Kangaroo Island during this picturesque, half-day sightseeing excursion. Penneshaw, Kangaroo Island, Pennington Bay, Free Time, Ocean & Coastal Views, Crashing Waves Depart the pier for the short drive to Pennington Bay, an extremely popular surfing and fishing beach. Upon arrival, some free time is made available to relax, stroll the beach and/or take in splendid panoramic views of the coast and ocean. Extreme care should be taken due to the very strong rip currents here, and crashing huge waves on the shore that can be heard at the American River, located approximately 5.6 miles (about nine kilometres) away. Kangaroo Island Wildlife Park, Rare and Unique Wildlife from Kangaroo Island and Australia Next, re-board your coach and proceed to the Kangaroo Island Wildlife Park. With a wide range of Kangaroo Island and Australia's rare, unique and special wildlife, this park offers a unique, hands-on experience in a safe, friendly and educational environment. During your guided walking tour, you get an up-close and hands on experience with many of the parks animals, most of which have been rescued over the years. There may also be the opportunity to hold a koala weather permitting at your own expense. At the conclusion of your visit, re-board your coach and commence the approximately 70-minute drive back to the pier. Please note: This tour involves a moderate amount of walking for approximately 547 yards (about 500 metres), at times over uneven surfaces, with three-four steps to negotiate to get on/off the coach and at the sites visited. Walking at Pennington Bay is at the discretion of each guest. This tour is suitable for guests with limited mobility, but is not wheelchair-accessible. Guests are advised to wear lightweight, comfortable clothing with flat, closed-toe walking shoes, and bring sun protection and a light jacket from the ship. Guests cannot stay on the coach for extended visits to venues, as the air-conditioning on the coach does not work without the engine running. The tour sequence may vary. Space on this tour is very limited; we suggest you book in advance to avoid disappointment. Please note: This tour involves a moderate amount of walking for approximately 547 yards (about 500 metres), at times over uneven surfaces, with three-four steps to negotiate to get on/off the coach and at the sites visited. Walking at Pennington Bay is at the discretion of each guest. This tour is suitable for guests with limited mobility, but is not wheelchair-accessible. Guests are advised to wear lightweight, comfortable clothing with flat, closed-toe walking shoes, and bring sun protection and a light jacket from the ship. Guests cannot stay on the coach for extended visits to venues, as the air-conditioning on the coach does not work without the engine running. The tour sequence may vary. Space on this tour is very limited; we suggest you book in advance to avoid disappointment.
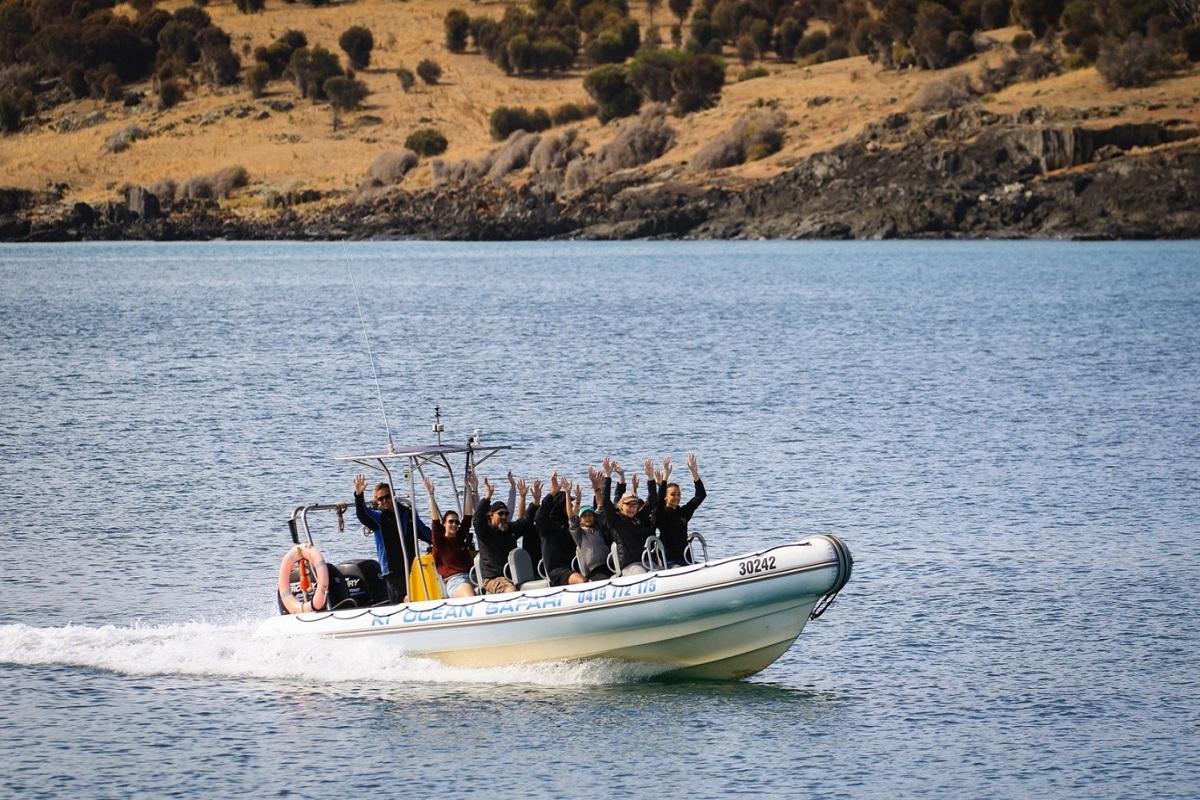
Penneshaw & Surrounds Ocean Experience
KAG-HMarvel at the coast and wildlife of Kangaroo Island from the water during this scenic and exhilarating, 'Ocean Safari' excursion. Christmas Cove, Dolphin Cove, Cuttlefish Bay, Kangaroo Head and Snapper Point Depart the pier for the short transfer to Christmas Cove. En route, a photo brief stop is made to take in spectacular panoramic views over Penneshaw. Upon arrival at Christmas Cove, embark your awaiting, 24.6-foot (about 7.5-metre) rigid-inflatable boat (RIB), the Gemini Waverider, and begin your approximately one-hour coast and wildlife tour. Along the way, your panoramic route wraps around the coastline of Kangaroo Island, and visits locales like Dolphin Cove, Cuttlefish Bay, Kangaroo Head and Snapper Point. Wildlife During your exciting journey via RIB-boat, you may encounter pods of bottlenose and common dolphins frolicking happily in their natural environment, or swimming alongside the boat. Seals also inhabit the coasts of Kangaroo Island, and may be seen resting up on the rocks. In addition, look for the many diverse species of seabirds, including sea eagles, osprey and wedged-tailed eagles. At the conclusion of your RIB-boat adventure, return to Christmas Cove and disembark your boat, then re-board your coach and commence the short drive back to the pier. Excursions are at an easy pace without the need for excessive walking or physical activities. Being able to board buses and negotiate steps that may be encountered Penneshaw & Surrounds Ocean Experience CODE: KAG-H DURATION 1.5 HOURS ACTIVITY LEVEL MINIMAL Excursions are at an easy pace without the need for excessive walking or physical activities. Being able to board buses and negotiate steps that may be encountered Marvel at the coast and wildlife of Kangaroo Island from the water during this scenic and exhilarating, 'Ocean Safari' excursion. Christmas Cove, Dolphin Cove, Cuttlefish Bay, Kangaroo Head and Snapper Point Depart the pier for the short transfer to Christmas Cove. En route, a photo brief stop is made to take in spectacular panoramic views over Penneshaw. Upon arrival at Christmas Cove, embark your awaiting, 24.6-foot (about 7.5-metre) rigid-inflatable boat (RIB), the Gemini Waverider, and begin your approximately one-hour coast and wildlife tour. Along the way, your panoramic route wraps around the coastline of Kangaroo Island, and visits locales like Dolphin Cove, Cuttlefish Bay, Kangaroo Head and Snapper Point. Wildlife During your exciting journey via RIB-boat, you may encounter pods of bottlenose and common dolphins frolicking happily in their natural environment, or swimming alongside the boat. Seals also inhabit the coasts of Kangaroo Island, and may be seen resting up on the rocks. In addition, look for the many diverse species of seabirds, including sea eagles, osprey and wedged-tailed eagles. At the conclusion of your RIB-boat adventure, return to Christmas Cove and disembark your boat, then re-board your coach and commence the short drive back to the pier. Please note: This tour involves a moderate amount of walking for approximately 547 yards (about 500 metres), at times over uneven surfaces and inclines, with a few steps to negotiate to get on/off the coach and embark/disembark the boat. This tour is not suitable for pregnant guests, guests with back and/or neck problems, guests with heart and/or respiratory conditions, guests prone to seasickness, guests with limited mobility, and guests who utilise a wheelchair. Guests are advised to wear lightweight, comfortable clothing with flat, closed-toe walking shoes, and bring sun protection and a weatherproof jacket from the ship. Although frequently encountered on this type of tour, wildlife sightings are not guaranteed. The tour sequence may vary. Operation of this tour is subject to weather conditions. Please note: This tour involves a moderate amount of walking for approximately 547 yards (about 500 metres), at times over uneven surfaces and inclines, with a few steps to negotiate to get on/off the coach and embark/disembark the boat. This tour is not suitable for pregnant guests, guests with back and/or neck problems, guests with heart and/or respiratory conditions, guests prone to seasickness, guests with limited mobility, and guests who utilise a wheelchair. Guests are advised to wear lightweight, comfortable clothing with flat, closed-toe walking shoes, and bring sun protection and a weatherproof jacket from the ship. Although frequently encountered on this type of tour, wildlife sightings are not guaranteed. The tour sequence may vary. Operation of this tour is subject to weather conditions.
Pennington Bay & Historic Kingscote
KAG-GExperience the coastal beauty of Kangaroo Island and legacy of southern Australia's oldest European settlement during this leisurely, half-day sightseeing excursion. Pennington Bay, South Coast, Kangaroo Island Beaches, Kangaroos Depart the pier for the scenic, approximately 45-minute drive to Kingscote. En route, a photo stop is made at Pennington Bay. Upon arrival, take in spectacular panoramic views of Pennington Bay, the rugged south coast and beautiful beaches of Kangaroo Island. During your drive, look for local kangaroos often seen lazing in the paddocks. Kingscote, Free Time, Reeves Point, Bay of Shoals Upon arrival, in Kingscote, southern Australia's oldest European settlement and the largest township on Kangaroo Island, approximately two hours of free time is made available to explore the main street, browse the local shops and/or relax with a refreshing drink in a local café at your own expense. At the conclusion of your visit, re-board your coach and commence the approximately 45-minute drive back to the pier. En route, learn about the history of Kangaroo Island, and pass by historic Reeves Point, the point of South Australia's first settlement, and the scenic Bay of Shoals. Excursions are at an easy pace without the need for excessive walking or physical activities. Being able to board buses and negotiate steps that may be encountered Pennington Bay & Historic Kingscote CODE: KAG-G DURATION 3.5 HOURS ACTIVITY LEVEL MINIMAL Excursions are at an easy pace without the need for excessive walking or physical activities. Being able to board buses and negotiate steps that may be encountered Experience the coastal beauty of Kangaroo Island and legacy of southern Australia's oldest European settlement during this leisurely, half-day sightseeing excursion. Pennington Bay, South Coast, Kangaroo Island Beaches, Kangaroos Depart the pier for the scenic, approximately 45-minute drive to Kingscote. En route, a photo stop is made at Pennington Bay. Upon arrival, take in spectacular panoramic views of Pennington Bay, the rugged south coast and beautiful beaches of Kangaroo Island. During your drive, look for local kangaroos often seen lazing in the paddocks. Kingscote, Free Time, Reeves Point, Bay of Shoals Upon arrival, in Kingscote, southern Australia's oldest European settlement and the largest township on Kangaroo Island, approximately two hours of free time is made available to explore the main street, browse the local shops and/or relax with a refreshing drink in a local café at your own expense. At the conclusion of your visit, re-board your coach and commence the approximately 45-minute drive back to the pier. En route, learn about the history of Kangaroo Island, and pass by historic Reeves Point, the point of South Australia's first settlement, and the scenic Bay of Shoals. Please note: This tour involves a moderate amount of walking, at times over uneven surfaces, with three-four steps to negotiate to get on/off the coach and at the sites visited. Walking at Kingscote is at the discretion of each guest. This tour is suitable for guests with limited mobility, but is not wheelchair-accessible. Guests are advised to wear lightweight, comfortable clothing with flat, closed-toe walking shoes, and bring sun protection and a light jacket from the ship. Although frequently encountered on this type of tour, animal sightings are not guaranteed. The tour sequence may vary. Please note: This tour involves a moderate amount of walking, at times over uneven surfaces, with three-four steps to negotiate to get on/off the coach and at the sites visited. Walking at Kingscote is at the discretion of each guest. This tour is suitable for guests with limited mobility, but is not wheelchair-accessible. Guests are advised to wear lightweight, comfortable clothing with flat, closed-toe walking shoes, and bring sun protection and a light jacket from the ship. Although frequently encountered on this type of tour, animal sightings are not guaranteed. The tour sequence may vary.
Seal Bay Discovery
KAG-BExplore the diverse flora, fauna and wildlife of Kangaroo Island during this picturesque excursion to Seal Bay,a national parks set up to protect the endangered the Australian Sea-lion and its natural habitat. Seal Bay Depart the pier for the scenic, approximately 80-minute narrated drive to Seal Bay. See the endangered Australian Sea-lions in their natural environment of coastal vegetation, dunes and beach. It is a large sandy beach and dune area where approximately 600 Australian sea lions rest and nurse their young. Seal Bay is one of only two places in the world where you can stroll with your guide through a wild seal colony. Wander along the 800-metre boardwalk which meanders through the limestone cliffs and dunes to viewing platforms where you can observe the sea-lions surfing the waves or sunning themselves on the beach while you enjoy the stunning coastal scenery. Pennington Bay Re-board the coach and continue driving to Pennington Bay, a superb surf beach and photographer's dream, and a popular for swimming and fishing. Your tour concludes with the transfer back to the pier. Full participation may include a limited number of steps, uneven surfaces, and/or periods of standing. Seal Bay Discovery CODE: KAG-B DURATION 4 HOURS ACTIVITY LEVEL MODERATE Full participation may include a limited number of steps, uneven surfaces, and/or periods of standing. Explore the diverse flora, fauna and wildlife of Kangaroo Island during this picturesque excursion to Seal Bay,a national parks set up to protect the endangered the Australian Sea-lion and its natural habitat. Seal Bay Depart the pier for the scenic, approximately 80-minute narrated drive to Seal Bay. See the endangered Australian Sea-lions in their natural environment of coastal vegetation, dunes and beach. It is a large sandy beach and dune area where approximately 600 Australian sea lions rest and nurse their young. Seal Bay is one of only two places in the world where you can stroll with your guide through a wild seal colony. Wander along the 800-metre boardwalk which meanders through the limestone cliffs and dunes to viewing platforms where you can observe the sea-lions surfing the waves or sunning themselves on the beach while you enjoy the stunning coastal scenery. Pennington Bay Re-board the coach and continue driving to Pennington Bay, a superb surf beach and photographer's dream, and a popular for swimming and fishing. Your tour concludes with the transfer back to the pier. Please note: This tour requires a moderate amount of walking for approximately 1100 yards (about 1000 metres), at times over natural, uneven and slippery ground, with a few steps to negotiate to get on/off the coach. At the Seal Colony, extensive walking is required along a boardwalk with inclines and steps, and on the sand. This tour is not suitable for guests with limited mobility or those who utilise a wheelchair. Lightweight, comfortable layered clothing, flat, closed-toe walking shoes, sun protection and a sweater are recommended. Facilities are eco-based and rustic at times. Guests may get wet. The tour sequence may vary. Please note: This tour requires a moderate amount of walking for approximately 1100 yards (about 1000 metres), at times over natural, uneven and slippery ground, with a few steps to negotiate to get on/off the coach. At the Seal Colony, extensive walking is required along a boardwalk with inclines and steps, and on the sand. This tour is not suitable for guests with limited mobility or those who utilise a wheelchair. Lightweight, comfortable layered clothing, flat, closed-toe walking shoes, sun protection and a sweater are recommended. Facilities are eco-based and rustic at times. Guests may get wet. The tour sequence may vary.
Lyttelton (Christchurch), New Zealand
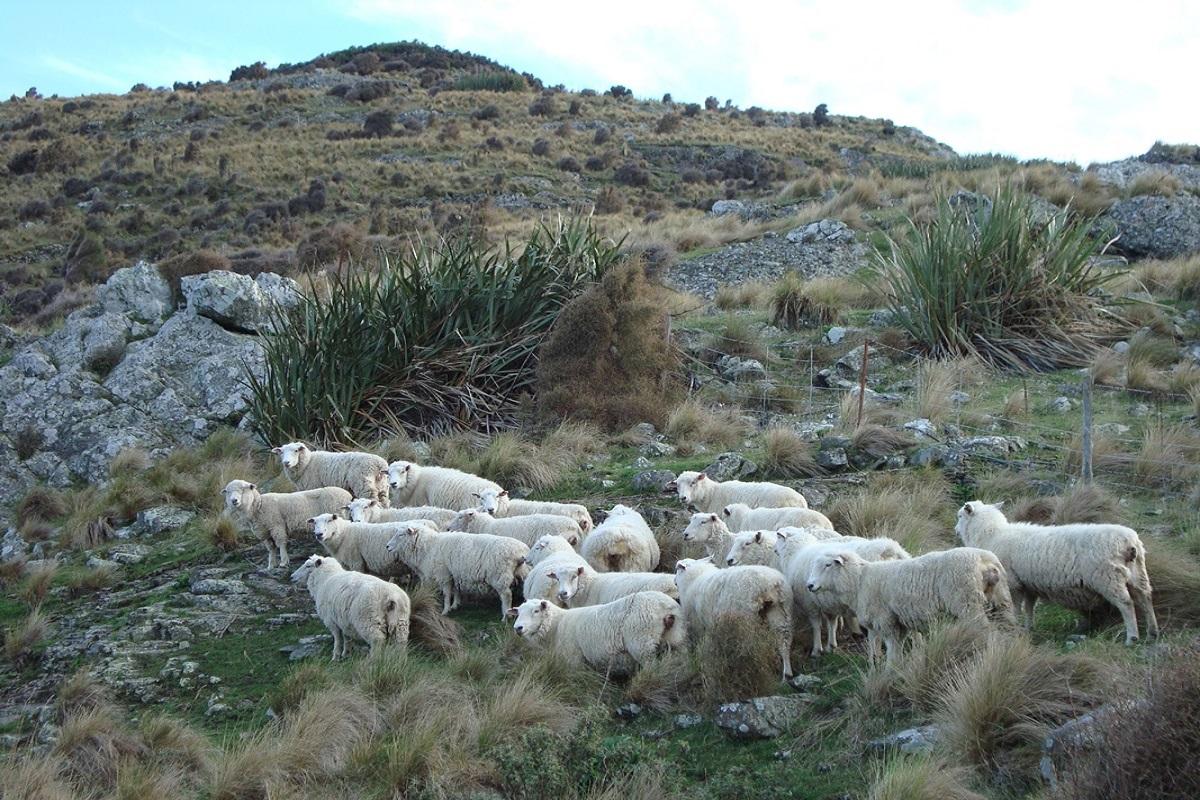
Canterbury Sheep Farm
LYT-HDiscover the highlights of Canterbury and Christchurch during this scenic and relaxing, half-day excursion through the city and countryside. Lyttelton City and Harbour, Governors Bay, Gebbies Pass, Manderley Farm Depart the pier for the scenic, approximately one-hour drive to the Manderley Farm. En route, ride around Lyttelton Harbour, an extinct volcano, then on to idyllic Governors Bay. From here, cross Gebbies Pass to the Manderley Farm, located near Little River. Manderley Farm, Sheepdog Demonstration, Morning Tea Upon arrival at Manderley Farm, receive a warm greeting from the owners, Ross and Mary Millar. Ross entertains you with a sheepdog demonstration that shows the important role dogs play in the operation of a successful sheep farm, then invites you to join them for a cup of morning tea. Lake Ellsmere, Tai Tapu, Christchurch, Lyttelton Tunnel Next, re-board your coach and proceed for a drive along the shores of Lake Ellsmere, then through the small township of Tai Tapu en route to Christchurch. Whilst driving through the city, pass by some of the areas affected by the 2011 earthquake. See how Christchurch is preserving some of its iconic heritage buildings, and hear about the exciting vision to rebuild and restore the inner-city before commencing the approximately 30-minute drive back to the pier via the Lyttelton Tunnel. Full participation may include a limited number of steps, uneven surfaces, and/or periods of standing. Canterbury Sheep Farm CODE: LYT-H DURATION 4 HOURS ACTIVITY LEVEL MODERATE Full participation may include a limited number of steps, uneven surfaces, and/or periods of standing. Discover the highlights of Canterbury and Christchurch during this scenic and relaxing, half-day excursion through the city and countryside. Lyttelton City and Harbour, Governors Bay, Gebbies Pass, Manderley Farm Depart the pier for the scenic, approximately one-hour drive to the Manderley Farm. En route, ride around Lyttelton Harbour, an extinct volcano, then on to idyllic Governors Bay. From here, cross Gebbies Pass to the Manderley Farm, located near Little River. Manderley Farm, Sheepdog Demonstration, Morning Tea Upon arrival at Manderley Farm, receive a warm greeting from the owners, Ross and Mary Millar. Ross entertains you with a sheepdog demonstration that shows the important role dogs play in the operation of a successful sheep farm, then invites you to join them for a cup of morning tea. Lake Ellsmere, Tai Tapu, Christchurch, Lyttelton Tunnel Next, re-board your coach and proceed for a drive along the shores of Lake Ellsmere, then through the small township of Tai Tapu en route to Christchurch. Whilst driving through the city, pass by some of the areas affected by the 2011 earthquake. See how Christchurch is preserving some of its iconic heritage buildings, and hear about the exciting vision to rebuild and restore the inner-city before commencing the approximately 30-minute drive back to the pier via the Lyttelton Tunnel. Please note: This tour involves a moderate amount of walking for approximately 219 yards (about 200 metres), at times over uneven and grassy surfaces and hills, with a few steps to negotiate to get on/off the coach. This tour is not suitable for guests with limited mobility and guests who utilise a wheelchair. Guests are advised to wear lightweight, comfortable clothing with flat, closed-toe walking shoes, and bring sun protection and a weatherproof coat or jacket from the ship. Space on this tour is very limited; we suggest you book in advance to avoid disappointment. Please note: This tour involves a moderate amount of walking for approximately 219 yards (about 200 metres), at times over uneven and grassy surfaces and hills, with a few steps to negotiate to get on/off the coach. This tour is not suitable for guests with limited mobility and guests who utilise a wheelchair. Guests are advised to wear lightweight, comfortable clothing with flat, closed-toe walking shoes, and bring sun protection and a weatherproof coat or jacket from the ship. Space on this tour is very limited; we suggest you book in advance to avoid disappointment.
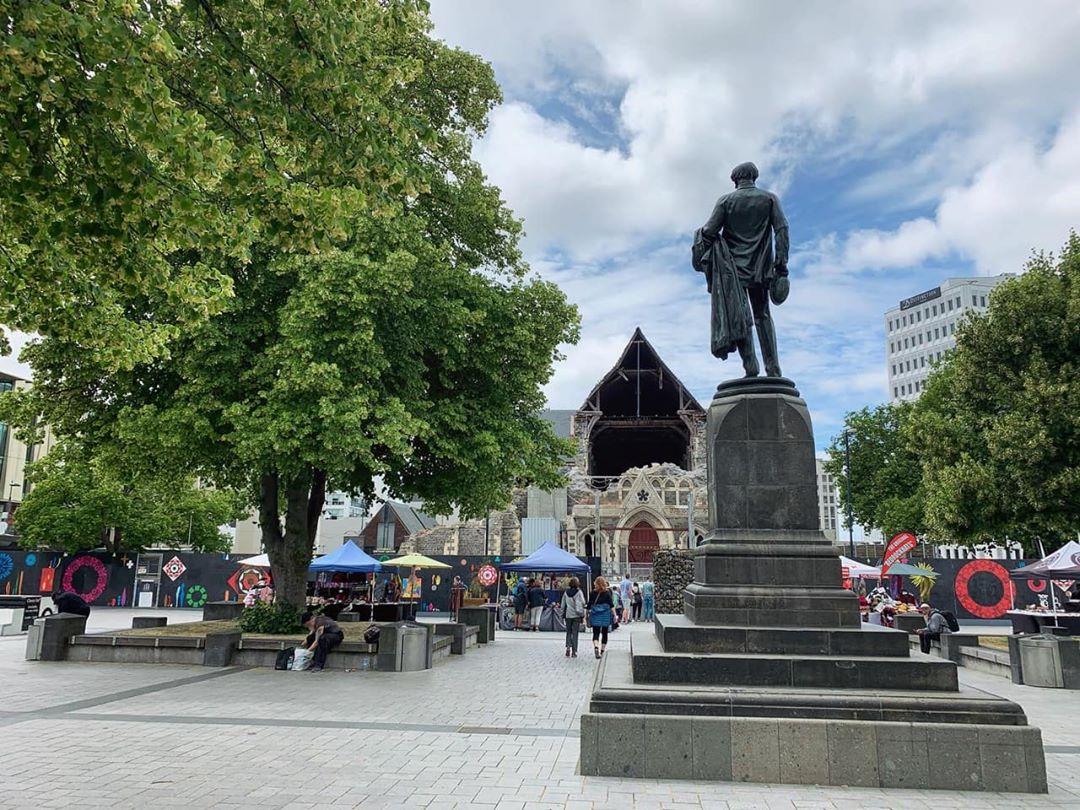
Discover Christchurch
LYT-AExplore the rebuilding of historic Christchurch following its devastating 2011 earthquakes during this picturesque, half-day sightseeing excursion. Lyttelton, Sign of the Takahe Lookout, Christchurch, Canterbury Plains, Ocean, Southern Alps Depart the pier a double-decker bus for the scenic, approximately 30-minute drive to the Sign of the Takahe Lookout. Upon arrival, marvel at the breath-taking panoramic views over Christchurch, the Canterbury Plains, ocean and distant Southern Alps. Mona Vale Gardens, Beautiful Flora and Fauna Next, re-board the double-decker bus and continue on to the stunning Mona Vale Gardens. Upon arrival, take a stroll through the gardens and enjoy the splendid views and photo opportunities of the lush, beautiful flora and fauna that surrounds you. Leaving the Mona Vale Gardens, your drive continues on to the city centre. Christchurch, City Centre, Post-Earthquake Rebuilding Efforts Upon arrival in the city centre, board a double-decker bus for a narrated drive past the city's main highlights. Visit all the must-see central city sights whilst enjoying spectacular views, see areas affected by the Canterbury earthquakes and learn about the exciting rebuild that is now taking place in Christchurch. This city tour is constantly changing as the city rebuilds. The stories told differ depending on where we are at with the rebuild but Christchurch today is already a vast improvement over what it looked like after that devastating 2011 earthquake and its aftershocks. Following your visit, re-board the double-decker bus and commence the approximately 30-minute drive back to the pier. Full participation may include a limited number of steps, uneven surfaces, and/or periods of standing. Discover Christchurch CODE: LYT-A DURATION 4 HOURS ACTIVITY LEVEL MODERATE Full participation may include a limited number of steps, uneven surfaces, and/or periods of standing. Explore the rebuilding of historic Christchurch following its devastating 2011 earthquakes during this picturesque, half-day sightseeing excursion. Lyttelton, Sign of the Takahe Lookout, Christchurch, Canterbury Plains, Ocean, Southern Alps Depart the pier a double-decker bus for the scenic, approximately 30-minute drive to the Sign of the Takahe Lookout. Upon arrival, marvel at the breath-taking panoramic views over Christchurch, the Canterbury Plains, ocean and distant Southern Alps. Mona Vale Gardens, Beautiful Flora and Fauna Next, re-board the double-decker bus and continue on to the stunning Mona Vale Gardens. Upon arrival, take a stroll through the gardens and enjoy the splendid views and photo opportunities of the lush, beautiful flora and fauna that surrounds you. Leaving the Mona Vale Gardens, your drive continues on to the city centre. Christchurch, City Centre, Post-Earthquake Rebuilding Efforts Upon arrival in the city centre, board a double-decker bus for a narrated drive past the city's main highlights. Visit all the must-see central city sights whilst enjoying spectacular views, see areas affected by the Canterbury earthquakes and learn about the exciting rebuild that is now taking place in Christchurch. This city tour is constantly changing as the city rebuilds. The stories told differ depending on where we are at with the rebuild but Christchurch today is already a vast improvement over what it looked like after that devastating 2011 earthquake and its aftershocks. Following your visit, re-board the double-decker bus and commence the approximately 30-minute drive back to the pier. Please note: This tour involves a moderate amount of walking for approximately 0.65 miles (about 1.05 kilometres), at times over uneven and grassy surfaces and hills, with a few steps to negotiate to get on/off the coach and double-decker bus, and stairs to access its second level. This tour is not suitable for guests with limited mobility and guests who utilise a wheelchair. Guests are advised to wear lightweight, comfortable clothing with flat, closed-toe walking shoes, and bring sun protection and a weatherproof coat or jacket from the ship. Space on this tour is very limited; we suggest you book in advance to avoid disappointment. The order of sites visited may vary. Please note: This tour involves a moderate amount of walking for approximately 0.65 miles (about 1.05 kilometres), at times over uneven and grassy surfaces and hills, with a few steps to negotiate to get on/off the coach and double-decker bus, and stairs to access its second level. This tour is not suitable for guests with limited mobility and guests who utilise a wheelchair. Guests are advised to wear lightweight, comfortable clothing with flat, closed-toe walking shoes, and bring sun protection and a weatherproof coat or jacket from the ship. Space on this tour is very limited; we suggest you book in advance to avoid disappointment. The order of sites visited may vary.
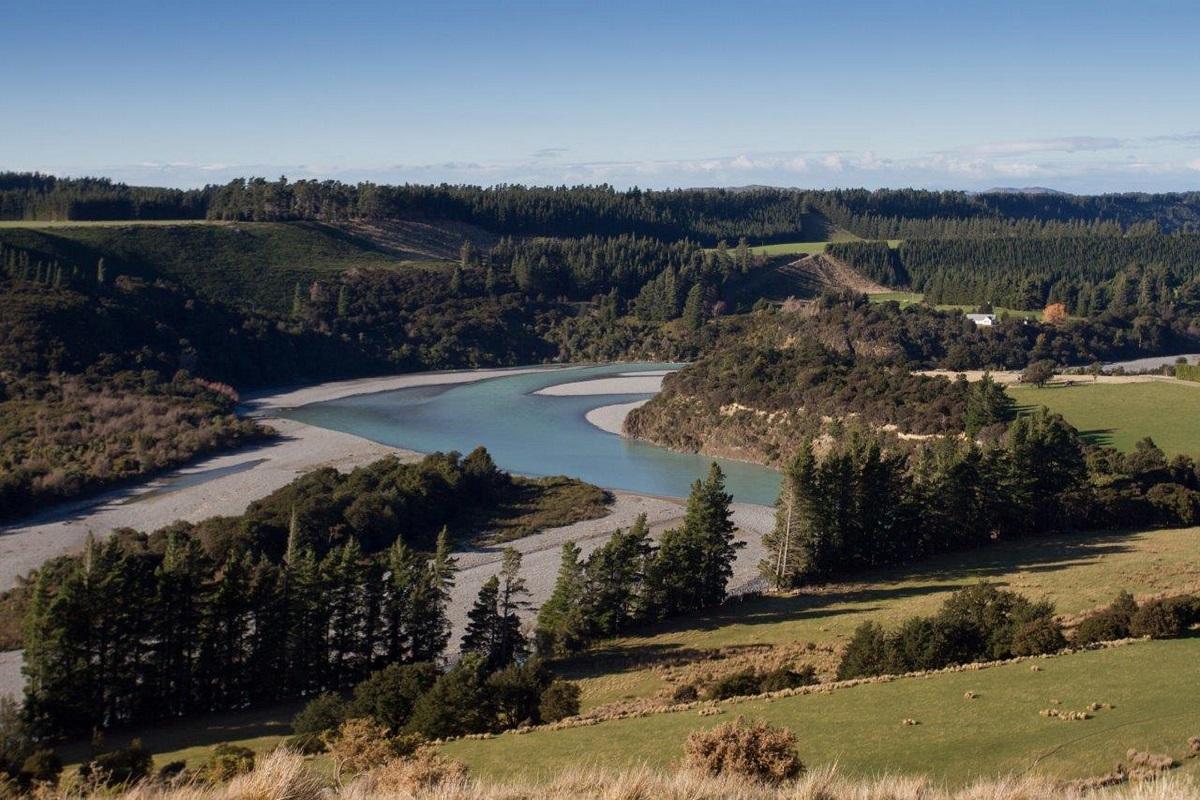
High Country Explorer
LYT-BEmbrace your spirit of adventure during this exhilarating, full-day excursion into the high country of the Southern Alps via coach, jet-boat and 4x4 vehicle. Lyttelton, Canterbury Plains, Waimakariri River, Southern Alps Depart the pier with your driver-guide for the scenic, approximately two-hour drive to the Rubicon Station. En route, watch the landscape change as you travel across the Canterbury Plains and Waimakariri River to the foothills of the majestic Southern Alps. Rubicon Station, 4X4 Ride, High Country, Mt. Torlesse, Southern Alps, River Gorges, Lunch Upon arrival at the Rubicon Station, located on the banks of the spectacular Waimakariri River-gorge, switch to a 4x4 touring vehicle for a panoramic drive through Rubicon, Mt. Torlesse and the rugged high country, which is framed by the jagged peaks of the Southern Alps and river gorges. Along the way, explore areas that even New Zealanders seldom see. Following your exciting 4x4 adventure, proceed for lunch back at the Rubicon Station. Jet-Boat-Ride, Waimakariri River, Steep-Walled Gorge, Staircase Viaduct, Scenic Drive After lunch, you are treated to an entirely different view of the magnificent high country during a lightning-fast jet-boat-ride on the Waimakariri River. Your jet-boat zips up the river and its steep-walled gorge en route to the Staircase Viaduct. Experience the thrill of skimming over the water, at times only inches deep, whilst feeling safe and secure. At the conclusion of your tour, re-board the coach and commence the approximately 2.5-hour drive back to the pier. Full participation may include a limited number of steps, uneven surfaces, and/or periods of standing. A meal is included in the excursion. High Country Explorer CODE: LYT-B DURATION 8 HOURS ACTIVITY LEVEL MODERATE Full participation may include a limited number of steps, uneven surfaces, and/or periods of standing. MEAL INCLUDED A meal is included in the excursion. Embrace your spirit of adventure during this exhilarating, full-day excursion into the high country of the Southern Alps via coach, jet-boat and 4x4 vehicle. Lyttelton, Canterbury Plains, Waimakariri River, Southern Alps Depart the pier with your driver-guide for the scenic, approximately two-hour drive to the Rubicon Station. En route, watch the landscape change as you travel across the Canterbury Plains and Waimakariri River to the foothills of the majestic Southern Alps. Rubicon Station, 4X4 Ride, High Country, Mt. Torlesse, Southern Alps, River Gorges, Lunch Upon arrival at the Rubicon Station, located on the banks of the spectacular Waimakariri River-gorge, switch to a 4x4 touring vehicle for a panoramic drive through Rubicon, Mt. Torlesse and the rugged high country, which is framed by the jagged peaks of the Southern Alps and river gorges. Along the way, explore areas that even New Zealanders seldom see. Following your exciting 4x4 adventure, proceed for lunch back at the Rubicon Station. Jet-Boat-Ride, Waimakariri River, Steep-Walled Gorge, Staircase Viaduct, Scenic Drive After lunch, you are treated to an entirely different view of the magnificent high country during a lightning-fast jet-boat-ride on the Waimakariri River. Your jet-boat zips up the river and its steep-walled gorge en route to the Staircase Viaduct. Experience the thrill of skimming over the water, at times only inches deep, whilst feeling safe and secure. At the conclusion of your tour, re-board the coach and commence the approximately 2.5-hour drive back to the pier. Please note: This tour involves jet-boat and 4x4 rides over rough, uneven terrain that can be at high speeds and result in bumpy, jerking motions. This tour involves a moderate amount of walking for approximately 411 yards (about 450 metres), at times over uneven surfaces, with a few steps to negotiate to get on/off the coach and off-road vehicle, and embark/disembark the jet-boat. This tour is not suitable for pregnant guests, guests with neck and/or back problems, guests with heart and/or respiratory conditions, guests prone to motion sickness, guests with limited mobility, and guests who utilise a wheelchair. Guests are advised to wear lightweight, comfortable clothing with flat, closed-toe walking shoes, and bring a warm hat and a weatherproof windbreaker or jacket and a towel from the ship. The driving distance between the pier and Rubicon Station is approximately 2-2-.5 hours in each direction. The tour sequence may vary. Space on this tour is very limited; we suggest you book in advance to avoid disappointment. Please note: This tour involves jet-boat and 4x4 rides over rough, uneven terrain that can be at high speeds and result in bumpy, jerking motions. This tour involves a moderate amount of walking for approximately 411 yards (about 450 metres), at times over uneven surfaces, with a few steps to negotiate to get on/off the coach and off-road vehicle, and embark/disembark the jet-boat. This tour is not suitable for pregnant guests, guests with neck and/or back problems, guests with heart and/or respiratory conditions, guests prone to motion sickness, guests with limited mobility, and guests who utilise a wheelchair. Guests are advised to wear lightweight, comfortable clothing with flat, closed-toe walking shoes, and bring a warm hat and a weatherproof windbreaker or jacket and a towel from the ship. The driving distance between the pier and Rubicon Station is approximately 2-2-.5 hours in each direction. The tour sequence may vary. Space on this tour is very limited; we suggest you book in advance to avoid disappointment.

Journey into Middle Earth
LYT-FEmbrace the pristine natural beauty of Mt. Sunday and Mt. Potts Station, settings for the Lord of the Rings movie trilogy, during this panoramic, full-day sightseeing excursion. Lyttelton, Canterbury Plains, Rakaia, Morning Tea, Mt. Somers, Southern Alps, Lake Clearwater Depart the pier for the scenic, approximately 90-minute drive over the farmland of the Canterbury Plains to the foothills of the Southern Alps and Mt Somers Village, where a stop is made for morning tea. Leaving Rakaia, re-board your coach and head inland from Mt. Somers towards the heart of the Southern Alps. Along the way, a photo stop is made at Lake Clearwater. On a clear day, this alpine lake features spectacular panoramic views over the lake and mountain chain that forms the backbone of the South Island. Mt. Potts Station, Mt. Sunday, Edoras, High Country, Free Time, Lord of the Rings Photo Opportunity Next, continue on to the remote and beautiful Mt. Potts Station, home of Mt. Sunday. Upon arrival, see how this peaceful mountain was transformed into 'Edoras', one of the most stunning and recognisable Lord of the Rings filming locations, and the capital city of the Rohan people in the Lord of the Rings movie trilogy. Immerse yourself in the natural unspoiled beauty of the high country's sparkling clear lakes, glistening blue rivers and fresh mountain air. Some free time is made available here to explore this magical landscape, and have your photo taken with Lord of the Rings replica swords. Mt. Somers Village and Memorial Hall, Lunch Following your visit, re-board your coach and proceed to nearby Mt. Somers Village for a rustic lunch stop at the Mt. Somers Memorial Hall. After lunch, re-board your coach and enjoy the spectacular scenery during the approximately three-hour drive back to the pier, with a comfort stop in Rakaia en route. Full participation may include a limited number of steps, uneven surfaces, and/or periods of standing. A meal is included in the excursion. Journey into Middle Earth CODE: LYT-F DURATION 8 HOURS ACTIVITY LEVEL MODERATE Full participation may include a limited number of steps, uneven surfaces, and/or periods of standing. MEAL INCLUDED A meal is included in the excursion. Embrace the pristine natural beauty of Mt. Sunday and Mt. Potts Station, settings for the Lord of the Rings movie trilogy, during this panoramic, full-day sightseeing excursion. Lyttelton, Canterbury Plains, Rakaia, Morning Tea, Mt. Somers, Southern Alps, Lake Clearwater Depart the pier for the scenic, approximately 90-minute drive over the farmland of the Canterbury Plains to the foothills of the Southern Alps and Mt Somers Village, where a stop is made for morning tea. Leaving Rakaia, re-board your coach and head inland from Mt. Somers towards the heart of the Southern Alps. Along the way, a photo stop is made at Lake Clearwater. On a clear day, this alpine lake features spectacular panoramic views over the lake and mountain chain that forms the backbone of the South Island. Mt. Potts Station, Mt. Sunday, Edoras, High Country, Free Time, Lord of the Rings Photo Opportunity Next, continue on to the remote and beautiful Mt. Potts Station, home of Mt. Sunday. Upon arrival, see how this peaceful mountain was transformed into 'Edoras', one of the most stunning and recognisable Lord of the Rings filming locations, and the capital city of the Rohan people in the Lord of the Rings movie trilogy. Immerse yourself in the natural unspoiled beauty of the high country's sparkling clear lakes, glistening blue rivers and fresh mountain air. Some free time is made available here to explore this magical landscape, and have your photo taken with Lord of the Rings replica swords. Mt. Somers Village and Memorial Hall, Lunch Following your visit, re-board your coach and proceed to nearby Mt. Somers Village for a rustic lunch stop at the Mt. Somers Memorial Hall. After lunch, re-board your coach and enjoy the spectacular scenery during the approximately three-hour drive back to the pier, with a comfort stop in Rakaia en route. Please note: This tour involves a moderate amount of walking for approximately 284 yards (about 260 metres), at times over uneven, gravel and grassy surfaces and rough terrain, with a few steps to negotiate to get on/off the coach. This tour is not suitable for guests prone to motion sickness, guests with limited mobility, and guests who utilise a wheelchair. Guests are advised to wear lightweight, comfortable clothing with flat, closed-toe walking shoes, and bring sun protection and a weatherproof coat or jacket from the ship. The driving distance between the pier and Mt. Potts Station is approximately three hours in each direction. Due to legal and conservation requirements, no film sets remain on location. Please note: This tour involves a moderate amount of walking for approximately 284 yards (about 260 metres), at times over uneven, gravel and grassy surfaces and rough terrain, with a few steps to negotiate to get on/off the coach. This tour is not suitable for guests prone to motion sickness, guests with limited mobility, and guests who utilise a wheelchair. Guests are advised to wear lightweight, comfortable clothing with flat, closed-toe walking shoes, and bring sun protection and a weatherproof coat or jacket from the ship. The driving distance between the pier and Mt. Potts Station is approximately three hours in each direction. Due to legal and conservation requirements, no film sets remain on location.
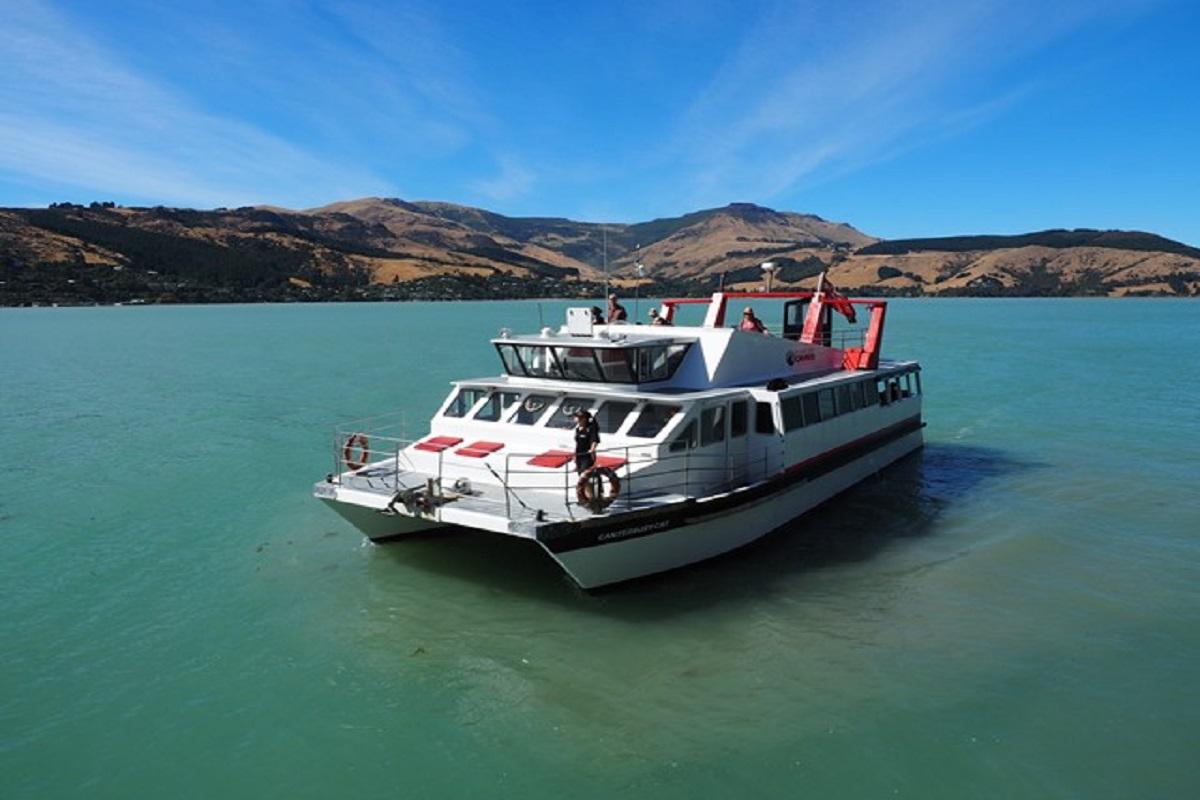
Lyttelton Discovery Cruise
LYT-GDiscover the exquisite natural beauty and storied past of Lyttelton Harbour during this panoramic, half-day sightseeing excursion via catamaran. Lyttelton Harbour, Catamaran Cruise, Dolphins, Seabirds Depart the pier aboard a catamaran for a scenic, approximately two-hour discovery cruise along Lyttelton Harbour, an extinct volcanic crater and the gateway to Antarctica. Full commentary is provided by your skipper/guide, who takes you up-close to the water in search of one of the world's rarest and smallest dolphins, the Hector's, or New Zealand, dolphin. In addition, look for coastal marine bird species such as breeding spotted shags, white-fronted terns and numerous species of gulls. Historic, Early-Maori and European Settlers' Sites Next, explore Lyttelton's fascinating history. See evidence of the harbour's violent, volcanic past and many significant sites, including those of the early Maori and European settlers. Enjoy a refreshing cup of tea or coffee as you hear the stories from the historic Lyttelton Township, the legends of Ripapa Island and more. At the conclusion of your panoramic catamaran journey, commence the short ride back to the pier. Upon arrival, disembark the catamaran and return to the ship on-foot. Excursions are at an easy pace without the need for excessive walking or physical activities. Being able to board buses and negotiate steps that may be encountered Lyttelton Discovery Cruise CODE: LYT-G DURATION 2.5 HOURS ACTIVITY LEVEL MINIMAL Excursions are at an easy pace without the need for excessive walking or physical activities. Being able to board buses and negotiate steps that may be encountered Discover the exquisite natural beauty and storied past of Lyttelton Harbour during this panoramic, half-day sightseeing excursion via catamaran. Lyttelton Harbour, Catamaran Cruise, Dolphins, Seabirds Depart the pier aboard a catamaran for a scenic, approximately two-hour discovery cruise along Lyttelton Harbour, an extinct volcanic crater and the gateway to Antarctica. Full commentary is provided by your skipper/guide, who takes you up-close to the water in search of one of the world's rarest and smallest dolphins, the Hector's, or New Zealand, dolphin. In addition, look for coastal marine bird species such as breeding spotted shags, white-fronted terns and numerous species of gulls. Historic, Early-Maori and European Settlers' Sites Next, explore Lyttelton's fascinating history. See evidence of the harbour's violent, volcanic past and many significant sites, including those of the early Maori and European settlers. Enjoy a refreshing cup of tea or coffee as you hear the stories from the historic Lyttelton Township, the legends of Ripapa Island and more. At the conclusion of your panoramic catamaran journey, commence the short ride back to the pier. Upon arrival, disembark the catamaran and return to the ship on-foot. Please note: This tour involves a minimal amount of walking for approximately 656 yards (about 600 metres) if the ship is docked at the No. 2 Wharf (a shuttle bus is utilised if the ship is docked at the No. 7 Wharf), with a few steps to negotiate to embark/disembark the boat. This tour is not suitable for guests prone to seasickness and guests who utilise a wheelchair. Guests are advised to wear lightweight, comfortable clothing with flat, closed-toe walking or boat shoes, and bring sun protection and a weatherproof coat or jacket from the ship. The tour sequence may vary. Operation of this tour is subject to weather conditions. Minimum number of participants is required to operate this tour. Please note: This tour involves a minimal amount of walking for approximately 656 yards (about 600 metres) if the ship is docked at the No. 2 Wharf (a shuttle bus is utilised if the ship is docked at the No. 7 Wharf), with a few steps to negotiate to embark/disembark the boat. This tour is not suitable for guests prone to seasickness and guests who utilise a wheelchair. Guests are advised to wear lightweight, comfortable clothing with flat, closed-toe walking or boat shoes, and bring sun protection and a weatherproof coat or jacket from the ship. The tour sequence may vary. Operation of this tour is subject to weather conditions. Minimum number of participants is required to operate this tour.

Waipara Valley Wine Outing
LYT-KWaipara. Just over an hour’s drive north of Christchurch, the region’s name means “muddy water.” But don’t be fooled; this trending wine valley in North Canterbury is not muddy. And it’s definitely not about water. While young in wine years, having been established in just 1978, its renown – and its grape plantings – have grown by leaps and bounds. Today more than 75 vineyards thrive here, encompassing over 1,200 hectares of lovingly cultivated vines. Blessed with dry summers and long hot autumns, Waipara’s grapes enjoy a generous ripening window. Each terroir’s unique characteristics yield subtly differing pinot noirs, pinot gris, rieslings, chardonnays, and sauvignon blancs – a number of which you will taste on this relaxed romp through the region. The typical tour agenda calls for in-depth tasting sessions at three prominent estates: Georges Road Wines, Waiapara Springs Winery & Restaurant, and Torlesse Wines. Each visit is an hour long, though the Waipara Springs stopover is expanded to 90 minutes to allow for a delicious platter lunch. Throughout the day, your driver/guide will provide informative insider commentary on the region’s history and burgeoning wine culture. Once your Waipara tastings have wound down, a 90-minute drive back to Lyttleton wharf includes a brief highlights tour through nearby Christchurch. Excursions are at an easy pace without the need for excessive walking or physical activities. Being able to board buses and negotiate steps that may be encountered Waipara Valley Wine Outing CODE: LYT-K DURATION 6.5 HOURS ACTIVITY LEVEL MINIMAL Excursions are at an easy pace without the need for excessive walking or physical activities. Being able to board buses and negotiate steps that may be encountered Waipara. Just over an hour’s drive north of Christchurch, the region’s name means “muddy water.” But don’t be fooled; this trending wine valley in North Canterbury is not muddy. And it’s definitely not about water. While young in wine years, having been established in just 1978, its renown – and its grape plantings – have grown by leaps and bounds. Today more than 75 vineyards thrive here, encompassing over 1,200 hectares of lovingly cultivated vines. Blessed with dry summers and long hot autumns, Waipara’s grapes enjoy a generous ripening window. Each terroir’s unique characteristics yield subtly differing pinot noirs, pinot gris, rieslings, chardonnays, and sauvignon blancs – a number of which you will taste on this relaxed romp through the region. The typical tour agenda calls for in-depth tasting sessions at three prominent estates: Georges Road Wines, Waiapara Springs Winery & Restaurant, and Torlesse Wines. Each visit is an hour long, though the Waipara Springs stopover is expanded to 90 minutes to allow for a delicious platter lunch. Throughout the day, your driver/guide will provide informative insider commentary on the region’s history and burgeoning wine culture. Once your Waipara tastings have wound down, a 90-minute drive back to Lyttleton wharf includes a brief highlights tour through nearby Christchurch. Please note: This easy excursion involves about 200m /600 ft of walking over paved surfaces. Guests who utilise a wheelchair or have limited mobility should consider suitability with care. Wear casual, weather-appropriate clothing. Wine tastings and platter-style lunch are included. The three vineyards visited may vary due to unforeseen circumstances. Please note: This easy excursion involves about 200m /600 ft of walking over paved surfaces. Guests who utilise a wheelchair or have limited mobility should consider suitability with care. Wear casual, weather-appropriate clothing. Wine tastings and platter-style lunch are included. The three vineyards visited may vary due to unforeseen circumstances.
Tauranga, New Zealand
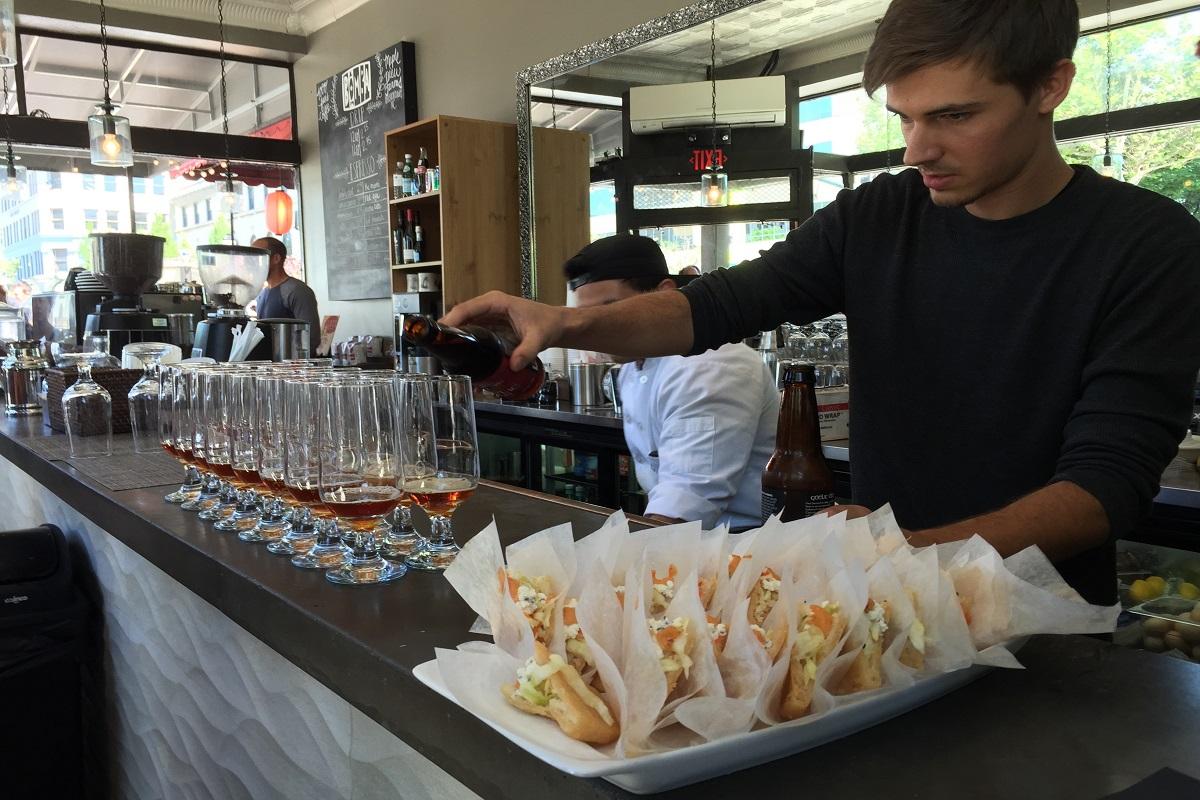
'Bay of Plenty' for Foodies
TRG-IExplore the splendid flavours, beauty and history of the 'Bay of Plenty' during this half-day tasting and sightseeing excursion. Mt. Maunganui Beachfront Heading into Mount Maunganui, a top holiday destination for Kiwis, we visit a boutique ice cream maker to try their unique flavors of ice cream, (great coffee too). What a way to start the day! Driving along Pilot Bay’s harbour beach past the iconic Mauao volcano then the stunning Mount Maunganui Main Beach. Next, we’re off for “Smoko”, a New Zealand institution, this is the “tradies” morning tea break, all will be revealed at a popular local food destination. A scenic drive across the harbour bridge, through Tauranga as we transition from urban to rural. Welcome to The Good Farm, where we get a closeup look at a tiny dairy farm, new calves and lambs plus an organic market garden. Specialty Food Shops, Tastings of Local Specialties, Kiwifruit and Avocado Orchards Traveling a back country road we view the extensive kiwifruit and avocado orchards, both are a significant part of the horticulture industries in the Bay of Plenty. Surprise, our next stop is a small private avocado orchard, take a short stroll amongst the trees with Gary and ‘Edi the Dog’. At the ‘Man-shed’ you will imbibe an array of culinary products including smashed avocado mousse plus other items that are exclusively produced here in the Bay. Countryside Drive, Photo Stops, 'Bay of Plenty' Continue travelling through the Kiwifruit Capital of the World, where cultivation of this amazing super fruit was first grown commercially in New Zealand, to the seaside settlement of Maketu. Maketu is a place of significant cultural history and abundant Kai Moana. Before heading back to the pier enjoy a light lunch right on the beach at the magical Maketu Beachside café, great food and stunning views. At the conclusion of your tour, commence the approximately 30-minute drive back to the pier. Excursions are at an easy pace without the need for excessive walking or physical activities. Being able to board buses and negotiate steps that may be encountered 'Bay of Plenty' for Foodies CODE: TRG-I DURATION 4.5 HOURS ACTIVITY LEVEL MINIMAL Excursions are at an easy pace without the need for excessive walking or physical activities. Being able to board buses and negotiate steps that may be encountered Explore the splendid flavours, beauty and history of the 'Bay of Plenty' during this half-day tasting and sightseeing excursion. Mt. Maunganui Beachfront Heading into Mount Maunganui, a top holiday destination for Kiwis, we visit a boutique ice cream maker to try their unique flavors of ice cream, (great coffee too). What a way to start the day! Driving along Pilot Bay’s harbour beach past the iconic Mauao volcano then the stunning Mount Maunganui Main Beach. Next, we’re off for “Smoko”, a New Zealand institution, this is the “tradies” morning tea break, all will be revealed at a popular local food destination. A scenic drive across the harbour bridge, through Tauranga as we transition from urban to rural. Welcome to The Good Farm, where we get a closeup look at a tiny dairy farm, new calves and lambs plus an organic market garden. Specialty Food Shops, Tastings of Local Specialties, Kiwifruit and Avocado Orchards Traveling a back country road we view the extensive kiwifruit and avocado orchards, both are a significant part of the horticulture industries in the Bay of Plenty. Surprise, our next stop is a small private avocado orchard, take a short stroll amongst the trees with Gary and ‘Edi the Dog’. At the ‘Man-shed’ you will imbibe an array of culinary products including smashed avocado mousse plus other items that are exclusively produced here in the Bay. Countryside Drive, Photo Stops, 'Bay of Plenty' Continue travelling through the Kiwifruit Capital of the World, where cultivation of this amazing super fruit was first grown commercially in New Zealand, to the seaside settlement of Maketu. Maketu is a place of significant cultural history and abundant Kai Moana. Before heading back to the pier enjoy a light lunch right on the beach at the magical Maketu Beachside café, great food and stunning views. At the conclusion of your tour, commence the approximately 30-minute drive back to the pier. Please note: This tour involves a minimal amount of walking for approximately 50 yards (about 46 metres), with a few steps to negotiate to get on/off the coach. This tour is suitable for guests with limited mobility. This tour is not suitable for guests with food allergies. Lightweight, comfortable clothing with flat, closed-toe walking shoes and sun protection are recommended. The tour sequence may vary. Space on this tour is very limited; we suggest you book in advance to avoid disappointment. Please note: This tour involves a minimal amount of walking for approximately 50 yards (about 46 metres), with a few steps to negotiate to get on/off the coach. This tour is suitable for guests with limited mobility. This tour is not suitable for guests with food allergies. Lightweight, comfortable clothing with flat, closed-toe walking shoes and sun protection are recommended. The tour sequence may vary. Space on this tour is very limited; we suggest you book in advance to avoid disappointment.
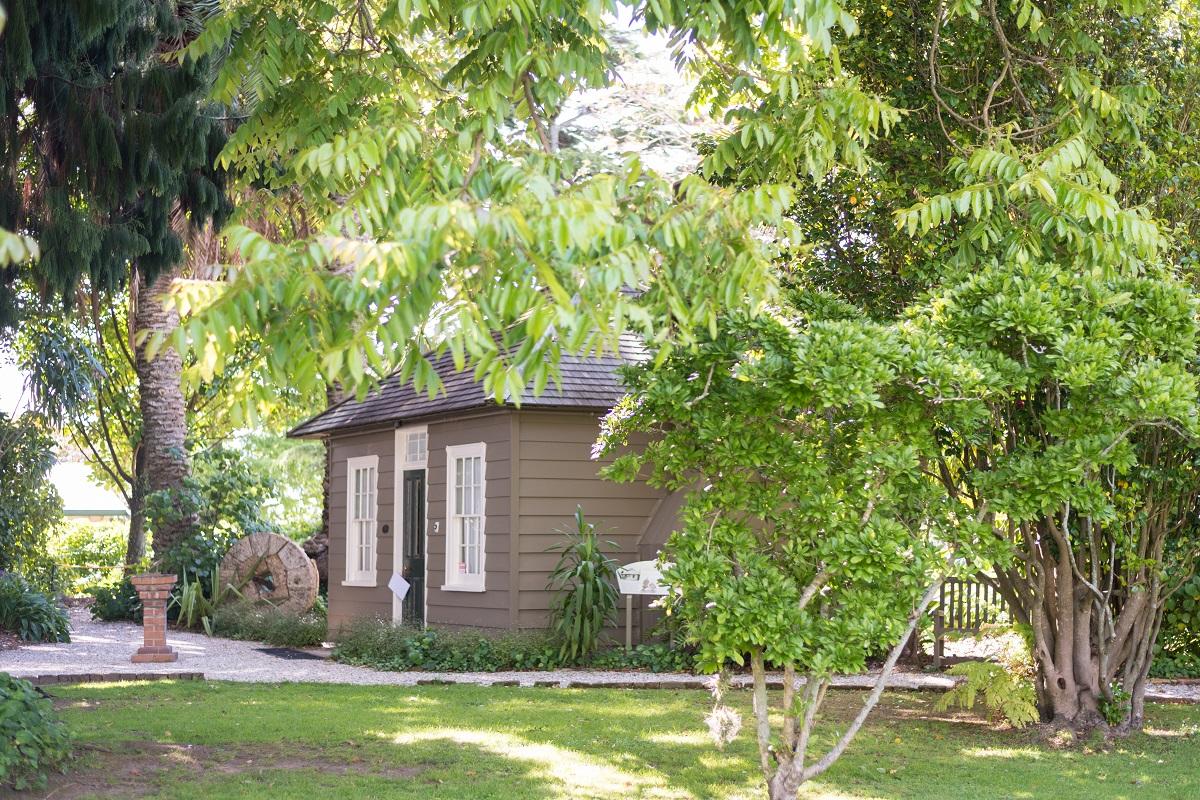
Discover Tauranga
TRG-BDiscover the historic sites of scenic Tauranga during this delightful half-day orientation tour of the city. Tauranga is the most populous city in the Bay of Plenty region of the North Island of New Zealand. It was settled by Maori late in the 13th century and by Europeans in the early 19th century and was constituted as a city in 1963. Tauranga Depart the Port of Mount Maunganui with your driver-guide for the drive across Tauranga Harbour to Tauranga, the principal city of the Bay of Plenty. The city's founders, a group of 19th-century missionaries, left a legacy of well-planned parks and gardens for future residents and visitors to enjoy. Elms Mission House Next, pass by the Monmouth Redoubt en route to the Elms Mission House, built in 1847 by Archdeacon Brown. Upon arrival, the guide leads you through the historic home and lovely garden surrounding the Georgian-styled home. Te Puke From here continue to Te Puke, kiwifruit capital of the world, with a guided visit to a kiwi fruit orchard. This will give you a chance to see and learn about the unique kiwifruit where the workings of the orchard will be fully explained. At the end of the tour you will be able to taste and sample the fruit and enjoy a freshly baked scone with kiwi jam and cream at the Paengaroa Community Centre. Following your tour of the kiwi orchard, re-board your coach for the return drive across the Matapihi Road to Mount Maunganui and your ship. Excursions are at an easy pace without the need for excessive walking or physical activities. Being able to board buses and negotiate steps that may be encountered Discover Tauranga CODE: TRG-B DURATION 4 HOURS ACTIVITY LEVEL MINIMAL Excursions are at an easy pace without the need for excessive walking or physical activities. Being able to board buses and negotiate steps that may be encountered Discover the historic sites of scenic Tauranga during this delightful half-day orientation tour of the city. Tauranga is the most populous city in the Bay of Plenty region of the North Island of New Zealand. It was settled by Maori late in the 13th century and by Europeans in the early 19th century and was constituted as a city in 1963. Tauranga Depart the Port of Mount Maunganui with your driver-guide for the drive across Tauranga Harbour to Tauranga, the principal city of the Bay of Plenty. The city's founders, a group of 19th-century missionaries, left a legacy of well-planned parks and gardens for future residents and visitors to enjoy. Elms Mission House Next, pass by the Monmouth Redoubt en route to the Elms Mission House, built in 1847 by Archdeacon Brown. Upon arrival, the guide leads you through the historic home and lovely garden surrounding the Georgian-styled home. Te Puke From here continue to Te Puke, kiwifruit capital of the world, with a guided visit to a kiwi fruit orchard. This will give you a chance to see and learn about the unique kiwifruit where the workings of the orchard will be fully explained. At the end of the tour you will be able to taste and sample the fruit and enjoy a freshly baked scone with kiwi jam and cream at the Paengaroa Community Centre. Following your tour of the kiwi orchard, re-board your coach for the return drive across the Matapihi Road to Mount Maunganui and your ship. Please note: This tour involves a panoramic drive with a moderate amount of walking at the mission house and orchard to explore fully. It is suitable for guests with limited mobility; however, wheelchairs cannot be accommodated. Order of sights seen may vary in sequence. Please note: This tour involves a panoramic drive with a moderate amount of walking at the mission house and orchard to explore fully. It is suitable for guests with limited mobility; however, wheelchairs cannot be accommodated. Order of sights seen may vary in sequence.
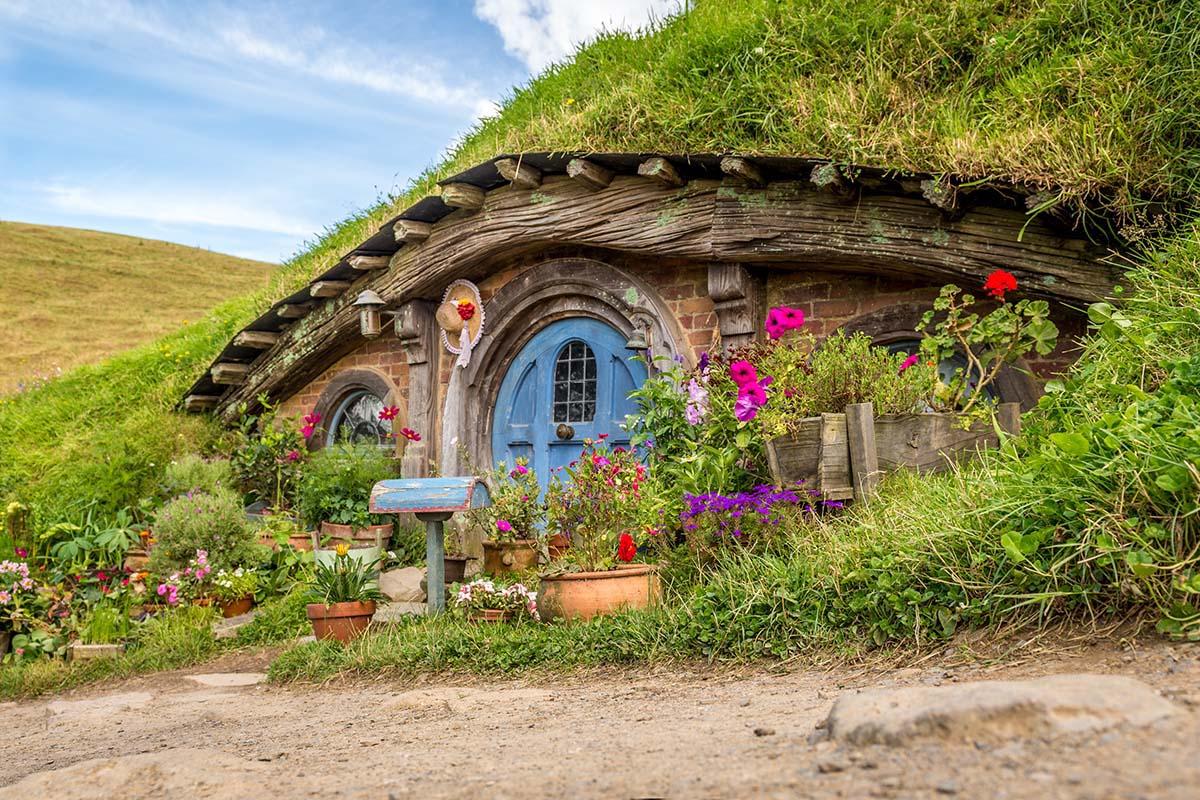
Fairytale New Zealand: Hobbiton Movie Set
TRG-EIndulge your senses with director Peter Jackson's cinematic tribute to writer JRR Tolkien during this fascinating excursion to the Hobbiton movie set. Originally constructed in 1999 for the filming of the Lord of the Rings trilogy, the movie set was rebuilt in amazing detail in 2010 for the filming of The Hobbit and its sequel. Scenic Drive Depart the pier with your driver-guide for the scenic, approximately 75-minute drive through Tauranga and across the Kaimai Range and Waikato Lowlands en route to the Hobbiton movie set. Located near Matamata, the set was originally constructed in 1999 for the filming of the Lord of the Rings trilogy. Osteria Restaurant Upon arrival at this iconic family-owned and run venue, enjoy authentic and high-quality Italian cuisine and marvel at its combined rustic and luxury themed surroundings. Hobbiton Movie Set Upon arrival, take a guided tour of the Hobbiton movie set, which was completely rebuilt in amazing detail in 2010 for the forthcoming three films of The Hobbit. Along the way, stroll around the home of the hobbits, where Bilbo Baggins lived, and see the Party Tree, restored bridge and old pub. Following your guided tour, enjoy tea or coffee and a snack. At the conclusion of your visit, re-board your coach and commence the approximately 1 hour drive back to the pier. Full participation may include a limited number of steps, uneven surfaces, and/or periods of standing. Fairytale New Zealand: Hobbiton Movie Set CODE: TRG-E DURATION 6.5 HOURS ACTIVITY LEVEL MODERATE Full participation may include a limited number of steps, uneven surfaces, and/or periods of standing. Indulge your senses with director Peter Jackson's cinematic tribute to writer JRR Tolkien during this fascinating excursion to the Hobbiton movie set. Originally constructed in 1999 for the filming of the Lord of the Rings trilogy, the movie set was rebuilt in amazing detail in 2010 for the filming of The Hobbit and its sequel. Scenic Drive Depart the pier with your driver-guide for the scenic, approximately 75-minute drive through Tauranga and across the Kaimai Range and Waikato Lowlands en route to the Hobbiton movie set. Located near Matamata, the set was originally constructed in 1999 for the filming of the Lord of the Rings trilogy. Osteria Restaurant Upon arrival at this iconic family-owned and run venue, enjoy authentic and high-quality Italian cuisine and marvel at its combined rustic and luxury themed surroundings. Hobbiton Movie Set Upon arrival, take a guided tour of the Hobbiton movie set, which was completely rebuilt in amazing detail in 2010 for the forthcoming three films of The Hobbit. Along the way, stroll around the home of the hobbits, where Bilbo Baggins lived, and see the Party Tree, restored bridge and old pub. Following your guided tour, enjoy tea or coffee and a snack. At the conclusion of your visit, re-board your coach and commence the approximately 1 hour drive back to the pier. Please note: This tour requires a moderate amount of walking for approximately 800 yards (about 731 metres) over uneven surfaces, with a few steps to negotiate to get on/off the coach and 10 steps at the venue. This tour is not suitable for guests with limited mobility and guests who utilise a wheelchair. Lightweight, comfortable clothing, flat, closed-toe walking shoes and sun protection are recommended. Space on this tour is very limited; we suggest you book in advance to avoid disappointment. The tour sequence may vary. Please note: This tour requires a moderate amount of walking for approximately 800 yards (about 731 metres) over uneven surfaces, with a few steps to negotiate to get on/off the coach and 10 steps at the venue. This tour is not suitable for guests with limited mobility and guests who utilise a wheelchair. Lightweight, comfortable clothing, flat, closed-toe walking shoes and sun protection are recommended. Space on this tour is very limited; we suggest you book in advance to avoid disappointment. The tour sequence may vary.
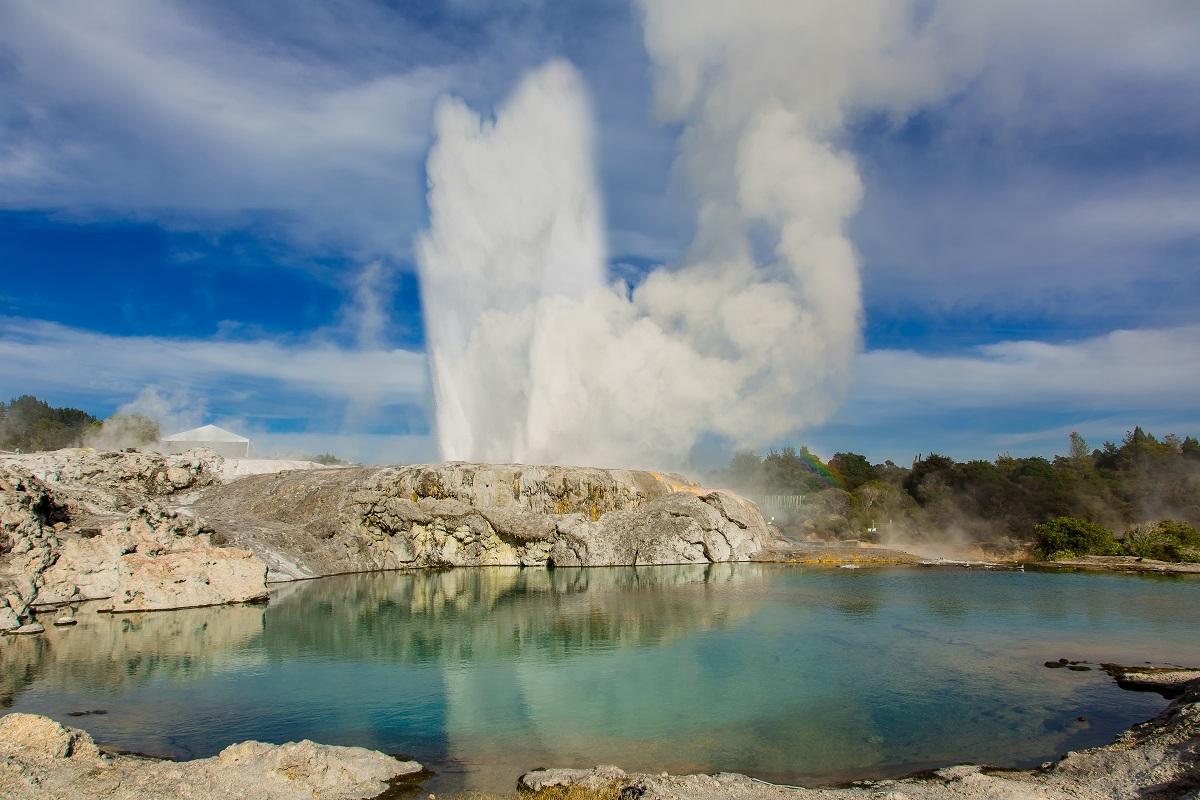
Geothermal Wonderland
TRG-ARotorua is one of New Zealand's most popular tourist centres, made famous by its Maori culture and thermal waters. Discover New Zealand's natural marvels, its geothermal system on this tour. Rotorua From Tauranga, it is a 90-minute drive to Rotorua with your driver-guide, beginning with a scenic journey inland through the kiwifruit country of Te Puke, the 'Kiwifruit Capital of the World'. This small furry fruit, once known as the Chinese gooseberry, has done a great deal to boost the area's prosperity. Te Puia Pass through Rotorua, to one of New Zealand's leading cultural and thermal attractions. See young Maori apprentices being taught the ancient art of carving and weaving before discovering the Whakarewarewa Thermal Reserve, Rotorua's largest and best known thermal area. Exploration of the site is on foot, you will pass boiling mud pools and the soaring Pohutu geyser. This incredible display of nature's raw force provides insight into the awesome natural forces at work below. Te Puia's Maori cultural performance will transport you back in time, beginning with a spine-tingling wero (challenge) from a Maori warrior followed by a traditional powhiri (welcome). You are then invited inside the beautifully carved wharenui (meeting house), to experience a traditional and unique Maori concert. Enjoy lunch at Te Puia with amazing kai against a backdrop of geysers and stunning park views as you enjoy a range of Kiwi flavours at Pataka Kai Restaurant. Afterwards, begin the approximately 90-minute drive back to Tauranga and your ship. Full participation may include a limited number of steps, uneven surfaces, and/or periods of standing. A meal is included in the excursion. Geothermal Wonderland CODE: TRG-A DURATION 7 HOURS ACTIVITY LEVEL MODERATE Full participation may include a limited number of steps, uneven surfaces, and/or periods of standing. MEAL INCLUDED A meal is included in the excursion. Rotorua is one of New Zealand's most popular tourist centres, made famous by its Maori culture and thermal waters. Discover New Zealand's natural marvels, its geothermal system on this tour. Rotorua From Tauranga, it is a 90-minute drive to Rotorua with your driver-guide, beginning with a scenic journey inland through the kiwifruit country of Te Puke, the 'Kiwifruit Capital of the World'. This small furry fruit, once known as the Chinese gooseberry, has done a great deal to boost the area's prosperity. Te Puia Pass through Rotorua, to one of New Zealand's leading cultural and thermal attractions. See young Maori apprentices being taught the ancient art of carving and weaving before discovering the Whakarewarewa Thermal Reserve, Rotorua's largest and best known thermal area. Exploration of the site is on foot, you will pass boiling mud pools and the soaring Pohutu geyser. This incredible display of nature's raw force provides insight into the awesome natural forces at work below. Te Puia's Maori cultural performance will transport you back in time, beginning with a spine-tingling wero (challenge) from a Maori warrior followed by a traditional powhiri (welcome). You are then invited inside the beautifully carved wharenui (meeting house), to experience a traditional and unique Maori concert. Enjoy lunch at Te Puia with amazing kai against a backdrop of geysers and stunning park views as you enjoy a range of Kiwi flavours at Pataka Kai Restaurant. Afterwards, begin the approximately 90-minute drive back to Tauranga and your ship. Please note: This tour requires a moderate amount of walking with approximately one-half mile (800 metres) of pathway at Te Puia which is along paved and well maintained tracks. This tour is wheelchair accessible; however guests must be able to negotiate a few steps to get on/off the coach. Lightweight, comfortable clothing, flat, closed-toe walking shoes and sun protection are recommended. Please note: This tour requires a moderate amount of walking with approximately one-half mile (800 metres) of pathway at Te Puia which is along paved and well maintained tracks. This tour is wheelchair accessible; however guests must be able to negotiate a few steps to get on/off the coach. Lightweight, comfortable clothing, flat, closed-toe walking shoes and sun protection are recommended.
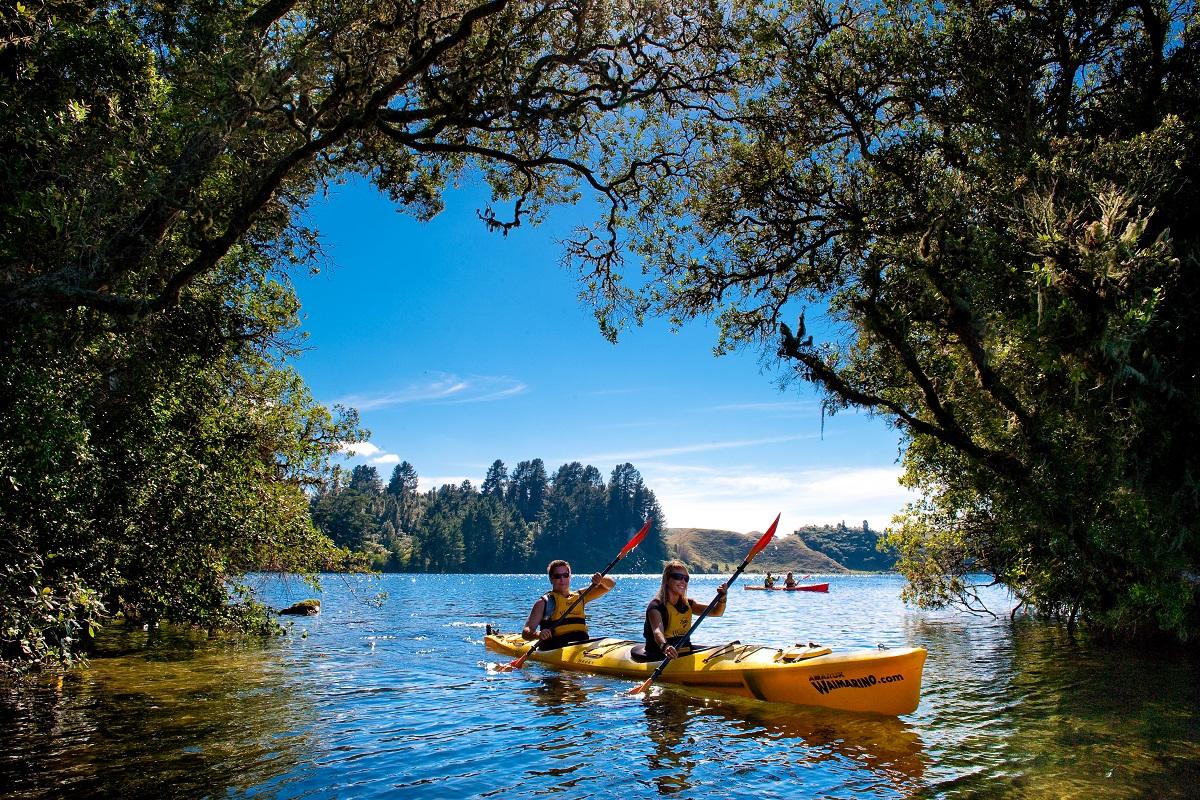
Lake Rotoiti & Glowworm Cave Kayaking
TRG-HGet up close and personal with the natural surroundings of native New Zealand birdlife and fauna. Travel to Lake Rotoiti and kayak the calm lake's edge, enter the glow-worm cave and relax in the natural hot pools. Lake Rotoiti Depart the pier with your driver-guide for the approximately 1-hour drive to the lake. Enjoy a scenic sea-kayak experience past the cascading native bush including the Pohutukawa, New Zealand's native Christmas tree. View classic kiwi holiday homes dotted amongst the cliffs and coves. Explore the quiet lake's edge with abundant birdlife before parting the bush to enter the glow-worm cave. Hot Pools Relax in the natural thermal hot pools as you reflect on your nature experience. Enjoy the myths and legends of the Maori people linked to Lake Rotoiti relayed to you by your guide. Your tour concludes back at the pier after an approximately 1-hour drive. Full participation requires being in good physical condition and may involve inclines, steps, uneven surfaces, and/or extended periods of standing. Lake Rotoiti & Glowworm Cave Kayaking CODE: TRG-H DURATION 6.5 HOURS ACTIVITY LEVEL EXTENSIVE Full participation requires being in good physical condition and may involve inclines, steps, uneven surfaces, and/or extended periods of standing. Get up close and personal with the natural surroundings of native New Zealand birdlife and fauna. Travel to Lake Rotoiti and kayak the calm lake's edge, enter the glow-worm cave and relax in the natural hot pools. Lake Rotoiti Depart the pier with your driver-guide for the approximately 1-hour drive to the lake. Enjoy a scenic sea-kayak experience past the cascading native bush including the Pohutukawa, New Zealand's native Christmas tree. View classic kiwi holiday homes dotted amongst the cliffs and coves. Explore the quiet lake's edge with abundant birdlife before parting the bush to enter the glow-worm cave. Hot Pools Relax in the natural thermal hot pools as you reflect on your nature experience. Enjoy the myths and legends of the Maori people linked to Lake Rotoiti relayed to you by your guide. Your tour concludes back at the pier after an approximately 1-hour drive. Please note: This tour involves an extensive amount of physical activity and is recommended for guests in good physical condition in order to operate their kayak. This is not suitable for guests with limited mobility or those who utilise a wheelchair. The maximum weight limit is 308 pounds (140 kilograms/22 stones). Minimum age required is 8 years old. Jeans are not allowed, we recommend shorts or casual pants; a fleece or rain jacket depending on the weather and to bring a swimsuit and a towel from the ship. This kayaking tour operates in two-seat kayaks and consists of approximately 2 hours in total of paddling. In the event of adverse weather conditions on Lake Rotoiti, for guests' safety and comfort an alternative location will be used and the tour duration may vary. The alternative location does not include the glow worm cave. A picnic snack is provided. A signed waiver is required to participate on this tour. Please note: This tour involves an extensive amount of physical activity and is recommended for guests in good physical condition in order to operate their kayak. This is not suitable for guests with limited mobility or those who utilise a wheelchair. The maximum weight limit is 308 pounds (140 kilograms/22 stones). Minimum age required is 8 years old. Jeans are not allowed, we recommend shorts or casual pants; a fleece or rain jacket depending on the weather and to bring a swimsuit and a towel from the ship. This kayaking tour operates in two-seat kayaks and consists of approximately 2 hours in total of paddling. In the event of adverse weather conditions on Lake Rotoiti, for guests' safety and comfort an alternative location will be used and the tour duration may vary. The alternative location does not include the glow worm cave. A picnic snack is provided. A signed waiver is required to participate on this tour.
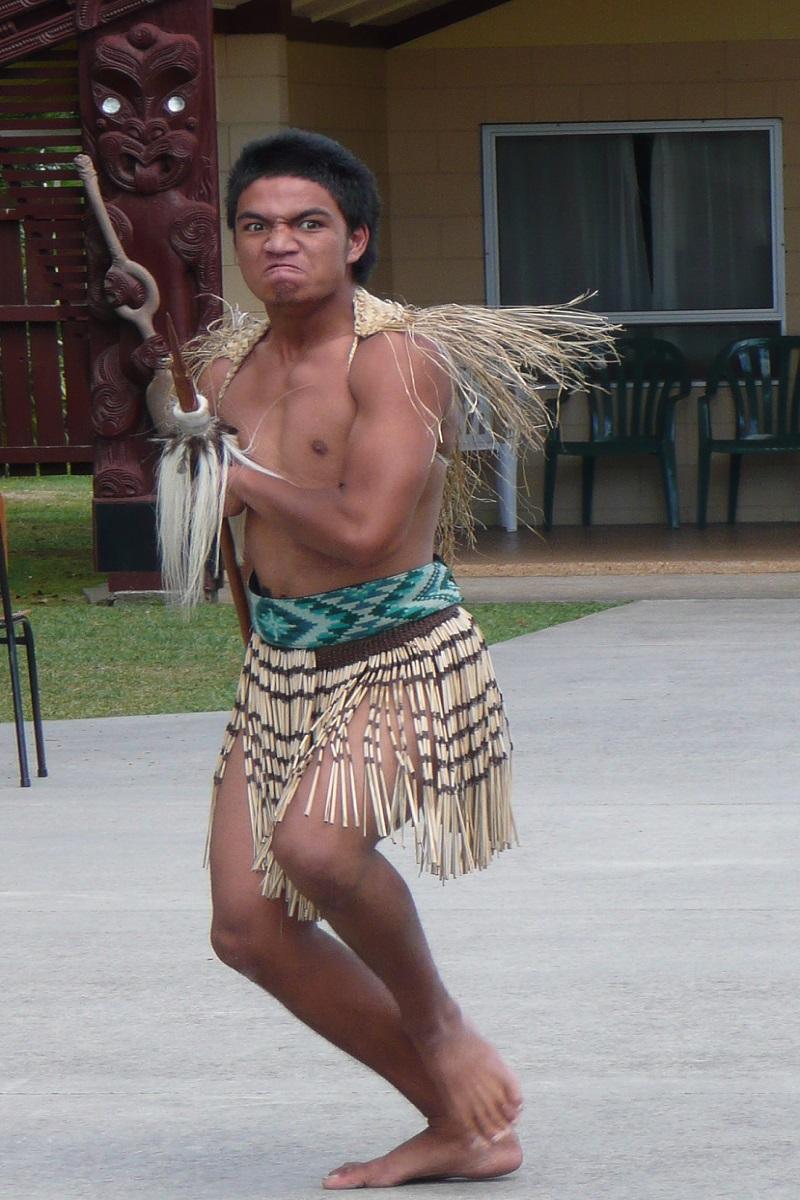
Maori Cultural Experience
TRG-LExperience a unique insight into the heritage and culture of the Maori people during this immersive, half-day sightseeing excursion to a traditional Maori marae. Tauranga, Marae, Folkloric Performance, Action Songs, Poi Dances, Stick Games, Haka War Dance Depart the pier with your guide for the scenic, approximately 30-minute drive through Tauranga en route to a traditional Maori marae, a sacred outdoor space in the heart of the village. Upon entering the gates of the marae, you are warmly greeted by the tangata whenua (local people), then taken on a unique cultural journey through their Maori heritage and early New Zealand life. Enjoy a typical Maori folkloric performance featuring action songs, poi dances, stick games, and the haka war dance. Refreshments, Minden Lookout, Bay of Plenty, Matapihi and Maungatapu Peninsulas, Gate Pa Following light refreshments served at the marae, re-board your coach and head to Minden Lookout. Upon arrival, take in spectacular panoramic views over the Bay of Plenty. After a photo stop here, re-board your coach and continue along the scenic Matapihi and Maungatapu peninsulas en route to Gate Pa, site of a battle between the Maoris and British in 1864. View the Maori War Canoe, Te Awanui, and downtown waterfront, then re-board your coach and commence the drive back to the pier. Full participation may include a limited number of steps, uneven surfaces, and/or periods of standing. Maori Cultural Experience CODE: TRG-L DURATION 4 HOURS ACTIVITY LEVEL MODERATE Full participation may include a limited number of steps, uneven surfaces, and/or periods of standing. Experience a unique insight into the heritage and culture of the Maori people during this immersive, half-day sightseeing excursion to a traditional Maori marae. Tauranga, Marae, Folkloric Performance, Action Songs, Poi Dances, Stick Games, Haka War Dance Depart the pier with your guide for the scenic, approximately 30-minute drive through Tauranga en route to a traditional Maori marae, a sacred outdoor space in the heart of the village. Upon entering the gates of the marae, you are warmly greeted by the tangata whenua (local people), then taken on a unique cultural journey through their Maori heritage and early New Zealand life. Enjoy a typical Maori folkloric performance featuring action songs, poi dances, stick games, and the haka war dance. Refreshments, Minden Lookout, Bay of Plenty, Matapihi and Maungatapu Peninsulas, Gate Pa Following light refreshments served at the marae, re-board your coach and head to Minden Lookout. Upon arrival, take in spectacular panoramic views over the Bay of Plenty. After a photo stop here, re-board your coach and continue along the scenic Matapihi and Maungatapu peninsulas en route to Gate Pa, site of a battle between the Maoris and British in 1864. View the Maori War Canoe, Te Awanui, and downtown waterfront, then re-board your coach and commence the drive back to the pier. Please note: This tour involves a moderate amount of walking, at times over uneven, gravel, and natural surfaces, with a few steps to negotiate to get on/off the coach. This tour is not suitable for guests with limited mobility and guests who utilise a wheelchair. Guests are advised to wear comfortable, weather-appropriate clothing in layers with flat, closed-toe walking shoes, and bring sun protection, bottled water, and local currency or credit cards for purchases from the ship. Guests may be asked to remove their hats and shoes when entering the Maori meetinghouse. Photography may be restricted in certain areas. The tour sequence may vary. Please note: This tour involves a moderate amount of walking, at times over uneven, gravel, and natural surfaces, with a few steps to negotiate to get on/off the coach. This tour is not suitable for guests with limited mobility and guests who utilise a wheelchair. Guests are advised to wear comfortable, weather-appropriate clothing in layers with flat, closed-toe walking shoes, and bring sun protection, bottled water, and local currency or credit cards for purchases from the ship. Guests may be asked to remove their hats and shoes when entering the Maori meetinghouse. Photography may be restricted in certain areas. The tour sequence may vary.

Tauranga by Private Car with Guide - Full Day
TRG-WExplore Tauranga at your leisure during your full-day (8-Hour) sightseeing tour via private car. Customise your own itinerary or choose to see an overview of the area's highlights. Depart the pier with your driver/guide in an air-conditioned car and discover the city and surrounding areas at your own pace. Your exclusive tour concludes back at the pier. Excursions are at an easy pace without the need for excessive walking or physical activities. Being able to board buses and negotiate steps that may be encountered Tauranga by Private Car with Guide - Full Day CODE: TRG-W DURATION 8 HOURS ACTIVITY LEVEL MINIMAL Excursions are at an easy pace without the need for excessive walking or physical activities. Being able to board buses and negotiate steps that may be encountered Explore Tauranga at your leisure during your full-day (8-Hour) sightseeing tour via private car. Customise your own itinerary or choose to see an overview of the area's highlights. Depart the pier with your driver/guide in an air-conditioned car and discover the city and surrounding areas at your own pace. Your exclusive tour concludes back at the pier. Please note: This tour is non-refundable if cancelled within 48 hours prior to the cruise start date. Participation is limited to 3 guests per car. The price, exclusive of meals, entrance fees and gratuities, is per vehicle. Therefore, when making your reservation, please indicate the number of vehicles, not the number of guests. Only one person in the party needs to reserve this programme. Driver/Guides are English-speaking; guides to converse in other languages may be available upon request; additional charges may apply. Please see the Shore Concierge Office on board the ship for assistance with your individual itinerary. Please note: This tour is non-refundable if cancelled within 48 hours prior to the cruise start date. Participation is limited to 3 guests per car. The price, exclusive of meals, entrance fees and gratuities, is per vehicle. Therefore, when making your reservation, please indicate the number of vehicles, not the number of guests. Only one person in the party needs to reserve this programme. Driver/Guides are English-speaking; guides to converse in other languages may be available upon request; additional charges may apply. Please see the Shore Concierge Office on board the ship for assistance with your individual itinerary.
Tauranga by Private Car with Guide - Half Day
TRG-VExplore Tauranga at your leisure during your half-day (4-Hour) sightseeing tour via private car. Customise your own itinerary or choose to see an overview of the area's highlights. Depart the pier with your driver/guide in an air-conditioned car and discover the city and surrounding areas at your own pace. Your exclusive tour concludes back at the pier. Excursions are at an easy pace without the need for excessive walking or physical activities. Being able to board buses and negotiate steps that may be encountered Tauranga by Private Car with Guide - Half Day CODE: TRG-V DURATION 4 HOURS ACTIVITY LEVEL MINIMAL Excursions are at an easy pace without the need for excessive walking or physical activities. Being able to board buses and negotiate steps that may be encountered Explore Tauranga at your leisure during your half-day (4-Hour) sightseeing tour via private car. Customise your own itinerary or choose to see an overview of the area's highlights. Depart the pier with your driver/guide in an air-conditioned car and discover the city and surrounding areas at your own pace. Your exclusive tour concludes back at the pier. Please note: This tour is non-refundable if cancelled within 48 hours prior to the cruise start date. Participation is limited to 3 guests per car. The price, exclusive of meals, entrance fees and gratuities, is per vehicle. Therefore, when making your reservation, please indicate the number of vehicles, not the number of guests. Only one person in the party needs to reserve this programme. Driver/Guides are English-speaking; guides to converse in other languages may be available upon request; additional charges may apply. Please see the Shore Concierge Office on board the ship for assistance with your individual itinerary. Please note: This tour is non-refundable if cancelled within 48 hours prior to the cruise start date. Participation is limited to 3 guests per car. The price, exclusive of meals, entrance fees and gratuities, is per vehicle. Therefore, when making your reservation, please indicate the number of vehicles, not the number of guests. Only one person in the party needs to reserve this programme. Driver/Guides are English-speaking; guides to converse in other languages may be available upon request; additional charges may apply. Please see the Shore Concierge Office on board the ship for assistance with your individual itinerary.
Tauranga by Private Van with Guide - Full Day
TRG-YExplore Tauranga at your leisure during your full-day (8-Hour) sightseeing tour via private van. Customise your own itinerary or choose to see an overview of the area's highlights. Depart the pier with your driver/guide in an air-conditioned car and discover the city and surrounding areas at your own pace. Your exclusive tour concludes back at the pier. Excursions are at an easy pace without the need for excessive walking or physical activities. Being able to board buses and negotiate steps that may be encountered Tauranga by Private Van with Guide - Full Day CODE: TRG-Y DURATION 8 HOURS ACTIVITY LEVEL MINIMAL Excursions are at an easy pace without the need for excessive walking or physical activities. Being able to board buses and negotiate steps that may be encountered Explore Tauranga at your leisure during your full-day (8-Hour) sightseeing tour via private van. Customise your own itinerary or choose to see an overview of the area's highlights. Depart the pier with your driver/guide in an air-conditioned car and discover the city and surrounding areas at your own pace. Your exclusive tour concludes back at the pier. Please note: This tour is non-refundable if cancelled within 48 hours prior to the cruise start date. Participation is limited to 6 guests per van. The price, exclusive of meals, entrance fees and gratuities, is per vehicle. Therefore, when making your reservation, please indicate the number of vehicles, not the number of guests. Only one person in the party needs to reserve this programme. Driver/Guides are English-speaking; guides to converse in other languages may be available upon request; additional charges may apply. Please see the Shore Concierge Office on board the ship for assistance with your individual itinerary. Please note: This tour is non-refundable if cancelled within 48 hours prior to the cruise start date. Participation is limited to 6 guests per van. The price, exclusive of meals, entrance fees and gratuities, is per vehicle. Therefore, when making your reservation, please indicate the number of vehicles, not the number of guests. Only one person in the party needs to reserve this programme. Driver/Guides are English-speaking; guides to converse in other languages may be available upon request; additional charges may apply. Please see the Shore Concierge Office on board the ship for assistance with your individual itinerary.
Tauranga by Private Van with Guide - Half Day
TRG-XExplore Tauranga at your leisure during your half-day (4-Hour) sightseeing tour via private van. Customise your own itinerary or choose to see an overview of the area's highlights. Depart the pier with your driver/guide in an air-conditioned car and discover the city and surrounding areas at your own pace. Your exclusive tour concludes back at the pier. Excursions are at an easy pace without the need for excessive walking or physical activities. Being able to board buses and negotiate steps that may be encountered Tauranga by Private Van with Guide - Half Day CODE: TRG-X DURATION 4 HOURS ACTIVITY LEVEL MINIMAL Excursions are at an easy pace without the need for excessive walking or physical activities. Being able to board buses and negotiate steps that may be encountered Explore Tauranga at your leisure during your half-day (4-Hour) sightseeing tour via private van. Customise your own itinerary or choose to see an overview of the area's highlights. Depart the pier with your driver/guide in an air-conditioned car and discover the city and surrounding areas at your own pace. Your exclusive tour concludes back at the pier. Please note: This tour is non-refundable if cancelled within 48 hours prior to the cruise start date. Participation is limited to 6 guests per van. The price, exclusive of meals, entrance fees and gratuities, is per vehicle. Therefore, when making your reservation, please indicate the number of vehicles, not the number of guests. Only one person in the party needs to reserve this programme. Driver/Guides are English-speaking; guides to converse in other languages may be available upon request; additional charges may apply. Please see the Shore Concierge Office on board the ship for assistance with your individual itinerary. Please note: This tour is non-refundable if cancelled within 48 hours prior to the cruise start date. Participation is limited to 6 guests per van. The price, exclusive of meals, entrance fees and gratuities, is per vehicle. Therefore, when making your reservation, please indicate the number of vehicles, not the number of guests. Only one person in the party needs to reserve this programme. Driver/Guides are English-speaking; guides to converse in other languages may be available upon request; additional charges may apply. Please see the Shore Concierge Office on board the ship for assistance with your individual itinerary.
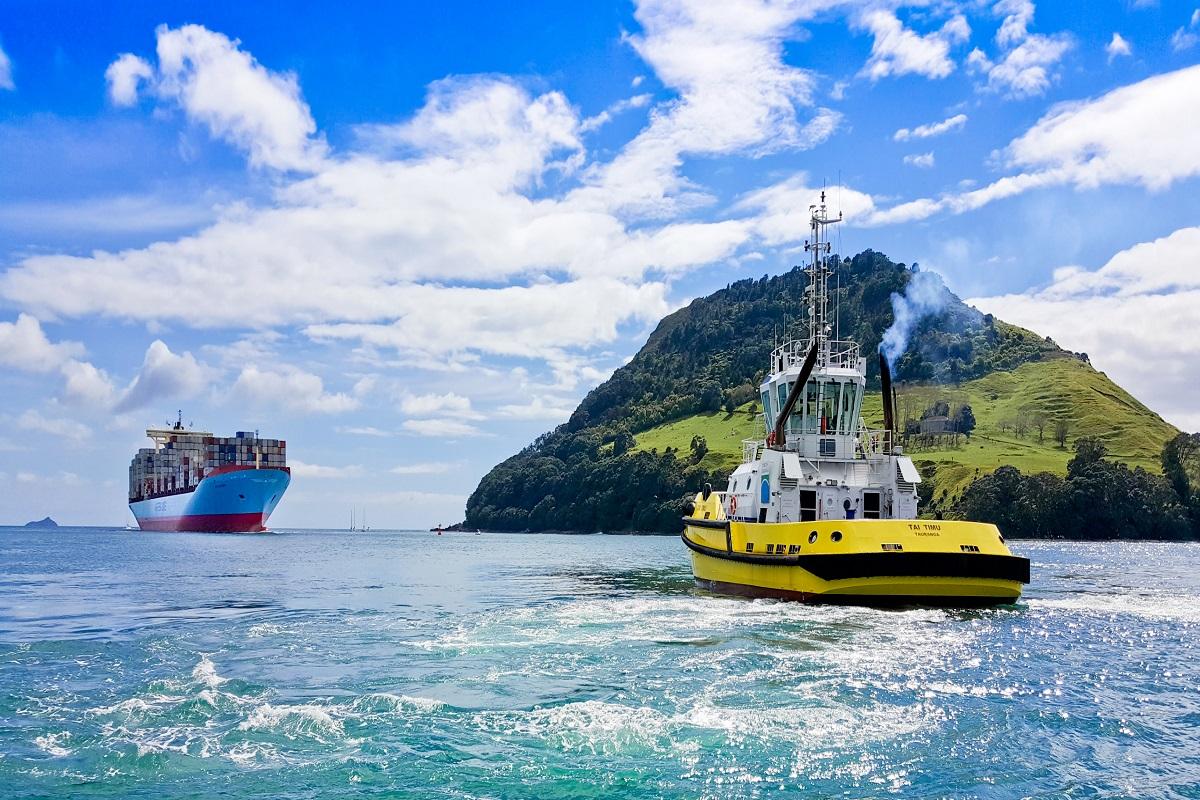
Tauranga Scenic Harbour Cruise
TRG-MDiscover the splendid vistas and coastal diversity of Tauranga Harbour during this picturesque sightseeing cruise aboard the Bay Explorer. Tauranga, Harbour Cruise, Bay Explorer Depart the pier for the short walk to the awaiting Bay Explorer. This spacious, approximately 60-foot-long (about 18-metre-long) boat features 360-degree outdoor views, comfortable, fully-enclosed seating downstairs, and a large, open sundeck for viewing and sightseeing. Upon arrival, embark the vessel, receive your safety and tour instructions, and begin your picturesque cruise along Tauranga Harbour. Port Facilities, Coastal Villages, Forests, Beaches. Bays, Coves, Mount Maunganui, Stella Passage Expansive Tauranga Harbour features a blend of high-intensity port facilities and contrasting quiet coastal villages, lush, verdant forests, open, sandy beaches, and bays of many coves. Your route travels through Tauranga Port, considered New Zealand's largest export-port and largest port by volume. Cruise towards the shores of Mount Maunganui and through the Stella Passage, then on to Tauranga City. Bustling Ports, Beaches, Forests, Fish, Marine Life, Penguins, Schools of Fish, Seabirds, Sharks Along the way, discover why Tauranga Harbour is considered the most beautiful harbour in the North Island of New Zealand, and home to some of the finest, and most diverse, harbour views in New Zealand. If you are lucky, you might also enjoy close-up encounters with the local marine life, penguins, schools of fish, seabirds, and sharks that inhabit this area. Following your harbour cruise, disembark the vessel and commence the short walk back to the pier. Excursions are at an easy pace without the need for excessive walking or physical activities. Being able to board buses and negotiate steps that may be encountered Tauranga Scenic Harbour Cruise CODE: TRG-M DURATION 2.5 HOURS ACTIVITY LEVEL MINIMAL Excursions are at an easy pace without the need for excessive walking or physical activities. Being able to board buses and negotiate steps that may be encountered Discover the splendid vistas and coastal diversity of Tauranga Harbour during this picturesque sightseeing cruise aboard the Bay Explorer. Tauranga, Harbour Cruise, Bay Explorer Depart the pier for the short walk to the awaiting Bay Explorer. This spacious, approximately 60-foot-long (about 18-metre-long) boat features 360-degree outdoor views, comfortable, fully-enclosed seating downstairs, and a large, open sundeck for viewing and sightseeing. Upon arrival, embark the vessel, receive your safety and tour instructions, and begin your picturesque cruise along Tauranga Harbour. Port Facilities, Coastal Villages, Forests, Beaches. Bays, Coves, Mount Maunganui, Stella Passage Expansive Tauranga Harbour features a blend of high-intensity port facilities and contrasting quiet coastal villages, lush, verdant forests, open, sandy beaches, and bays of many coves. Your route travels through Tauranga Port, considered New Zealand's largest export-port and largest port by volume. Cruise towards the shores of Mount Maunganui and through the Stella Passage, then on to Tauranga City. Bustling Ports, Beaches, Forests, Fish, Marine Life, Penguins, Schools of Fish, Seabirds, Sharks Along the way, discover why Tauranga Harbour is considered the most beautiful harbour in the North Island of New Zealand, and home to some of the finest, and most diverse, harbour views in New Zealand. If you are lucky, you might also enjoy close-up encounters with the local marine life, penguins, schools of fish, seabirds, and sharks that inhabit this area. Following your harbour cruise, disembark the vessel and commence the short walk back to the pier. Please note: This tour involves a minimal amount of walking for approximately 0.6 miles (about one kilometre), with six steps to negotiate to embark/disembark the boat, and steps on board the boat between the sundeck and fully-enclosed seating area below. This tour is not suitable for guests prone to seasickness, guests with limited mobility, and guests who utilise a wheelchair. Guests are advised to wear comfortable, weather-appropriate clothing with flat, sturdy, and closed-toe walking shoes, and bring sun protection, a sweater or light jacket, bottled water, and local currency or credit cards for purchases from the ship. Drinks and snacks are available on board the boat at each guest's own expense. Although frequently encountered on this type of tour, fish and marine life sightings are not guaranteed. Operation of this tour is subject to weather conditions. Please note: This tour involves a minimal amount of walking for approximately 0.6 miles (about one kilometre), with six steps to negotiate to embark/disembark the boat, and steps on board the boat between the sundeck and fully-enclosed seating area below. This tour is not suitable for guests prone to seasickness, guests with limited mobility, and guests who utilise a wheelchair. Guests are advised to wear comfortable, weather-appropriate clothing with flat, sturdy, and closed-toe walking shoes, and bring sun protection, a sweater or light jacket, bottled water, and local currency or credit cards for purchases from the ship. Drinks and snacks are available on board the boat at each guest's own expense. Although frequently encountered on this type of tour, fish and marine life sightings are not guaranteed. Operation of this tour is subject to weather conditions.
Wellington, New Zealand
Capital Bites Walking Sampler
WLG-OMany world cities vie for the moniker of “Capital of Cool” – but here in Kiwi country, there’s only one: Wellington. This town isn’t just New Zealand’s political capital, but its culinary one, too. On this curated food walk, led by a seasoned local guide, you’ll find – and taste – why. After a half-hour shuttle from the ship to central Wellington, you’ll set out on foot with your seasoned local guide. A carefully curated pedestrian banquet awaits as you trace a delectable path around town over the next three hours. The journey takes you through iconic markets, down charming laneways, and into hidden eateries – each offering a unique slice of Wellington’s rich food culture. World-class coffee, regional wine, and craft-brewed beer. Zesty pizza. Artisanal cheeses. Scrumptious chocolate. Traditional Maori dishes, contemporary fusional creations, and more. All are on the menu as your knowledgeable escort/food guru shepherds the small group around, complementing the bites with fascinating intel on Wellington’s history, culture, and the passionate chefs who bring its cuisine to life. Whether you’re a seasoned gastronome or a curious traveler (with foodie tendencies), this excursion provides a tantalizing intro to Wellington’s dynamic eats scene Full participation requires being in good physical condition and may involve inclines, steps, uneven surfaces, and/or extended periods of standing. Capital Bites Walking Sampler CODE: WLG-O DURATION 4 HOURS ACTIVITY LEVEL EXTENSIVE Full participation requires being in good physical condition and may involve inclines, steps, uneven surfaces, and/or extended periods of standing. Many world cities vie for the moniker of “Capital of Cool” – but here in Kiwi country, there’s only one: Wellington. This town isn’t just New Zealand’s political capital, but its culinary one, too. On this curated food walk, led by a seasoned local guide, you’ll find – and taste – why. After a half-hour shuttle from the ship to central Wellington, you’ll set out on foot with your seasoned local guide. A carefully curated pedestrian banquet awaits as you trace a delectable path around town over the next three hours. The journey takes you through iconic markets, down charming laneways, and into hidden eateries – each offering a unique slice of Wellington’s rich food culture. World-class coffee, regional wine, and craft-brewed beer. Zesty pizza. Artisanal cheeses. Scrumptious chocolate. Traditional Maori dishes, contemporary fusional creations, and more. All are on the menu as your knowledgeable escort/food guru shepherds the small group around, complementing the bites with fascinating intel on Wellington’s history, culture, and the passionate chefs who bring its cuisine to life. Whether you’re a seasoned gastronome or a curious traveler (with foodie tendencies), this excursion provides a tantalizing intro to Wellington’s dynamic eats scene Please note: This active excursion involves substantial standing and approximately 3 km /1.85 mi of walking over mostly paved surfaces with some steps and inclines. The tour is not suitable for guests who utilise a wheelchair or have limited mobility. Special dietary needs may be able to be accommodated with 48 hrs advance notice. Wear weather-appropriate clothing and comfortable walking shoes. The order of sights and activities may vary. Please note: This active excursion involves substantial standing and approximately 3 km /1.85 mi of walking over mostly paved surfaces with some steps and inclines. The tour is not suitable for guests who utilise a wheelchair or have limited mobility. Special dietary needs may be able to be accommodated with 48 hrs advance notice. Wear weather-appropriate clothing and comfortable walking shoes. The order of sights and activities may vary.
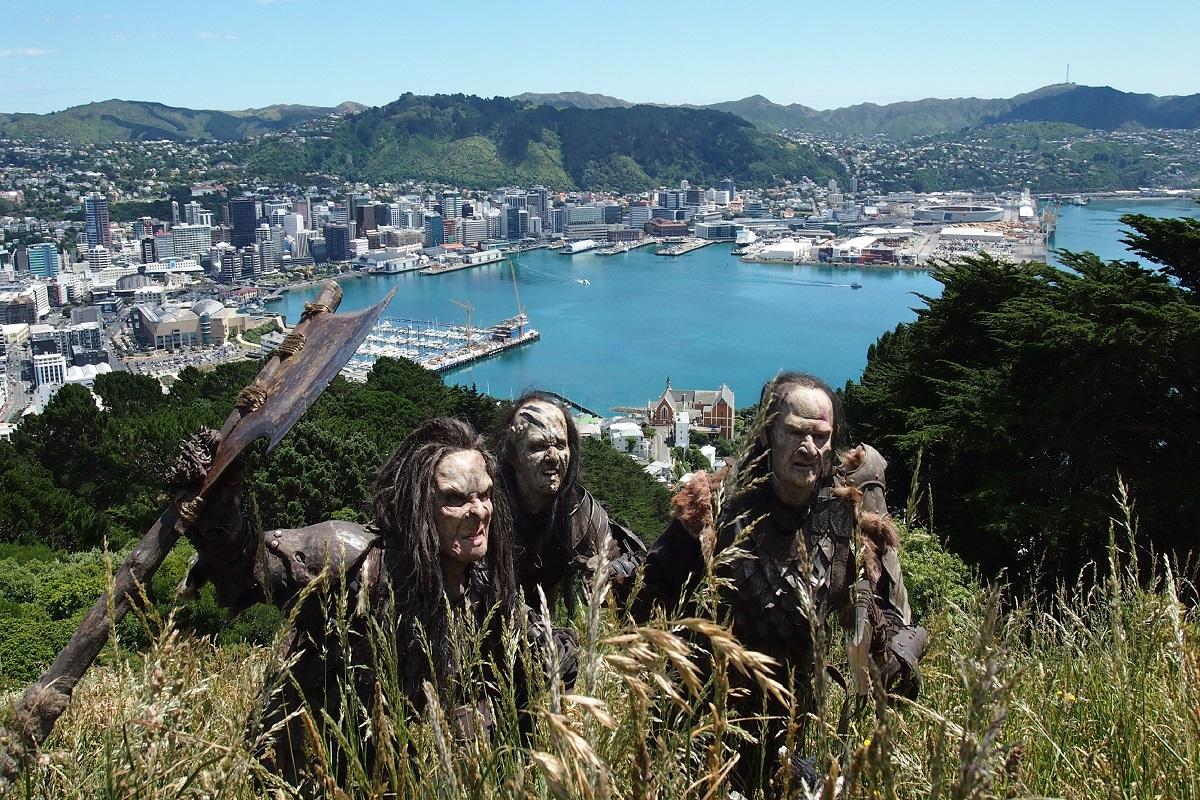
In the Footsteps of Lord of the Rings
WLG-EExplore Wellington's connection with the Lord of the Rings movie trilogy during this memorable excursion to the locations and settings where many of the scenes were filmed. Your guide with knowledge of Wellington and the movies and their production will provide behind-the-scenes insight to where the filming first began. Mt. Victoria Lookout Depart the pier for the short drive to Mt. Victoria Lookout. This is Wellington's best vantage point with 360° views of the city and harbour. Film Locations Next proceed to the film locations located on Mt Victoria. Take a gentle stroll through the picturesque forest of the 'Outer Shire' where Frodo and the Hobbits began their journey. Many scenes were filmed here including the 'Race to the Ferry' and the famous 'Get off the Road' scene. Learn how the films were made while visiting scenes and locations right in the heart of Wellington City. Weta Workshop Travelling to Miramar you will have the exclusive opportunity to visit "Weta Studios - The Weta Workshop". This experience offers a peek into the magic of Weta and the many films they have worked on. You will be given an insight into the movies Weta is best known for as well as given an introduction to processes and creative and innovative thinking that goes on within the walls of this custom built facility. This movie based visitor experience provides a unique behind-the-scenes glimpse into the workings of Weta Workshop. The story of the creative process is told and guided by a member of the talented Weta Workshop crew from the workshop floor using the props, models and weapons they have helped make for the movies. They may even reveal some of the secrets behind the movie magic. You will enjoy a private screening of a 25-minute behind-the-scenes film, which tells the story and history of the film industry in Wellington and features interviews with Weta Workshop co-founders Peter Jackson, Richard Taylor, Tania Rodger and Jamie Selkirk. Return to the cruise terminal, approximately 30-minute drive, via Evans Bay and Oriental Bay for stunning views of Wellington city and harbour. Full participation may include a limited number of steps, uneven surfaces, and/or periods of standing. In the Footsteps of Lord of the Rings CODE: WLG-E DURATION 3.5 HOURS ACTIVITY LEVEL MODERATE Full participation may include a limited number of steps, uneven surfaces, and/or periods of standing. Explore Wellington's connection with the Lord of the Rings movie trilogy during this memorable excursion to the locations and settings where many of the scenes were filmed. Your guide with knowledge of Wellington and the movies and their production will provide behind-the-scenes insight to where the filming first began. Mt. Victoria Lookout Depart the pier for the short drive to Mt. Victoria Lookout. This is Wellington's best vantage point with 360° views of the city and harbour. Film Locations Next proceed to the film locations located on Mt Victoria. Take a gentle stroll through the picturesque forest of the 'Outer Shire' where Frodo and the Hobbits began their journey. Many scenes were filmed here including the 'Race to the Ferry' and the famous 'Get off the Road' scene. Learn how the films were made while visiting scenes and locations right in the heart of Wellington City. Weta Workshop Travelling to Miramar you will have the exclusive opportunity to visit "Weta Studios - The Weta Workshop". This experience offers a peek into the magic of Weta and the many films they have worked on. You will be given an insight into the movies Weta is best known for as well as given an introduction to processes and creative and innovative thinking that goes on within the walls of this custom built facility. This movie based visitor experience provides a unique behind-the-scenes glimpse into the workings of Weta Workshop. The story of the creative process is told and guided by a member of the talented Weta Workshop crew from the workshop floor using the props, models and weapons they have helped make for the movies. They may even reveal some of the secrets behind the movie magic. You will enjoy a private screening of a 25-minute behind-the-scenes film, which tells the story and history of the film industry in Wellington and features interviews with Weta Workshop co-founders Peter Jackson, Richard Taylor, Tania Rodger and Jamie Selkirk. Return to the cruise terminal, approximately 30-minute drive, via Evans Bay and Oriental Bay for stunning views of Wellington city and harbour. Please note: This tour requires a moderate amount of walking over unpaved tracks and lawns for approximately 0.5 kilometres, with a few steps and inclines to negotiate at the lookout point and film locations. This tour is not suitable for guests with limited mobility or those who utilise a wheelchair. Lightweight, comfortable clothing and sun protection are recommended. None of the former movie sites visited on this tour were left standing; all were completely returned to their natural state. Space on this tour is very limited; we suggest you book in advance to avoid disappointment. Please note: This tour requires a moderate amount of walking over unpaved tracks and lawns for approximately 0.5 kilometres, with a few steps and inclines to negotiate at the lookout point and film locations. This tour is not suitable for guests with limited mobility or those who utilise a wheelchair. Lightweight, comfortable clothing and sun protection are recommended. None of the former movie sites visited on this tour were left standing; all were completely returned to their natural state. Space on this tour is very limited; we suggest you book in advance to avoid disappointment.

Maori Cultural Walking Tour
WLG-NSee Te Whanganui a Tara, the Maori name for Wellington Harbour, from the perspective of the mana whenua – the indigenous people who claim ancient historical rights over the land. This fascinating two-hour walk begins with a shuttle ride from Wellington’s modern cruise port to a different waterfront district with deep roots in the Maori culture. The area known as Te Aro Pa was one of the city’s largest Maori communities until the 1880s, and your walk begins at Te Raukura-Te Wharewaka o Po¯neke, a landmark building located on what was once its harbor frontage. With your local guide providing the narration, take a walk through and learn about the various design elements of the Te Raukura building and its connection to the legendary Polynesian explorer Kupe, original discoverer of New Zealand per Maori oral history. A standout among the many intriguing takeaways from this amble into another culture’s stories is the one depicting the two taniwha (supernatural dragon-like beings) who shaped Wellington’s harbor eons ago. Another highlight is your exclusive access to the excavations underway at a 200-year-old whare ponga archaeological site. By the tour’s end, you’ll be well-informed about the environmental and cultural influence the ancient Ma¯ori culture still has on modern Wellington’s urban landscape. Full participation requires being in good physical condition and may involve inclines, steps, uneven surfaces, and/or extended periods of standing. Maori Cultural Walking Tour CODE: WLG-N DURATION 3 HOURS ACTIVITY LEVEL EXTENSIVE Full participation requires being in good physical condition and may involve inclines, steps, uneven surfaces, and/or extended periods of standing. See Te Whanganui a Tara, the Maori name for Wellington Harbour, from the perspective of the mana whenua – the indigenous people who claim ancient historical rights over the land. This fascinating two-hour walk begins with a shuttle ride from Wellington’s modern cruise port to a different waterfront district with deep roots in the Maori culture. The area known as Te Aro Pa was one of the city’s largest Maori communities until the 1880s, and your walk begins at Te Raukura-Te Wharewaka o Po¯neke, a landmark building located on what was once its harbor frontage. With your local guide providing the narration, take a walk through and learn about the various design elements of the Te Raukura building and its connection to the legendary Polynesian explorer Kupe, original discoverer of New Zealand per Maori oral history. A standout among the many intriguing takeaways from this amble into another culture’s stories is the one depicting the two taniwha (supernatural dragon-like beings) who shaped Wellington’s harbor eons ago. Another highlight is your exclusive access to the excavations underway at a 200-year-old whare ponga archaeological site. By the tour’s end, you’ll be well-informed about the environmental and cultural influence the ancient Ma¯ori culture still has on modern Wellington’s urban landscape. Please note: This active excursion involves substantial standing and approximately 2 km /1.25 mi of walking over mostly paved surfaces. The tour is not suitable for guests who utilise a wheelchair or have limited mobility. Wear weather-appropriate clothing and comfortable walking shoes. The order of sights and activities may vary. Please note: This active excursion involves substantial standing and approximately 2 km /1.25 mi of walking over mostly paved surfaces. The tour is not suitable for guests who utilise a wheelchair or have limited mobility. Wear weather-appropriate clothing and comfortable walking shoes. The order of sights and activities may vary.
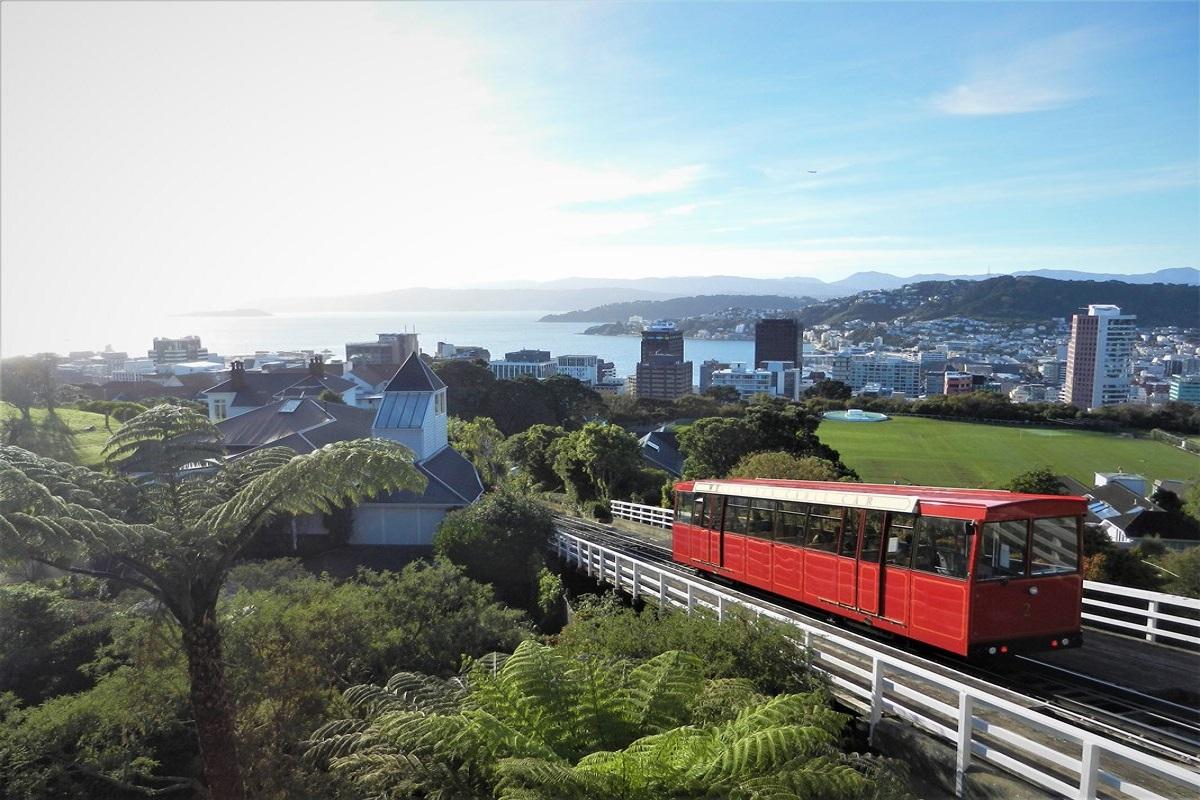
New Zealand’s Capital
WLG-AGet acquainted with the essential features of New Zealand's lively capital during this half-day excursion. Downtown Wellington Begin with the drive through Lambton Quay, Wellington's main business and shopping district. Here, board the cable car for a short ride up to Kelburn. The coach waits at the top to take you next to the Lady Norwood Garden. Lady Norwood Garden Lady Norwood Rose Garden boasts over 100 kinds of roses at the height of the season. Continue the sightseeing drive past New Zealand's parliamentary complex, easily recognized by the distinct edifice of The Beehive, which has become the architectural symbol of the country. On the opposite side stands the old government building, one of the largest all-wooden buildings in the world. Museum of New Zealand Te Papa Tongarewa Your last stop will be at Te Papa, New Zealand's bold and innovative national museum and a recognized world leader in interactive and visitor-focused museum experiences. New Zealand's geology and natural environment, and the stories of New Zealand's indigenous people, the Maori, are celebrated in Te Papa's permanent exhibitions. Enjoy a guided tour through this wonderful museum with some free time to explore afterwards. This tour concludes back at the pier. Excursions are at an easy pace without the need for excessive walking or physical activities. Being able to board buses and negotiate steps that may be encountered New Zealand’s Capital CODE: WLG-A DURATION 4.5 HOURS ACTIVITY LEVEL MINIMAL Excursions are at an easy pace without the need for excessive walking or physical activities. Being able to board buses and negotiate steps that may be encountered Get acquainted with the essential features of New Zealand's lively capital during this half-day excursion. Downtown Wellington Begin with the drive through Lambton Quay, Wellington's main business and shopping district. Here, board the cable car for a short ride up to Kelburn. The coach waits at the top to take you next to the Lady Norwood Garden. Lady Norwood Garden Lady Norwood Rose Garden boasts over 100 kinds of roses at the height of the season. Continue the sightseeing drive past New Zealand's parliamentary complex, easily recognized by the distinct edifice of The Beehive, which has become the architectural symbol of the country. On the opposite side stands the old government building, one of the largest all-wooden buildings in the world. Museum of New Zealand Te Papa Tongarewa Your last stop will be at Te Papa, New Zealand's bold and innovative national museum and a recognized world leader in interactive and visitor-focused museum experiences. New Zealand's geology and natural environment, and the stories of New Zealand's indigenous people, the Maori, are celebrated in Te Papa's permanent exhibitions. Enjoy a guided tour through this wonderful museum with some free time to explore afterwards. This tour concludes back at the pier. Please note: This tour requires a moderate amount of leisurely walking, with a few steps to climb. It is suitable for guests with limited mobility and those who utilise a wheelchair; however, guests must be able to embark and disembark the coach via the bus steps. At the Lady Norwood Garden, this is not a guided tour. Depending on the time of year, Lady Norwood Garden will display differing flora. Order of sites seen may vary. Please note: This tour requires a moderate amount of leisurely walking, with a few steps to climb. It is suitable for guests with limited mobility and those who utilise a wheelchair; however, guests must be able to embark and disembark the coach via the bus steps. At the Lady Norwood Garden, this is not a guided tour. Depending on the time of year, Lady Norwood Garden will display differing flora. Order of sites seen may vary.
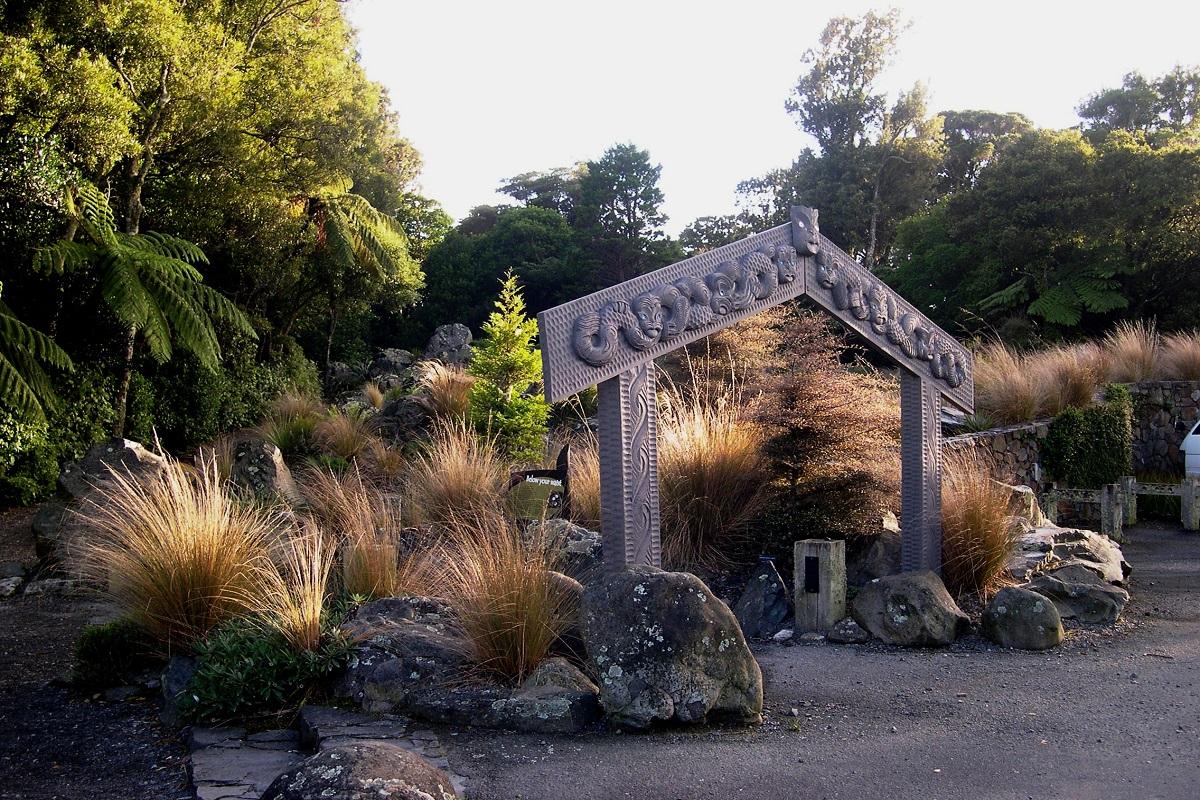
Otari Wilton's Bush Nature Trek
WLG-MDiscover Wellington's beautiful native plants during this scenic, off the beaten track half-day excursion on-foot. Join your nature guide to walk you through Otari Native Botanic Garden and Wilton's Bush Reserve. Otari Native Botanic Garden and Wilton's Bush Reserve Start your journey with an approximately 15-minute drive to Botanic Gardens. Upon arrival, join your experienced nature guide for an approximately 2-hour walk as he lead you through this magnificent, immaculately maintained botanic garden. Otari is the only Botanic Garden in New Zealand that is solely dedicated to New Zealand Native plants. This unique plant sanctuary and forest reserve consists of 100 hectares of native forest, and five hectares of plant collections. Some of Wellington's oldest trees are here, including an 800-year-old Rimu. Otari-Wilton's Bush is classified as a Garden of National Significance by the New Zealand Gardens Trust. It is also one of the Founding Gardens of the Trust. Otari occupies the same valley as Zealandia Wildlife Sanctuary and as such it hosts a rich variety of New Zealand native birds which follow you throughout the trek. Some of the native birds you may see (and hear) on your walk include Kereru (Wood Pigeon), Kaka, Kakariki, Karearea, Tui and Fantails. Finally, stop at the Stellin Memorial Lookout for some spectacular views over Wellington City, before continuing your 30-minute drive back to the pier. Full participation may include a limited number of steps, uneven surfaces, and/or periods of standing. Otari Wilton's Bush Nature Trek CODE: WLG-M DURATION 3 HOURS ACTIVITY LEVEL MODERATE Full participation may include a limited number of steps, uneven surfaces, and/or periods of standing. Discover Wellington's beautiful native plants during this scenic, off the beaten track half-day excursion on-foot. Join your nature guide to walk you through Otari Native Botanic Garden and Wilton's Bush Reserve. Otari Native Botanic Garden and Wilton's Bush Reserve Start your journey with an approximately 15-minute drive to Botanic Gardens. Upon arrival, join your experienced nature guide for an approximately 2-hour walk as he lead you through this magnificent, immaculately maintained botanic garden. Otari is the only Botanic Garden in New Zealand that is solely dedicated to New Zealand Native plants. This unique plant sanctuary and forest reserve consists of 100 hectares of native forest, and five hectares of plant collections. Some of Wellington's oldest trees are here, including an 800-year-old Rimu. Otari-Wilton's Bush is classified as a Garden of National Significance by the New Zealand Gardens Trust. It is also one of the Founding Gardens of the Trust. Otari occupies the same valley as Zealandia Wildlife Sanctuary and as such it hosts a rich variety of New Zealand native birds which follow you throughout the trek. Some of the native birds you may see (and hear) on your walk include Kereru (Wood Pigeon), Kaka, Kakariki, Karearea, Tui and Fantails. Finally, stop at the Stellin Memorial Lookout for some spectacular views over Wellington City, before continuing your 30-minute drive back to the pier. Please note: This tour involves a moderate amount of walking for approximately 1.25 miles (about 2 kilometers) over unpaved, uneven and steep in places terrain with 30-40 steps spread out through the track. This tour is not suitable for guests with limited mobility and guests who utilise a wheelchair. Guests are advised to wear comfortable walking shoes and bring hat, sunscreen, wind/rain jacket depending on the day. Please note: This tour involves a moderate amount of walking for approximately 1.25 miles (about 2 kilometers) over unpaved, uneven and steep in places terrain with 30-40 steps spread out through the track. This tour is not suitable for guests with limited mobility and guests who utilise a wheelchair. Guests are advised to wear comfortable walking shoes and bring hat, sunscreen, wind/rain jacket depending on the day.
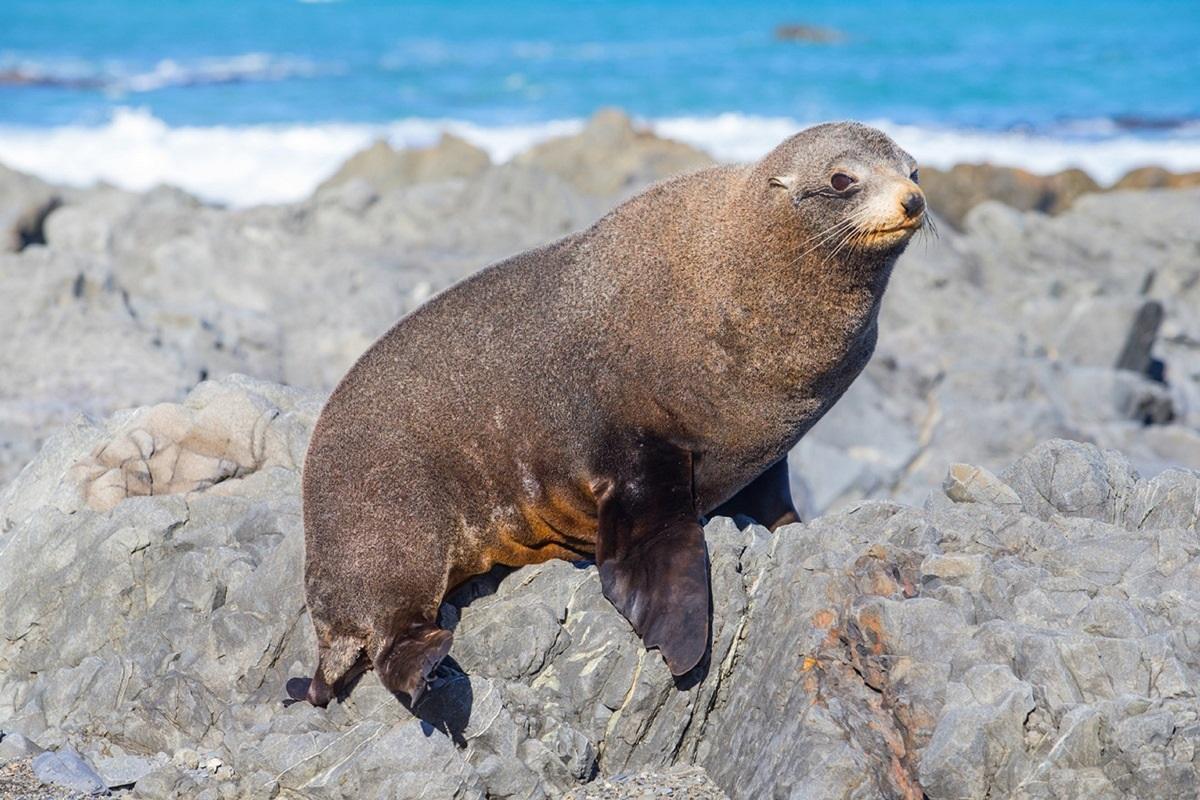
Seal Coast Safari
WLG-BThis half-day excursion offers access to Wellington's rugged, untouched and hidden southern coastline, offering fantastic views, and the chance to see some of New Zealand's marine wildlife including Zealand fur seals. Wellington, Farmland, Cook Strait, Red Rocks, Tongue Point, Fur Seals Enjoy a 4WD adventure into some of Wellington's most beautiful scenery over farmland with fabulous views of Cook Strait and the famous Red Rocks. Created over 210 million years ago by an undersea volcano, these twisted iron oxide rocks are steeped in Mâori myths. Depart the pier and drive by the city and through coastal farmland, until you reach Tongue Point, home to 600 native fur seals. Leaning Lighthouse of Wellington As your guide leads you to the best spot for pictures he'll share stories of these heart-warming mammals. Nearby, see the Leaning Lighthouse of Wellington. Built in 1915, the decommissioned 65-foot tall tower was one of New Zealand's first automated lighthouses and, yes, it does lean a little. Morning/Afternoon Tea, Farmland, Makara Village After refreshments, you'll board your 4WD once again for the ride back to the ship. En route you will cross farmland and fault lines before passing through the quaint village of Makara. Full participation may include a limited number of steps, uneven surfaces, and/or periods of standing. Seal Coast Safari CODE: WLG-B DURATION 3.5 HOURS ACTIVITY LEVEL MODERATE Full participation may include a limited number of steps, uneven surfaces, and/or periods of standing. This half-day excursion offers access to Wellington's rugged, untouched and hidden southern coastline, offering fantastic views, and the chance to see some of New Zealand's marine wildlife including Zealand fur seals. Wellington, Farmland, Cook Strait, Red Rocks, Tongue Point, Fur Seals Enjoy a 4WD adventure into some of Wellington's most beautiful scenery over farmland with fabulous views of Cook Strait and the famous Red Rocks. Created over 210 million years ago by an undersea volcano, these twisted iron oxide rocks are steeped in Mâori myths. Depart the pier and drive by the city and through coastal farmland, until you reach Tongue Point, home to 600 native fur seals. Leaning Lighthouse of Wellington As your guide leads you to the best spot for pictures he'll share stories of these heart-warming mammals. Nearby, see the Leaning Lighthouse of Wellington. Built in 1915, the decommissioned 65-foot tall tower was one of New Zealand's first automated lighthouses and, yes, it does lean a little. Morning/Afternoon Tea, Farmland, Makara Village After refreshments, you'll board your 4WD once again for the ride back to the ship. En route you will cross farmland and fault lines before passing through the quaint village of Makara. Please note: This tour requires a moderate amount of walking for approximately 50 metres (54 yards) with 10 steps at the lookout point. It involves driving off-road and over rocky ground on farm roads; the ride may be bumpy at times. This tour is not suitable for guests with neck or back problems, limited mobility or those who utilise a wheelchair. Please be advised that this tour operates on 4WD vehicles with bench seating. The drive to Tongue Point is approximately 90 minutes and travel is in remote areas with no toilet facilities. Participation is very limited; guests must book early to avoid disappointment. Although frequently encountered on this type of tour, animal sightings are not guaranteed. Tour sequence can vary. Please note: This tour requires a moderate amount of walking for approximately 50 metres (54 yards) with 10 steps at the lookout point. It involves driving off-road and over rocky ground on farm roads; the ride may be bumpy at times. This tour is not suitable for guests with neck or back problems, limited mobility or those who utilise a wheelchair. Please be advised that this tour operates on 4WD vehicles with bench seating. The drive to Tongue Point is approximately 90 minutes and travel is in remote areas with no toilet facilities. Participation is very limited; guests must book early to avoid disappointment. Although frequently encountered on this type of tour, animal sightings are not guaranteed. Tour sequence can vary.
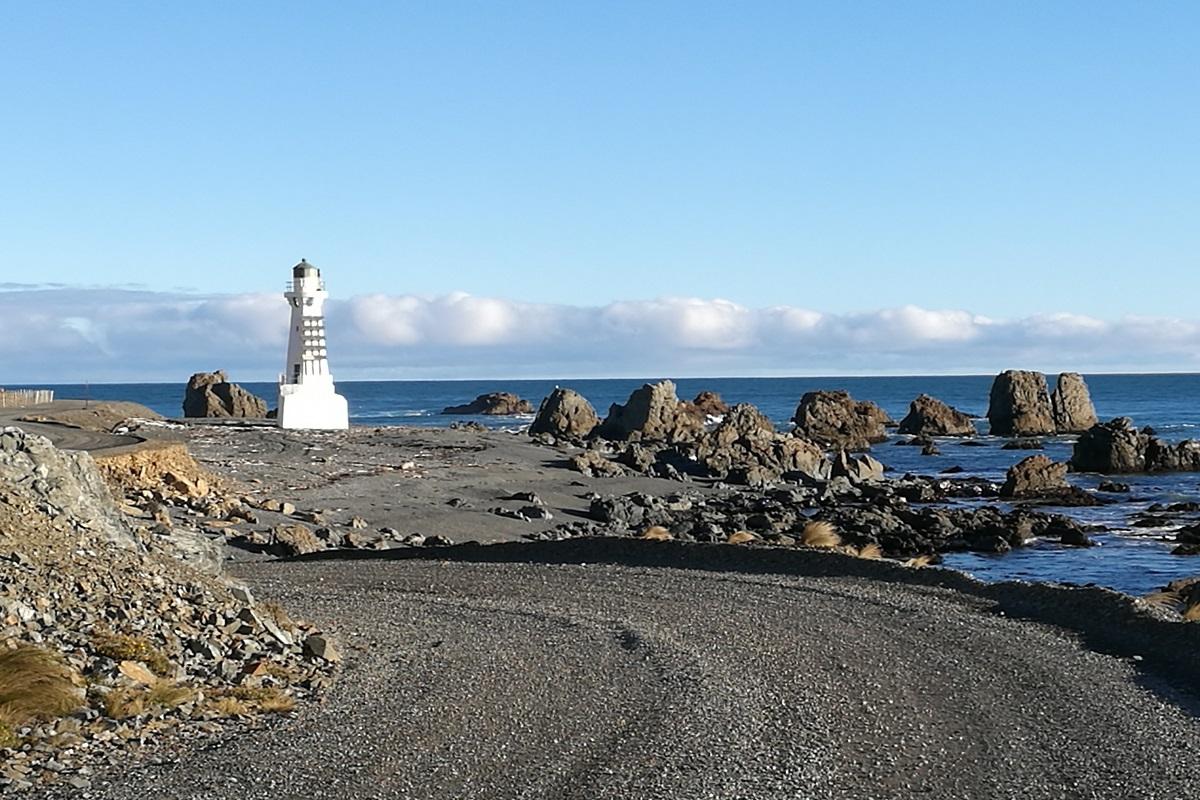
The Storm Coast
WLG-HExplore the maritime beauty and dramatic views of Wellington's wreck-strewn Storm Coast during this picturesque, half-day sightseeing excursion to Pencarrow Station. Wellington, Storm Coast, Petone, Hidden Lakes, Lighthouse, Maori Sites, Pencarrow Station Depart the pier for the scenic, approximately 75-minute drive to Pencarrow Station and beautiful Wellington Harbour's easternmost point. En route, your drive along the panoramic route of the Storm Coast which follows the harbour shoreline and passes Petone, where Wellington's first settlers landed. As you drive along this dramatic coastline, see quaint coastal villages and bays, New Zealand's oldest lighthouse and hear tales of shipwrecks. Morning/Afternoon Tea, Farm Dog Demonstration, Cook Strait, South Island's Kaikoura Ranges Upon arrival at Pencarrow Station, one of the earliest settled sheep and cattle stations in the Wellington area, head to the Pencarrow Lodge, one of Wellington's best-kept secrets. Situated near the entrance to Wellington Harbour, the lodge offers spectacular vistas across Cook Strait to the South Island's Kaikoura Ranges. During a stop at the Pencarrow Lodge, you will enjoy a farm dog demonstration and savour the panoramic views whilst enjoying morning/afternoon tea, coffee and snacks. At the conclusion of your visit, re-board your coach and commence the approximately 75-minute drive back to the pier. Full participation may include a limited number of steps, uneven surfaces, and/or periods of standing. The Storm Coast CODE: WLG-H DURATION 3.75 HOURS ACTIVITY LEVEL MODERATE Full participation may include a limited number of steps, uneven surfaces, and/or periods of standing. Explore the maritime beauty and dramatic views of Wellington's wreck-strewn Storm Coast during this picturesque, half-day sightseeing excursion to Pencarrow Station. Wellington, Storm Coast, Petone, Hidden Lakes, Lighthouse, Maori Sites, Pencarrow Station Depart the pier for the scenic, approximately 75-minute drive to Pencarrow Station and beautiful Wellington Harbour's easternmost point. En route, your drive along the panoramic route of the Storm Coast which follows the harbour shoreline and passes Petone, where Wellington's first settlers landed. As you drive along this dramatic coastline, see quaint coastal villages and bays, New Zealand's oldest lighthouse and hear tales of shipwrecks. Morning/Afternoon Tea, Farm Dog Demonstration, Cook Strait, South Island's Kaikoura Ranges Upon arrival at Pencarrow Station, one of the earliest settled sheep and cattle stations in the Wellington area, head to the Pencarrow Lodge, one of Wellington's best-kept secrets. Situated near the entrance to Wellington Harbour, the lodge offers spectacular vistas across Cook Strait to the South Island's Kaikoura Ranges. During a stop at the Pencarrow Lodge, you will enjoy a farm dog demonstration and savour the panoramic views whilst enjoying morning/afternoon tea, coffee and snacks. At the conclusion of your visit, re-board your coach and commence the approximately 75-minute drive back to the pier. Please note: This tour involves a moderate amount of walking for approximately 400 yards (about 366 metres), at times over uneven and gravel surfaces, with three-five steps to negotiate to get on/off the coach. This tour is suitable for guests with limited mobility, but is not wheelchair-accessible. Guests are advised to wear warm, comfortable clothing in layers with flat, closed-toe walking shoes, and bring sun protection and a waterproof jacket from the ship. The tour sequence may vary. Please note: This tour involves a moderate amount of walking for approximately 400 yards (about 366 metres), at times over uneven and gravel surfaces, with three-five steps to negotiate to get on/off the coach. This tour is suitable for guests with limited mobility, but is not wheelchair-accessible. Guests are advised to wear warm, comfortable clothing in layers with flat, closed-toe walking shoes, and bring sun protection and a waterproof jacket from the ship. The tour sequence may vary.
Wellington by Private Car with Guide - Full Day
WLG-WExplore Wellington at your leisure during your full-day (8-Hour) sightseeing tour via private car. Customise your own itinerary or choose to see an overview of the area's highlights. Depart the pier with your driver/guide in an air-conditioned car and discover the city and surrounding areas at your own pace. Your exclusive tour concludes back at the pier. Excursions are at an easy pace without the need for excessive walking or physical activities. Being able to board buses and negotiate steps that may be encountered Wellington by Private Car with Guide - Full Day CODE: WLG-W DURATION 8 HOURS ACTIVITY LEVEL MINIMAL Excursions are at an easy pace without the need for excessive walking or physical activities. Being able to board buses and negotiate steps that may be encountered Explore Wellington at your leisure during your full-day (8-Hour) sightseeing tour via private car. Customise your own itinerary or choose to see an overview of the area's highlights. Depart the pier with your driver/guide in an air-conditioned car and discover the city and surrounding areas at your own pace. Your exclusive tour concludes back at the pier. Please note: This tour is non-refundable if cancelled within 48 hours prior to the cruise start date. Participation is limited to 3 guests per car. The price, exclusive of meals, entrance fees and gratuities, is per vehicle. Therefore, when making your reservation, please indicate the number of vehicles, not the number of guests. Only one person in the party needs to reserve this programme. Driver/Guides are English-speaking; guides to converse in other languages may be available upon request; additional charges may apply. Please see the Shore Concierge Office on board the ship for assistance with your individual itinerary. Please note: This tour is non-refundable if cancelled within 48 hours prior to the cruise start date. Participation is limited to 3 guests per car. The price, exclusive of meals, entrance fees and gratuities, is per vehicle. Therefore, when making your reservation, please indicate the number of vehicles, not the number of guests. Only one person in the party needs to reserve this programme. Driver/Guides are English-speaking; guides to converse in other languages may be available upon request; additional charges may apply. Please see the Shore Concierge Office on board the ship for assistance with your individual itinerary.
Wellington by Private Car with Guide - Half Day
WLG-VExplore Wellington at your leisure during your half-day (4-Hour) sightseeing tour via private car. Customise your own itinerary or choose to see an overview of the area's highlights. Depart the pier with your driver/guide in an air-conditioned car and discover the city and surrounding areas at your own pace. Your exclusive tour concludes back at the pier. Excursions are at an easy pace without the need for excessive walking or physical activities. Being able to board buses and negotiate steps that may be encountered Wellington by Private Car with Guide - Half Day CODE: WLG-V DURATION 4 HOURS ACTIVITY LEVEL MINIMAL Excursions are at an easy pace without the need for excessive walking or physical activities. Being able to board buses and negotiate steps that may be encountered Explore Wellington at your leisure during your half-day (4-Hour) sightseeing tour via private car. Customise your own itinerary or choose to see an overview of the area's highlights. Depart the pier with your driver/guide in an air-conditioned car and discover the city and surrounding areas at your own pace. Your exclusive tour concludes back at the pier. Please note: This tour is non-refundable if cancelled within 48 hours prior to the cruise start date. Participation is limited to 3 guests per car. The price, exclusive of meals, entrance fees and gratuities, is per vehicle. Therefore, when making your reservation, please indicate the number of vehicles, not the number of guests. Only one person in the party needs to reserve this programme. Driver/Guides are English-speaking; guides to converse in other languages may be available upon request; additional charges may apply. Please see the Shore Concierge Office on board the ship for assistance with your individual itinerary. Please note: This tour is non-refundable if cancelled within 48 hours prior to the cruise start date. Participation is limited to 3 guests per car. The price, exclusive of meals, entrance fees and gratuities, is per vehicle. Therefore, when making your reservation, please indicate the number of vehicles, not the number of guests. Only one person in the party needs to reserve this programme. Driver/Guides are English-speaking; guides to converse in other languages may be available upon request; additional charges may apply. Please see the Shore Concierge Office on board the ship for assistance with your individual itinerary.
Wellington by Private Van with Guide - Full Day
WLG-YExplore Wellington at your leisure during your full-day (8-Hour) sightseeing tour via private van. Customise your own itinerary or choose to see an overview of the area's highlights. Depart the pier with your driver/guide in an air-conditioned van and discover the city and surrounding areas at your own pace. Your exclusive tour concludes back at the pier. Excursions are at an easy pace without the need for excessive walking or physical activities. Being able to board buses and negotiate steps that may be encountered Wellington by Private Van with Guide - Full Day CODE: WLG-Y DURATION 8 HOURS ACTIVITY LEVEL MINIMAL Excursions are at an easy pace without the need for excessive walking or physical activities. Being able to board buses and negotiate steps that may be encountered Explore Wellington at your leisure during your full-day (8-Hour) sightseeing tour via private van. Customise your own itinerary or choose to see an overview of the area's highlights. Depart the pier with your driver/guide in an air-conditioned van and discover the city and surrounding areas at your own pace. Your exclusive tour concludes back at the pier. Please note: This tour is non-refundable if cancelled within 48 hours prior to the cruise start date. Participation is limited to 6 guests per van. The price, exclusive of meals, entrance fees and gratuities, is per vehicle. Therefore, when making your reservation, please indicate the number of vehicles, not the number of guests. Only one person in the party needs to reserve this programme. Driver/Guides are English-speaking; guides to converse in other languages may be available upon request; additional charges may apply. Please see the Shore Concierge Office on board the ship for assistance with your individual itinerary. Please note: This tour is non-refundable if cancelled within 48 hours prior to the cruise start date. Participation is limited to 6 guests per van. The price, exclusive of meals, entrance fees and gratuities, is per vehicle. Therefore, when making your reservation, please indicate the number of vehicles, not the number of guests. Only one person in the party needs to reserve this programme. Driver/Guides are English-speaking; guides to converse in other languages may be available upon request; additional charges may apply. Please see the Shore Concierge Office on board the ship for assistance with your individual itinerary.
Wellington by Private Van with Guide - Half Day
WLG-XExplore Wellington at your leisure during your half-day (4-Hour) sightseeing tour via private van. Customise your own itinerary or choose to see an overview of the area's highlights. Depart the pier with your driver/guide in an air-conditioned van and discover the city and surrounding areas at your own pace. Your exclusive tour concludes back at the pier. Excursions are at an easy pace without the need for excessive walking or physical activities. Being able to board buses and negotiate steps that may be encountered Wellington by Private Van with Guide - Half Day CODE: WLG-X DURATION 4 HOURS ACTIVITY LEVEL MINIMAL Excursions are at an easy pace without the need for excessive walking or physical activities. Being able to board buses and negotiate steps that may be encountered Explore Wellington at your leisure during your half-day (4-Hour) sightseeing tour via private van. Customise your own itinerary or choose to see an overview of the area's highlights. Depart the pier with your driver/guide in an air-conditioned van and discover the city and surrounding areas at your own pace. Your exclusive tour concludes back at the pier. Please note: This tour is non-refundable if cancelled within 48 hours prior to the cruise start date. Participation is limited to 6 guests per van. The price, exclusive of meals, entrance fees and gratuities, is per vehicle. Therefore, when making your reservation, please indicate the number of vehicles, not the number of guests. Only one person in the party needs to reserve this programme. Driver/Guides are English-speaking; guides to converse in other languages may be available upon request; additional charges may apply. Please see the Shore Concierge Office on board the ship for assistance with your individual itinerary. Please note: This tour is non-refundable if cancelled within 48 hours prior to the cruise start date. Participation is limited to 6 guests per van. The price, exclusive of meals, entrance fees and gratuities, is per vehicle. Therefore, when making your reservation, please indicate the number of vehicles, not the number of guests. Only one person in the party needs to reserve this programme. Driver/Guides are English-speaking; guides to converse in other languages may be available upon request; additional charges may apply. Please see the Shore Concierge Office on board the ship for assistance with your individual itinerary.
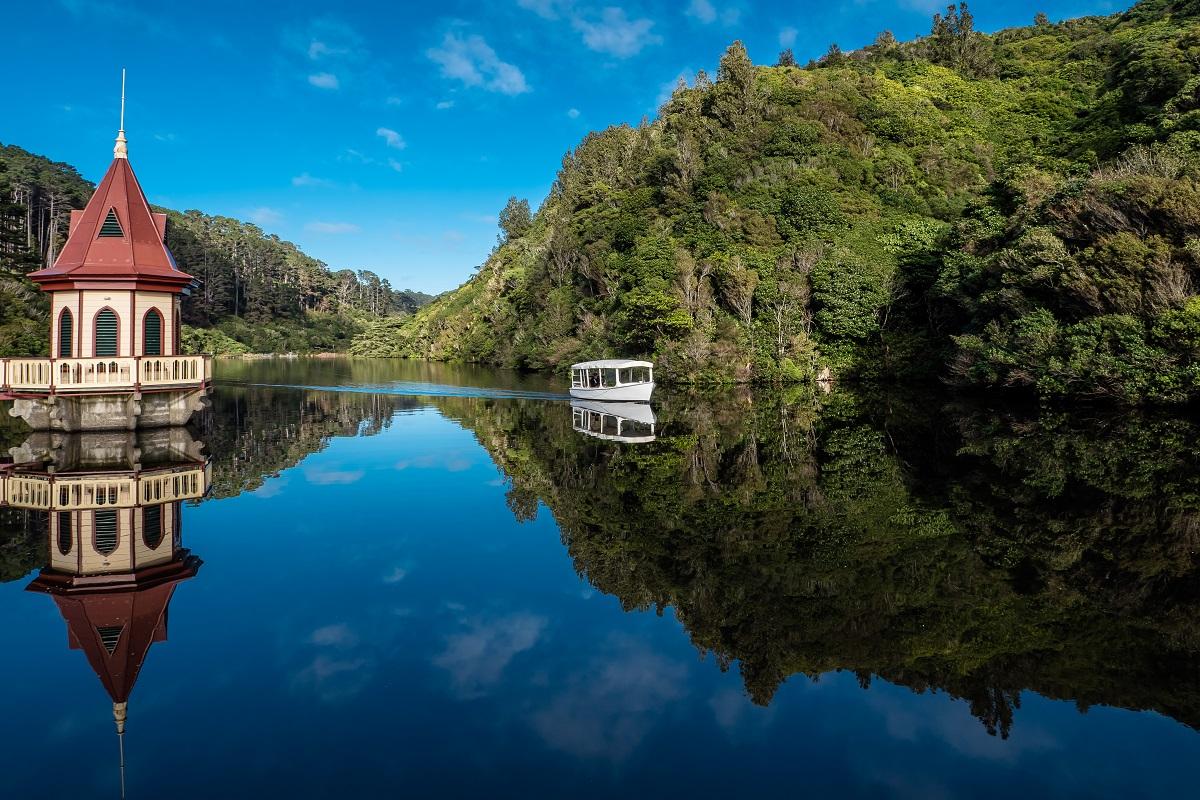
Zealandia Ecosanctuary & Cable Car
WLG-JExperience the stunning natural beauty, history and conservation efforts of New Zealand during this panoramic, half-day sightseeing excursion. Wellington, Lambton Quay, Wellington Harbour and Cable Car, Funicular Ride, Panoramic Views Depart the pier for the short drive to Lambton Quay, located in the central business district and home to the 111-year-old Wellington Cable Car. Upon arrival, board the funicular for a vertical climb of over 390 feet (about 119 metres), and travel a length of approximately 2,000 feet (about 610 metres). Three minutes later, arrive at the top. From this commanding location, marvel at the breath-taking panoramic views over the city's rolling hills, downtown area, Wellington Harbour and beyond. Zealandia Ecosanctuary, Forested Valley Next, re-board your coach and continue on to Zealandia. Located just minutes from downtown Wellington, this approximately 550-acre (about 222-hectare) eco-sanctuary is tucked in a forested valley and protected by a unique, five-mile (about eight-kilometre), predator-proof fence. Interactive Museum Tour, Conservation Area, Rare Bird Species Upon arrival, take a guided, approximately two-hour walking tour. Along the way, discover the story of New Zealand's natural history and conservation movement in a world-class interactive museum. From here, your guide leads you through this extraordinary conservation area and shows you some of New Zealand's rarest species, including the saddleback and hihi birds, which were brought back from the brink of extinction. At the conclusion of your visit, re-board your coach, and commence the short drive through the heart of the city and back to the pier. Full participation may include a limited number of steps, uneven surfaces, and/or periods of standing. Zealandia Ecosanctuary & Cable Car CODE: WLG-J DURATION 4 HOURS ACTIVITY LEVEL MODERATE Full participation may include a limited number of steps, uneven surfaces, and/or periods of standing. Experience the stunning natural beauty, history and conservation efforts of New Zealand during this panoramic, half-day sightseeing excursion. Wellington, Lambton Quay, Wellington Harbour and Cable Car, Funicular Ride, Panoramic Views Depart the pier for the short drive to Lambton Quay, located in the central business district and home to the 111-year-old Wellington Cable Car. Upon arrival, board the funicular for a vertical climb of over 390 feet (about 119 metres), and travel a length of approximately 2,000 feet (about 610 metres). Three minutes later, arrive at the top. From this commanding location, marvel at the breath-taking panoramic views over the city's rolling hills, downtown area, Wellington Harbour and beyond. Zealandia Ecosanctuary, Forested Valley Next, re-board your coach and continue on to Zealandia. Located just minutes from downtown Wellington, this approximately 550-acre (about 222-hectare) eco-sanctuary is tucked in a forested valley and protected by a unique, five-mile (about eight-kilometre), predator-proof fence. Interactive Museum Tour, Conservation Area, Rare Bird Species Upon arrival, take a guided, approximately two-hour walking tour. Along the way, discover the story of New Zealand's natural history and conservation movement in a world-class interactive museum. From here, your guide leads you through this extraordinary conservation area and shows you some of New Zealand's rarest species, including the saddleback and hihi birds, which were brought back from the brink of extinction. At the conclusion of your visit, re-board your coach, and commence the short drive through the heart of the city and back to the pier. Please note: This tour involves an extensive amount of walking for approximately two miles (about 3.2 kilometres), at times over uneven, loose dirt and natural surfaces, and inclines and declines, with three-five steps to negotiate to get on/off the coach and funicular, and 15 steps at the sites visited. This tour is not suitable for guests with limited mobility and guests who utilise a wheelchair. Guests are advised to wear warm, comfortable clothing in layers with flat, closed-toe walking shoes, and bring sun protection, a waterproof jacket and local currency for purchases from the ship. The tour sequence may vary. Please note: This tour involves an extensive amount of walking for approximately two miles (about 3.2 kilometres), at times over uneven, loose dirt and natural surfaces, and inclines and declines, with three-five steps to negotiate to get on/off the coach and funicular, and 15 steps at the sites visited. This tour is not suitable for guests with limited mobility and guests who utilise a wheelchair. Guests are advised to wear warm, comfortable clothing in layers with flat, closed-toe walking shoes, and bring sun protection, a waterproof jacket and local currency for purchases from the ship. The tour sequence may vary.
Quick Booking
You Might Also Like
SAN CRISTÓBAL, GALAPAGOS TO SAN CRISTÓBAL, GALAPAGOS
San CristÓbal, Galapagos $19,300.00
SAN CRISTÓBAL, GALAPAGOS TO SAN CRISTÓBAL, GALAPAGOS
San CristÓbal, Galapagos $12,960.00
ATHENS (PIRAEUS) TO ATHENS (PIRAEUS)
Athens(Piraeus) $8,600.00